On-Call Optimizer enables teams to operate effective, flexible on-call rotations that deliver growth in expertise throughout the team.
The foundation is hassle-free creation of a flexible on-call schedule that fits on-call shifts around the other commitments in
each team members life.
1 - Overview
On-Call Optimizer delivers hassle-free, flexible on-call schedules for your team.
Flexible on-call schedules provide the foundation for on-call to become a practice that delivers growth in expertise.
How does it work?
Each member of the on-call schedule links their calendar.
On-Call Optimizer looks for matching events that are used to create availability information
describing blocks (time periods when they cannot be on-call) and preferences (time periods when they would like to be on-call).
On-Call Optimizer combines the availability information for each member with the shifts configured
for the schedule and uses advanced constraint optimizing algorithms to generate an
assignment of shifts that fits around the constraints in each member’s life, while honouring
as many of the requested preferences as feasible.
The on-call schedule is then exported to any external systems (e.g. PagerDuty) or calendars for further use.
Benefits
Compared to the typical round-robin scheduling used by other on-call tools, On-Call Optimizer’s flexible scheduling
creates the foundation for on-call work to be performed in the optimium environment, ensuring that the schedule has the minimum possible
impact on the life of each team member. In addition to the flexibility benefits, On-Call Optimizer also provides:
Simplicity: Team members maintain their availability for on-call in the same single location (their calendar) where they already manage the
rest of their time.
Straightforward swaps: Automated shift assignment simplifies swap management and removes the need for 1:1 swaps. Any imbalance in on-call burden
across the team will be automatically addressed in the next assignment.
Getting started
Experience the benefits of On-Call Optimizer by following one of the getting started guides:
Use these simple guides to quickly get underway with the most common tasks On-Call Optimizer solves.
Prerequisites
On-Call Optimizer is a SaaS application designed to work with any modern web browser. Off-line access is not supported.
For the best experience it is strongly recommended to integrate On-Call Optimizer with both an on-call product (e.g. PagerDuty) for each schedule and a calendar provider (e.g. Google) for each member
Authentication
All users are required to login via OIDC using one of the following identity providers. Username and password based login is not supported.
Google
Microsoft
Additional OIDC providers can be supported upon request.
Common Use-Cases
To begin experiencing the benefits of On-Call Optimizer start with one of these commonly used guides:
Learn more about the key concepts and operation of an On-Call Optimizer maintained on-call schedule.
2.1 - Organization set-up
Guidelines for setting up your organization’s home in On-Call Optimizer
Every user and schedule in On-Call Optimizer belongs to an organization. The metadata provided by the identity provider
used to login supplies the details used to associate each user to the correct organization.
The primary domain name associated with an organization is shown as the organization’s name in On-Call Optimizer.
Step 1: Create an On-Call Optimizer organization
To create an On-Call Optimizer organization simply login with your chosen identity provider.
The first user to login to On-Call Optimizer from a particular organization will trigger the creation of the organization and will become the initial
Organization Admin.
If you find you are logging into an already existing organization when you were expecting to be the first user to create it, you can view the users in the organization
using the link in the profile menu in the top-right corner of the page. Existing organization admins will be listed first.
There’s no need to set-up billing until you’re consistently using On-Call Optimizer to generate your schedules.
We’ll be in touch before you reach that point to make sure your trial is going smoothly and we’ll let you know when it’s time to upgrade as part of that conversation
once we’re confident you’re getting the best out of On-Call Optimizer. Easy!
Once the organization has been created, the next step is to create a connection to your existing On-Call Product (e.g. Pagerduty).
Step 2: Connect to your existing on-call product
Connecting your On-Call product to On-Call Optimizer enables shift assignments generated by On-Call Optimizer to be exported into your existing schedules and speeds up
the process of configuring schedules in On-Call Optimizer by importing the existing configuration and members for each schedule.
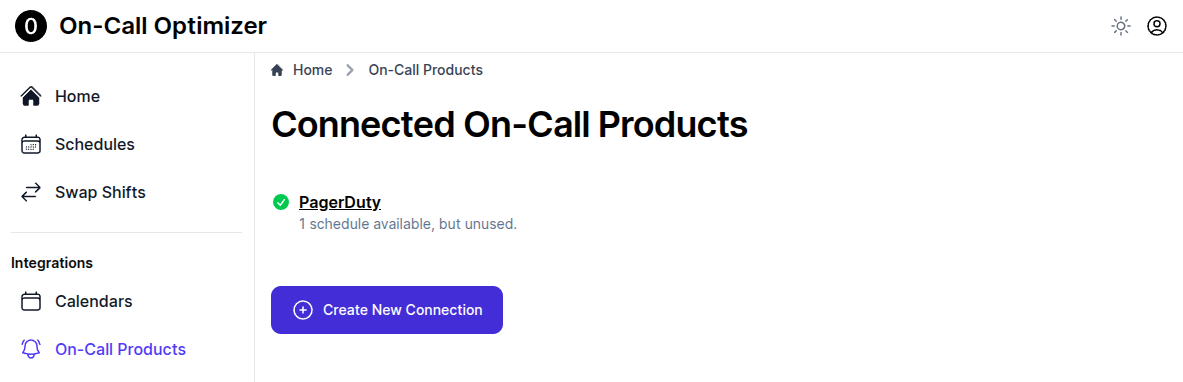
Select On-Call Products from the side bar.
Click the Create new connection button.
Click on the logo of the On-Call Product you are connecting to.
Enter your API Key in the provided field and click Continue
It may take a few moments for the connection to be established after which you’ll see a list of the scheduled available from the connected product displayed.
Step 3: Integrate your first schedule
Congratulations on getting your on-call product connected! Now you’re ready to integrate your first schedule with On-Call Optimizer.
This is an easy process. One that you’ll likely need to follow several times as more and more schedules begin to experience On-Call Optimizer’s benefits, so we’ve put the
instructions into their own guide Integrate an existing schedule with On-Call Optimizer which you can bookmark
for easy reference in future.
The process is quick to get started, but may take some time in the subsequent steps while you wait for each member to login to On-Call Optimizer and
link their calendar.
Next Steps
To further integrate On-Call Optimizer into your organization we recommend continuing with the following guides:
Connect an existing on-call product schedule to On-Call Optimizer
Ensure you have completed the organization set-up and established a connection
with an on-call product before startig this guide.
Overview
For teams new to On-Call Optimizer, the following four steps provide a recommended path to
integrating your existing schedule:
Set-up the link between your existing schedule and an On-Call Optimizer schedule. As part of this step you will configure a future date for On-Call Optimizer to start assigning shifts from and generate invitations to members to join On-Call Optimizer.
Each member has time to accept the invitation, link their calendar to On-Call Optimizer and add availability information.
Once all members are set-up, the first assignment for the schedule can occur. You will have the opportunity manually review and confirm everything is working as expected.
Finally, when the team is comfortable with how the schedule is operating, configure On-Call Optimizer to automatically confirm and export assignments on a rolling basis.
Teams already experienced with On-Call Optimizer, can skip or shorten the time spent on
steps 2 and 3 while still following the same overall process to link additional schedules.
What you need
To successfully complete this guide, you will need:
An existing on-call schedule in a connected on-call product.
Schedule Admin: 5-10 minutes to complete the initial setup and invitation process in step 1,
and additional time to review and confirm the assignment in step 3.
Each team member: 5-10 minutes to link their calendar and set-up availability information
during step 2.
Changes to your existing schedule
You will have full control over when and how each action On-Call Optimizer takes occurs.
Your existing schedule will not change in any way until you explicitly initiate the export of
the first assignment in step 3.
Notifications generated
You can choose to send new members an invitation to join On-Call Optimizer during step 1.
You (and any other schedule admins) will receive a notification when the first assignment
is ready for review.
When you confirm the first assignment in step 3, each member assigned new shifts will receive
a notification detailing their shifts.
Ready to begin?
To get started, select Step 1: Set-up schedule below.
If anything is unclear, or your would like some assistance feel free to reach out to help@oncall-optimizer.com.
2.2.1 - Step 1: Set-up schedule
Integration of a schedule begins with On-Call Optimizer importing key
configuration details from the existing schedule.
Select existing schedule
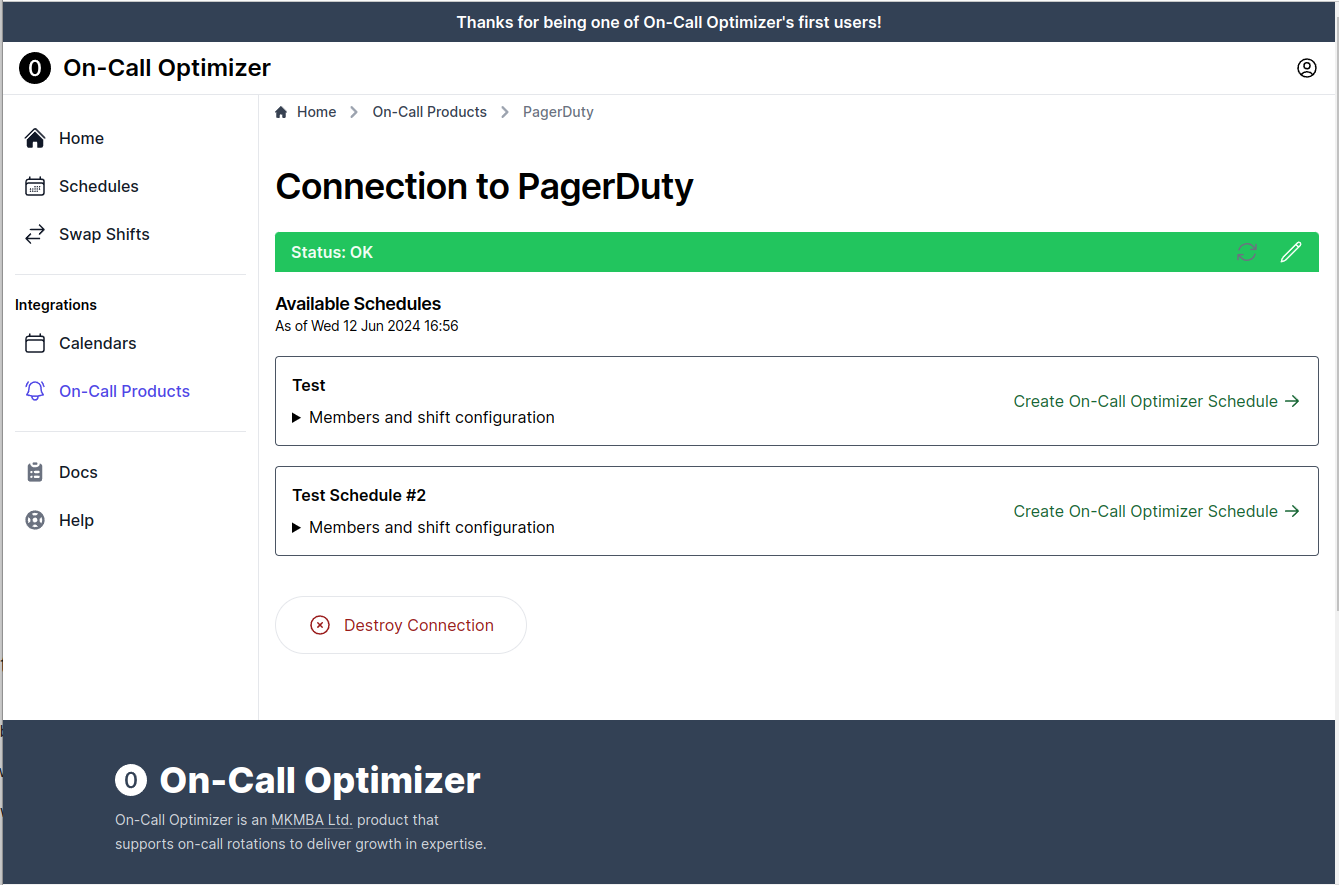
Click ‘On-Call Products’ in the menu and select the connection to the product where your
existing schedule exists from the displayed list.
From the list of all existing schedules, find the row corresponding to the schedule
you want to integrate with On-Call Optimizer and click
Create On-Call Optimizer Schedule in the right-most column.
For connections with many available schedules, you can use the search box to filter the table.
On-Call Optimizer supports primary and secondary assignees using a single schedule
configuration. When linking to a product like Pagerduty which requires two independent
schedules for primary/secondary roles, select the schedule corresponding to the primary
assignee in this step.
Configure shift specifications
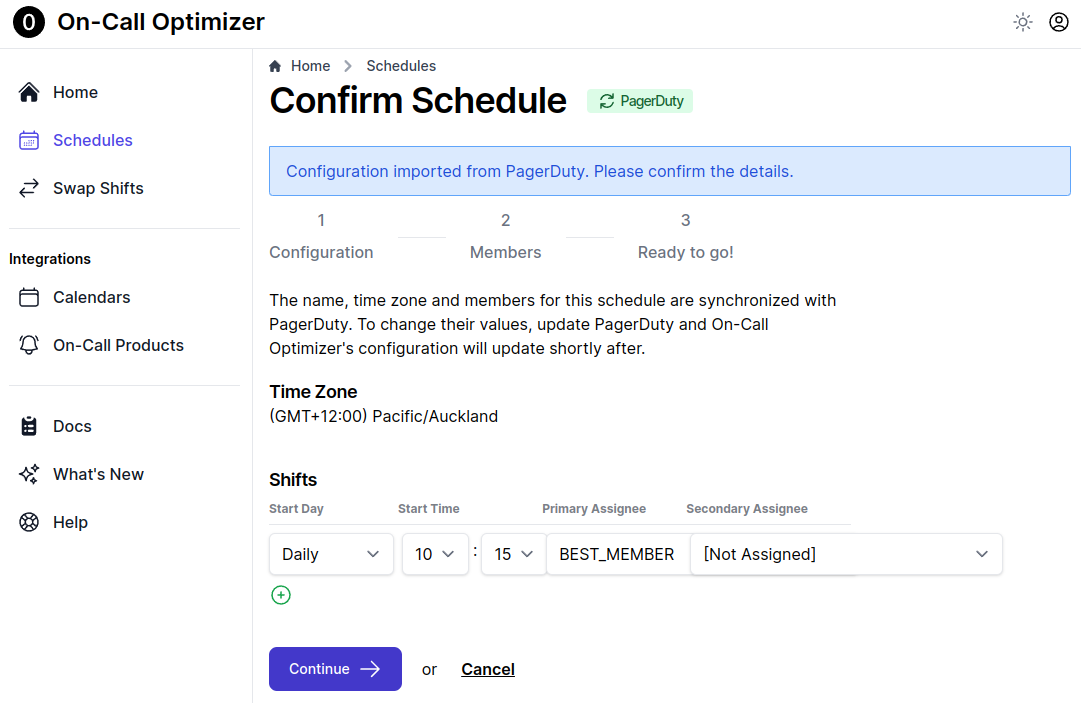
On-Call Optimizer will show the time zone and shift configuration that have been detected from the source On-Call Product.
If the listed shifts do not match your desired configuration you can alter them now (e.g. to add a secondary assignee). Refer to the schedule configuration docs for further information.
Once you are happy with the configuration shown, click Continue to proceed to Members.
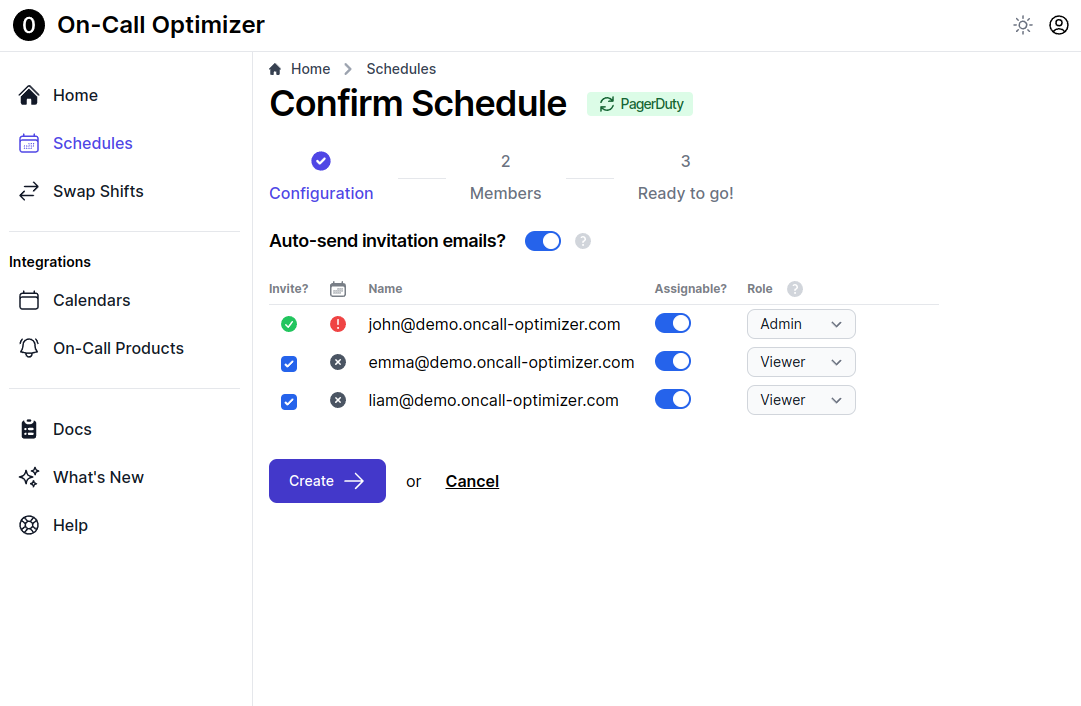
Member list
Review the list of members imported from the linked schedule. Select the appropiate role
and assignability status for each member. For more information on these options, refer to
the schedule members docs.
Click Create to finish linking the schedule. On-Call Optimizer will send invitations to any
members who do not yet have an On-Call Optimizer account unless you uncheck the
Auto-send invitation emails option above the member list.
Next Steps
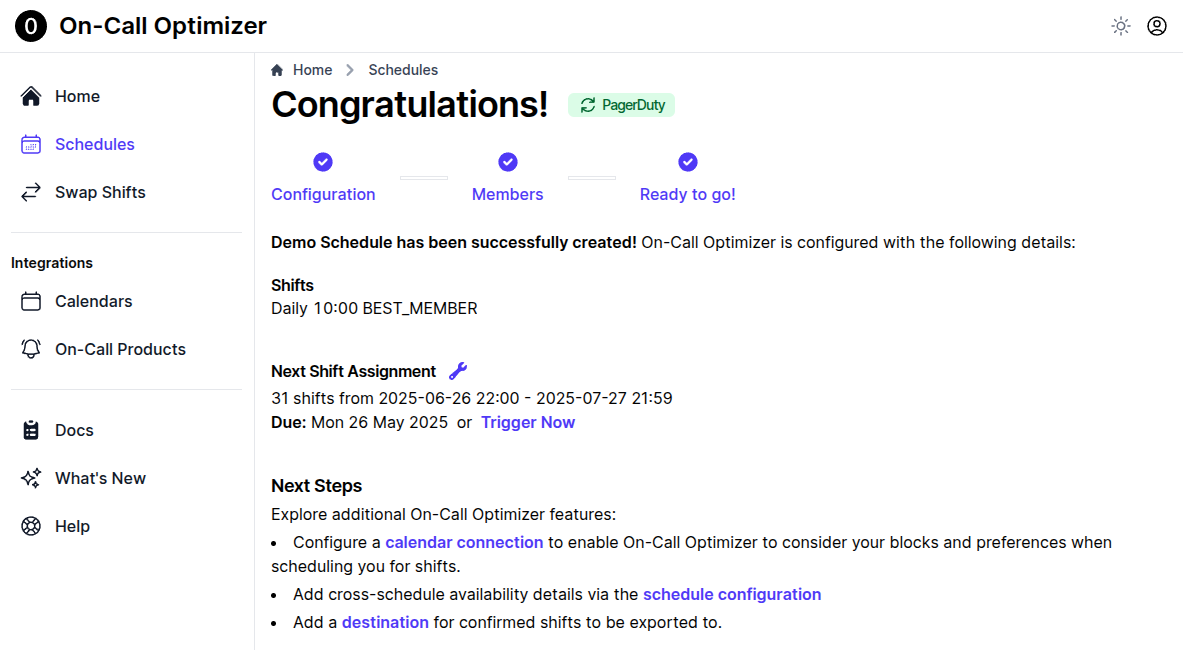
Your schedule is now linked. The confirmation page shows when the first assignment for the schedule will take place.
We’ll come back and look at how the first assignment will work in step 3, first, each member needs to link their calendar to
On-Call Optimizer to provide their availability information.
After configuring the schedule it’s time to ensure each member of the schedule has a calendar linked to provide availability information
for On-Call Optimizer to use when choosing which shifts to assign to them.
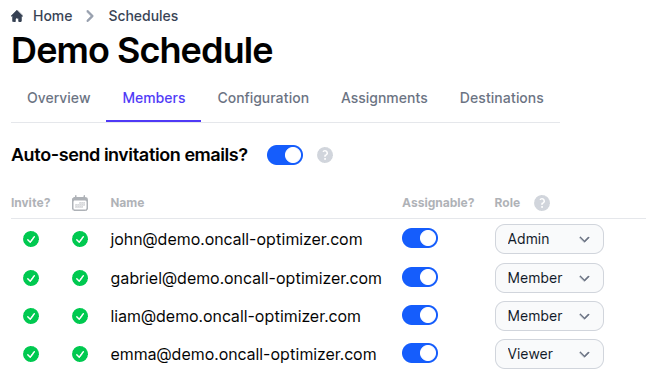
Member Status
The Members tab of the schedule provides you with a quick summary of the status of each member via the icons in the first two columns. The Invite? column
shows whether an On-Call Optimizer account exists for the member. The calendar icon column shows whether availability information is available for the member.
Hover over each icon for an explanation of the status or refer to the schedule member docs.
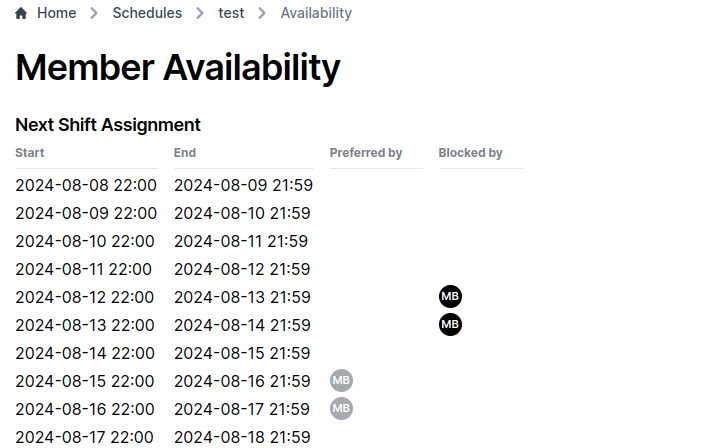
Target State
To begin Step 3 each assignable member needs two green check marks in their row
(as shown in the screenshot below), indicating that they have signed in to On-Call Optimizer and configured a calendar to provide availability information.
Members missing a green check mark should be instructed to follow the steps below.
Assignments will be generated for every member listed as assignable, even if they have not yet logged in to On-Call Optimizer or configured a calendar.
Responding to an invitation
Invitations to join On-Call Optimizer will arrive at the specified email address of the member via an email.
Click the link containing an invitation code to respond, which will require logging in to On-Call Optimizer.
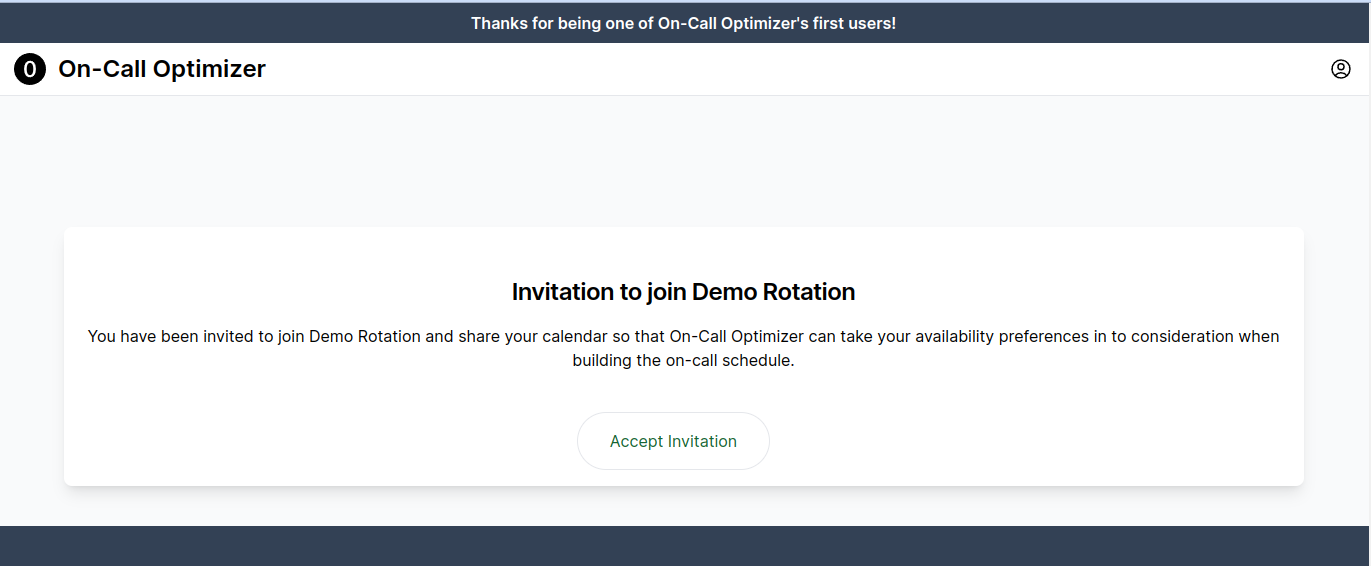
After logging in, click the button to accept the invitation.
Linking a calendar
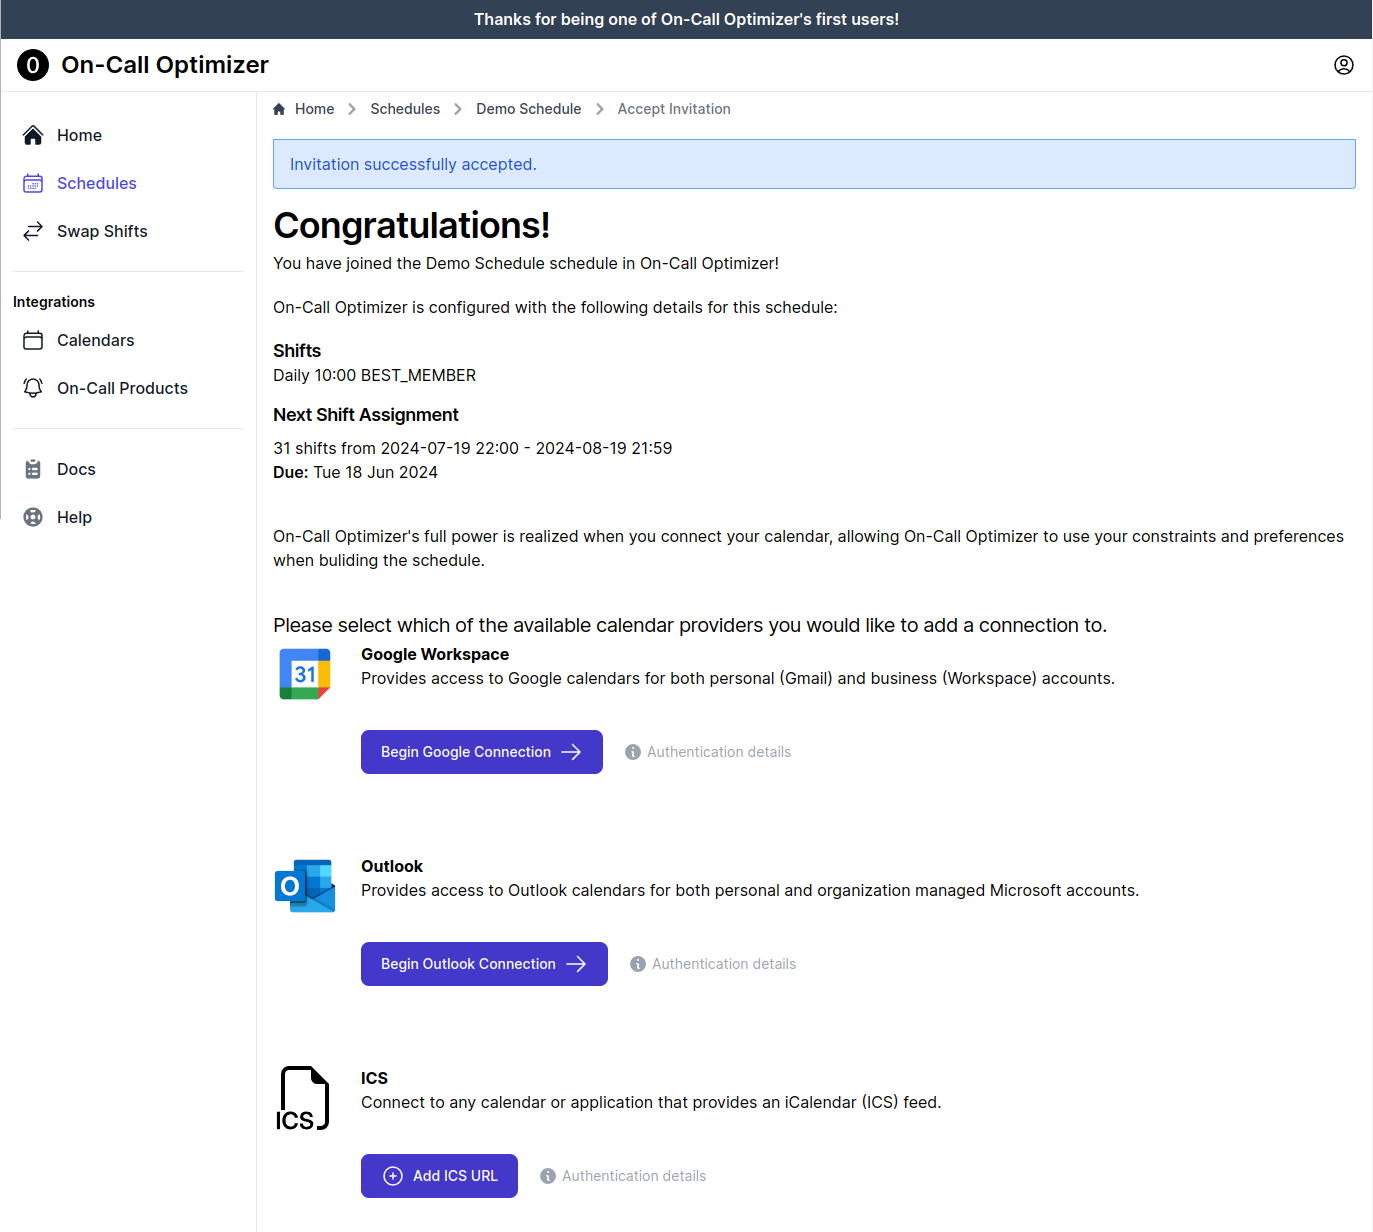
Once the invitation has been accepted, you will be prompted to link a calendar.
The welcome screen will provide a list of available calendar providers.
Click the button for the desired provider to begin the connection process.
The same options are available by selecting the Calendars menu item, and then clicking Add Calendar Connection button at the bottom of the page.
Authentication
After selecting the calendar provider an authorization flow will occur for Google and Outlook calendars, or a prompt for the ICS URL will appear and must
be completed.
For more information on the authorization or configuration process please refer to the full calendar documentation.
Calendar Selection
When multiple calendars are available on the connection you will be asked to select which calendars On-Call Optimizer will process for availability events.
For each calendar select whether or not On-Call Optimizer should process it for availability information.
Click Save when done to confirm these choices.
Calendar Operation
On-Call Optimizer regularly scans linked calendars for new or changed availability information and uses the latest available information to assign
new on-call shifts.
For more details on how to structure calendar events for On-Call Optimizer to recognize, please refer to the event filtering documentation.
Next Steps
When all members have configured their calendar connections you’re ready to proceed.
Now that all members have a linked calendar, it’s time to generate the first shift assignment!
Background
On-Call Optimizer’s schedule lifecycle regularly assigns new shifts so that a
configured number of days (the horizon) of shifts into the future are assigned.
The first assignment for a new schedule takes place 7 days after it is created (providing time for users to be invited and link their calendars first),
and uses a default horizon of 30 days. This means the first shift assigned by On-Call Optimizer will start in around 37 days time
(give or take a few days depending on your shift configuration).
Existing shifts from configured destination schedules will be imported into On-Call Optimizer as history to provide continuity until that date.
Configuring lifecycle parameters
To change the horizon, click the (wrench) icon to the right of the Next Shift Assignment heading found on the Assignments tab at any time (or on the confirmation page immediately following creation of a schedule).
After saving lifecycle parameters, the Next Shift Assignment section of the Assignments tab updates to show the date of assignment and shifts
to be assigned based on the new configuration.
Changing the first assignment
To generate your first assignment immediately click the Trigger Now option on the Assignments tab.
To change the date or duration of the first assignment without affecting the configuration of future assignments, click the Create New Custom Assignment button on the Assignments tab.
In both cases, you can copy/paste the URL of the resulting assignment to other team members for review or discussion before confirming it if desired.
Creating an assignment via either of these methods is low-cost and safe to do whenever you’re curious what the next set of shifts will look
like given the currently available information.
The resulting assignment can easily be abandoned or regenerated as described if you do not wish to confirm it into the current schedule.
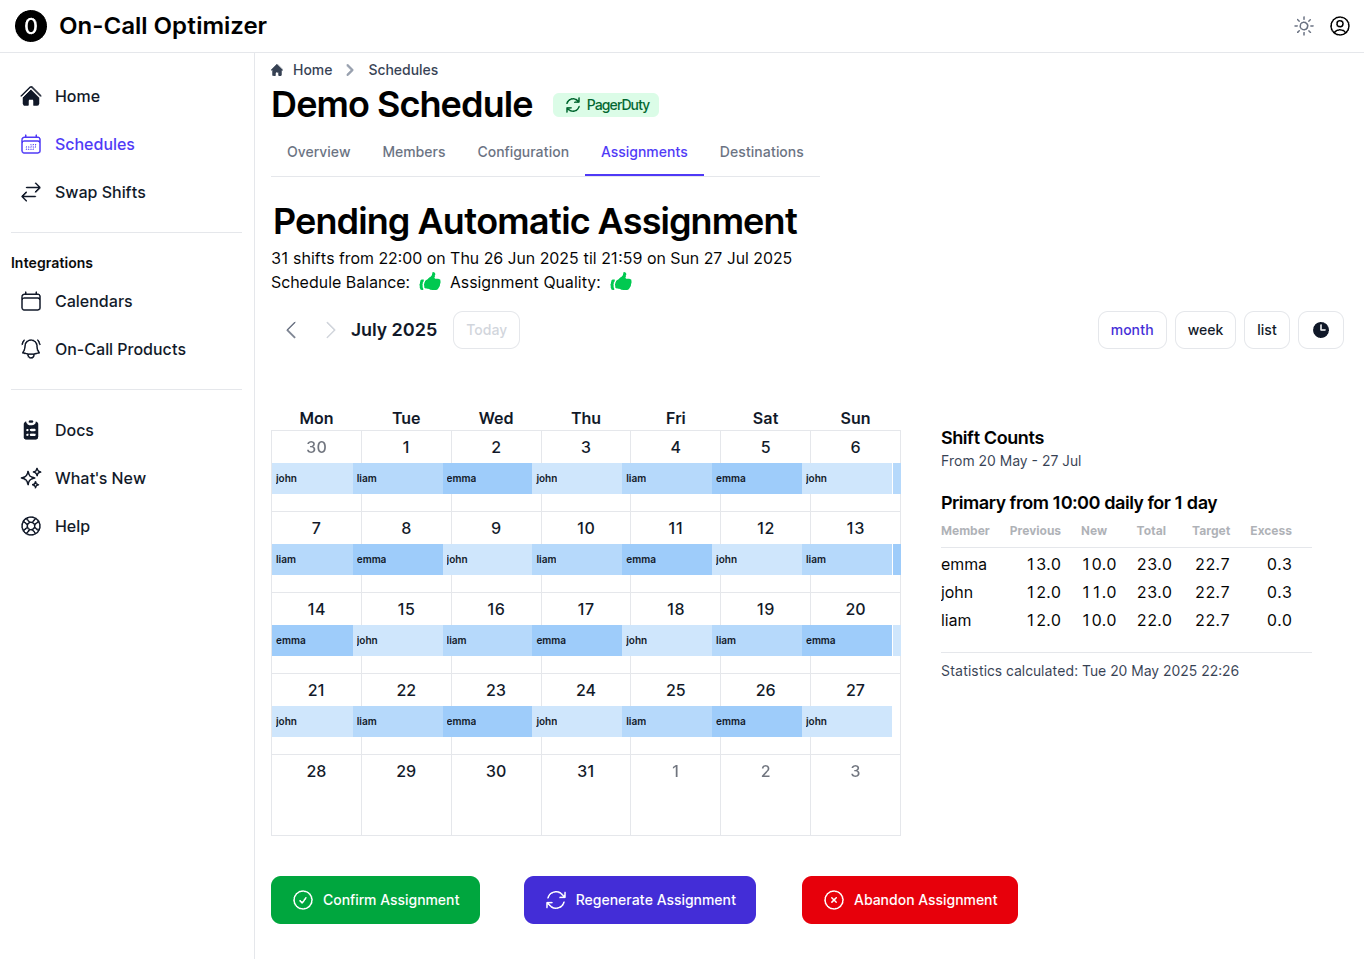
Assignment confirmation
Once an assignment has been generated (either automatically, or in response to an action from the above section) you will see the assignment review screen:
To view more details hover or click on any shift to show the corresponding shift popup.
Three actions are available for each pending assignment:
Confirm: This adds the shifts from the pending assignment into the schedule itself. When you confirm shifts into the schedule:
Each member with new shifts assigned receives a notification.
The shifts are queued for export to each configured destination.
Confirmation cannot be undone. Confirmed shifts can be replaced by a subsequent custom assignment or a swap request.
Regenerate This regenerates the assignment using the most recently fetched availability information for each member of the schedule.
Regeneration can be useful when one or more members have changed their availability information since the assignment was first generated.
Abandon Deletes the assignment.
Exporting updated shifts
After the first assignment has been confirmed, an orange notification icon appears on the Destinations tab for the schedule to signal there are pending changes
waiting for export to one or more destinations.
Click into the Destinations tab to see a count of shifts to be added or removed from each destination. Click View Diffs to see the specific changes to be made.
When you’re happy with what will be exported, click Export Now to begin updating the shifts in the connected on-call product.
Next Steps
The schedule is now fully operational. The final step enables On-Call Optimizer’s automatic lifecycle operations.
On-Call Optimizer is designed to work in the background, consistently and reliably keeping your on-call schedules up-to-date, flexible and fair without requiring
any significant input or attention from you or other members of the schedule.
Lifecycle automation
The previous steps of this guide helped you manually confirm and export the first assignment generated by On-Call Optimizer for your schedule.
On-Call Optimizer will keep requiring manual confirmation and manual export of any updated shifts until you are ready to enable automatic operation.
Our Recommendation
Enable automatic export for each destination as soon as you’ve completed the export of your first assignment (e.g. now!).
Enable automatic confirmation of new assignments once you and your team are comfortable with On-Call Optimizer’s
schedule lifecycle and are in the habit of keeping availability information up to date in
your calendar.
It’s important to enable automatic destination export as soon as possible so that updated shifts resulting from swaps can be promptly synchronized to all connected destinations.
The cost of keeping manual confirmation enabled for longer is only in your own time to approve assignments.
Enable automatic destination export
Each configured destination can be individually enabled or disabled for automatic export.
To enable a destination, visit the Destinations tab for the schedule, and simply toggle the slider next to the Enabled? text to the right (on) for the appropriate destination.
Enable automatic confirmation of new assignments
To allow On-Call Optimizer to automatically confirm new assignments it creates for you click on the Assignments tab of the schedule and then select the (wrench) icon to the right of the Next Shift Assignment heading.
In the assignment settings page that is displayed, toggle off (to the left) the slider with the Require Manual Confirmation? label.
Congratulations
You’ve reached the end of this guide! Your on-call schedule is now fully configured and running in On-Call Optimizer.
If you have any questions which were not answered here, please let us know at help@oncall-optimizer.com.
2.3 - User onboarding
This guide is for members of an on-call schedule who have received an email invitation to share their calendar.
Before you start
Locate the invitation email you received from the owner of your On-Call Schedule
The invitation email will have a sender of help@oncall-optimizer.com
The invitiation email will have a subject of Invitation from Owner Name, where Owner Name is the owner of your schedule.
Completing the steps in this guide will result in:
Confirmation of your membership in the schedule you have been invited to join.
One or more of your calendars configured to provide availability information for On-Call Optimizer to use when scheduling your on-call shifts.
Begin
To get started, select Accept the invitation below.
2.3.1 - Accept the invitation
In this step you will accept the invitation sent by the owner of your schedule. If you do not already have an On-Call Optimizer account this step
will guide you through the process of creating one.
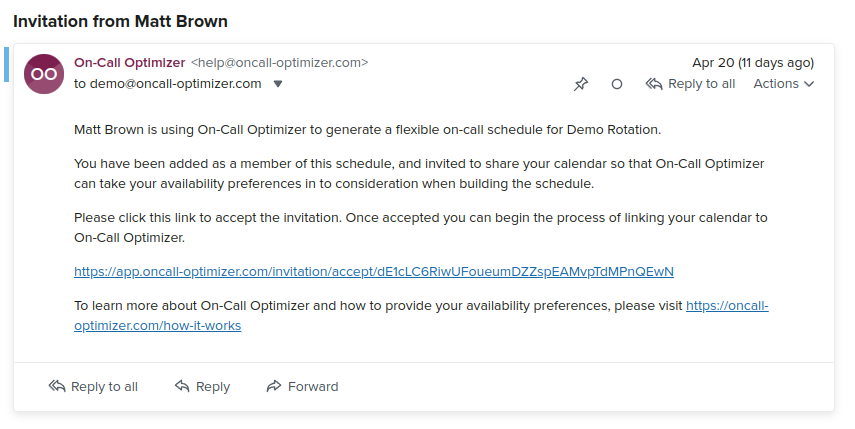
1. Click the link in the invitation
The invitation email which you have received will contain a link as shown in the below image.
Click on the link to be taken to On-Call Optimizer.
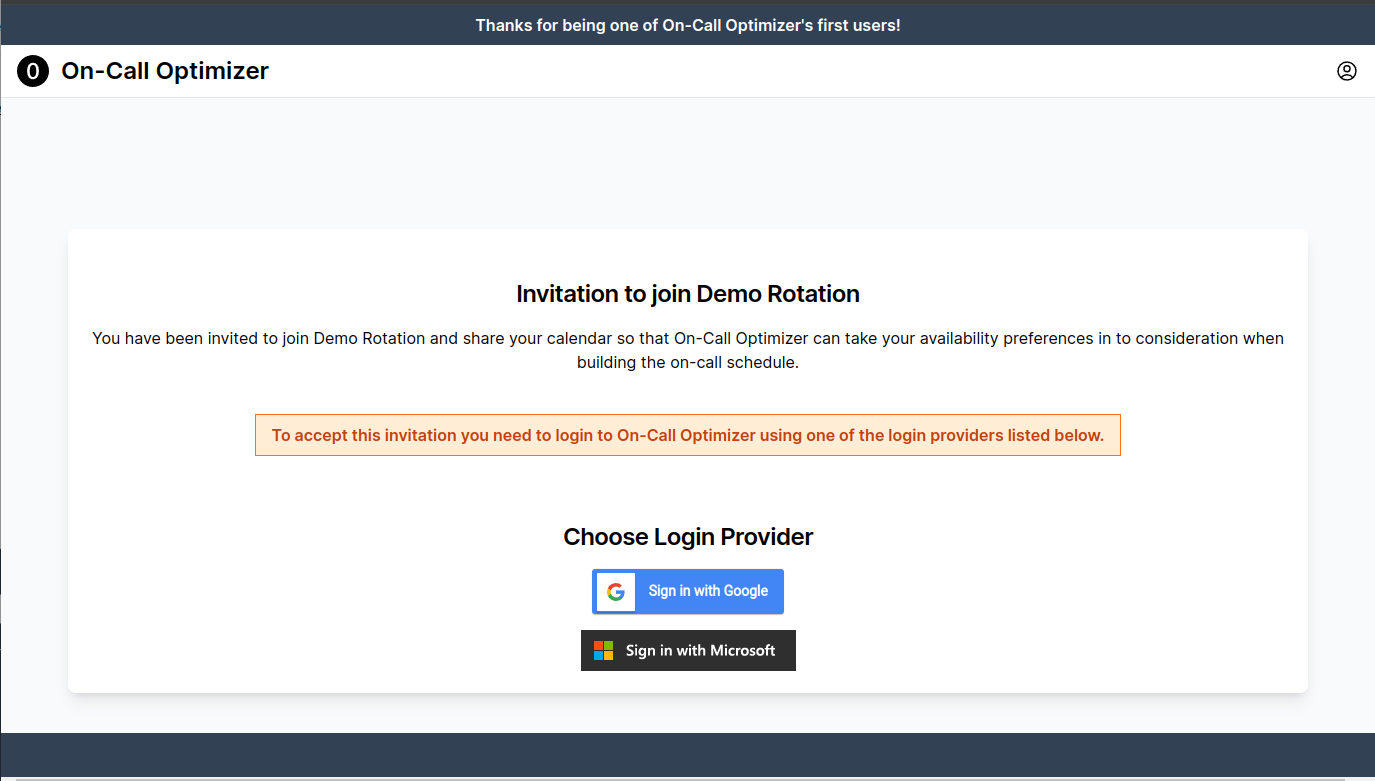
2. Login
To accept the invitation you must have an On-Call Optimizer account. If you have not used On-Call Optimizer before, you will see a screen similar to the one show below asking you to choose an authentication provider to use for login. Your account will be automatically created on the first time that you authenticate and login with this provider.
If you have previously used On-Call Optimizer and are already logged in you may not see the above screen at all. However if you do, simply log-in again by selecting the authentication provider that matches your account.
Email address mismatches
On-Call Optimizer expects, but does not require, that you will accept the invitation from an account whose email address matches the address to which
the invitation was sent. Attempting to accept an invitation from an account whose email does not match the address to which the invitation was sent will display a warning.
3. Click accept
Once you have successfully logged in to On-Call Optimizer, you will see a button allowing you to accept the invitation.
Accepting the invitation means you are agreeing to share any availability information imported from your calendars with the members of the schedule.
Next Steps
Once you have accepted the invitation, you will be taken to a welcome screen from which you can follow the next set of instructions to link your calendar to On-Call Optimizer.
In this step we will establish a connection between On-Call Optimizer and the Calendar you wish to use to provide availability information.
1. Select the desired calendar product
Click on the button in the row corresponding to the calendar product you wish to connect.
Complete the authorization or configuration process that follows.
For full details of the authorization or configuration process please refer to full calendar documentation.
2. Choose calendars to use
When multiple calendars are available on the connection you will be asked to select which calendars On-Call Optimizer will process for availability events.
For each calendar select whether or not On-Call Optimizer should process it for availability information.
Click Save when done to confirm these choices.
Ready to Go!
Congratulations. You have successfully shared your calendar availability!
On-Call Optimizer will regularly scan your calendar for new or changed availability information and use the latest available information whenever assinging
new on-call shifts.
For more details on how to structure events on your calendar that On-Call Optimizer can recognize, please refer to the event filtering section of the calendar documentation.
2.4 - Integrating many schedules
Guidance for large organizations with many schedules to integrate with On-Call Optimizer
Coordinating integration of schedules across many teams in an organization requires a structured program of work. Our recommended approach is as follows:
Please get in touch early!
We’re eager to help apply the general guidance from this page to your specific situation and needs. Email help@oncall-optimizer.com.
Preparation
Initiate vendor onboarding and security reviews for On-Call Optimizer with your procurement and security teams.
The list of supported calendar providers can also be found in the calendar documentation.
Send an initial introduction to On-Call Optimizer to the organization.
Example introduction email
Hi team,

Next week we're beginning the introduction of On-Call Optimizer to improve the
flexibility of our on-call schedules and make it easy and hassle free to
organize swaps when your plans change.

On-Call Optimizer works by collecting availability information from your calendar,
such as Out of Office events or any other event where you've added a tag like
'no-oncall' or 'prefer-oncall' to the title or description.

On-Call Optimizer uses this availability information from each member of the team
to flexibly assign on-call shifts on a rolling basis - ensuring that on-call
commitments fit around your life, rather than life being disrupted by on-call.

The rollout will take place in a staged fashion over the next few months, and you'll
receive further detailed instructions and an onboarding guide when it's time to upgrade
your schedule.

For more information on On-Call Optimizer visit https://oncall-optimizer.com/
Phase 1: Create a schedule catalog
Build a catalog of schedules in-scope for integration with On-Call Optimizer.
From your existing on-call product, collect a list of all schedules in-use and their important properties:
Roles required (e.g. single assignee, or primary/secondary assignees)
Number of people participating in the schedule
Do they belong to a single team?
Are the in a single time zone, or distributed across geographies?
Do all members have the same assignment criteria and availability?
Does the schedule depend on any other schedules, or the availability of other teams?
Phase 2: Pilot
From the schedule catalog, select one or two schedules that meet the following criteria:
Staffed by members of a single team, in a single time-zone.
Have between 3 - 8 members.
The precise size is not important, but needs to be small enough easily coordinate while large enough to benefit from the flexibility On-Call Optimizer provdies.
Consider grouping schedules into batches using common targets for the date of the first On-Call Optimizer assigned shift to clarify communication and
understanding of when changes in operation will occur.
Phase 4: Complex schedules
Schedules with more complex shift patterns, or requiring use of advanced features such as assignment groups are smoother to integrate once organizational
experience and familiarity with On-Call Optimizer has grown.
Create throw-away schedules and generate custom assignments to test and observe how different combinations of shift patterns, assignment groups and schedule
nesting can be used to model a wide range of different schedule requirements.
Can't find a configuration that works?
Let us know!. We may be able to suggest an approach you have not yet considered, or in the event that you’ve discovered a
novel use-case, we’ll evaluate how On-Call Optimizer can be improved to meet your needs.
Phase 5: Cross-team schedules
Finally, schedules where cross-schedule availability is required are best integrated last, once the schedules on which they depend
have integrated and reached steady-state operation.
Tips for cross-schedule availability use:
Minimize the number of schedules providing availability information into any particular schedule.
In all cases, ensure that availability for any individual member is not being sourced from schedules with different actions.
For example: do not configure a cross-schedule availability block based on schedule A, and a cross-schedule preference based on schedule B if the
same members are being assigned in both schedules since this risks conflicting availability information for a member being provided if they are assigned
to shifts in both A and B at the same time.
3 - Schedules
Understand how the core scheduling functionality of On-Call Optimizer works.
An effective on-call schedule must be flexible and ensure that on-call shifts fit around other commitments in each team members life.
On-Call Optimizer takes the hassle out of maintaining flexible on-call schedules and provides a foundation for teams to experience
an on-call environment that delivers growth in expertise.
3.1 - Concepts
Understand the key concepts, data and information used in an On-Call Optimizer schedule
Schedule
Schedules are the core focus of On-Call Optimizer. The primary information contained within a schedule is the list of shifts describing
which member(s) are assigned to be on-call at a particular point in time.
To enable creation of new shifts each schedule also contains a set of configuration details in addition to the list of shifts. These configuration details
are used by On-Call Optimizer to regularly extend the list of shifts into the future to maintain a desired horizon of assignments.
Each set of new shifts generated by On-Call Optimizer is referred to as an assignment, described further below. The collection of assignments
associated with a schedule collectively describe the history and future shifts for the schedule.
Advanced configurations of On-Call Optimizer make use of inter-schedule relationships to achieve more
complex scheduling outcomes than are possible within a single schedule.
Schedules can be linked to integrations to synchronize their configuration and assignments with
external systems (e.g. On-Call Products such as PagerDuty or Ops Genie).
Schedule Balance
Maintaining a balance of shifts between members of a schedule is one of the primary objectives that On-Call Optimizer targets. On-Call Optimizer
considers a schedule to be balanced when each member has fair share of the total number of shifts.
See the Schedule Balance page for detailed information on how balance and fairness is calculated and reported in On-Call Optimizer.
Shift
An on-call shift is a contiguous period with defined start and end times associated with one or more assignees. The start and end time of an on-call shift are measured to the minute only (no seconds component) and must be fully specified including a time zone.
The maximum length of a single on-call shift is one week.
On-Call Optimizer supports up to 2 assignees per shift referred to as the primary and secondary respectively.
Shift Configuration
Each schedule contains a list of shift configurations which describe how future shifts in the schedule are to be assigned. A shift configuration is made up of
the time at which a shift in the schedule should start and who the desired assignee(s) for the shift should be.
On-Call Optimizer uses the shift configuration to generate the list of specific shifts with explicit start and end times when extending the
schedule.
Basic vs Nested Schedules
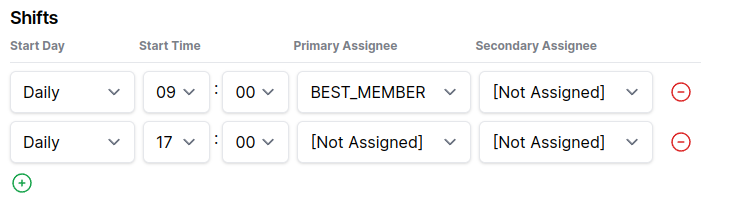
On-Call Optimizer can support almost any rotation configuration using a combination of basic and nested schedules:
An basic schedule contains shift configurations that do not reference any other shift as an assignee - each shift is either assigned to
a staticly chosen member, or by placeholder (e.g. BEST_MEMBER) denoting that the constraint optimizing algorithm
should be used to dynamically choose the best assignee.
To construct more complicated rotation configurations another schedule can be specified as one of the assignees for a shift in the
configuration of a schedule. When one schedule refers to another schedule in this manner it is called a nested schedule.
On-Call Optimizer supports up to 3 levels of nesting.
Nesting provides an intuitive and straightforward method to configure rotations whenever there are two or more different groups of people or configurations to manage. Common examples of this would be rotating between two halves of a team on different sides of the world, or having only a subset of a team provide after-hours coverage for a schedule.
The configuration library contains multiple examples demonstrating how these simple
combinations enable many diverse schedule structures to be created while remaining simple to undersatnd and configure.
Assignment
A collection of shifts associated in some way with a schedule. The shifts in an assignment may not overlap at any point, and typically
represent a contiguous block of time, but under certain configurations (e.g. business hours only) there may be gaps where no
shift or assignment is present.
On-Call Optimizer continually generates new assignments for future shifts to maintain the schedule according to its configuration.
Assignments can exist in a number of states with defined roles, purposes and processes for moving between states. Please refer to the full assignment documentation for further details.
Assignment quality
The quality of each assignment is evaluated by On-Call Optimizer based on how close to perfectly meeting every goal and constraint it reaches. When a perfect
assignment is not able to be made, as set of penalties are reported to help explain the factors that impacted on the quality of the assignment.
Further details of how quality is evaluated and calculated can be found on the Assignments page.
Linked Schedules
On-Call Optimizer supports linking schedules to external systems (e.g. On-Call Products such as PagerDuty or Ops Genie). Schedules
that have been linked to an external system can be identified by looking for a badge next to the schedule’s name.
The badge(s) shown next to the schedule name describe the external system(s) that the schedule has been linked to and the type of link that has been established.
Example System
The configuration and shifts for this schedule are linked with Example System.
Example System
The configuration for this schedule is imported from Example System.
Example System
The shifts of this schedule are exported to Example System.
The horizon of a schedule is counted in days and describes the level of visibility into future assignments that is
or should be provided by the schedule.
As one of the configuration parameters for a schedule, the desired horizon, it describes how far in advance shifts
should be assigned, and therefore the minimum number of days of notice that members should receive prior to a shift
they are assigned to.
As a reported property of an existing schedule, the current horizon, it describes how many days exist between a point
in time (typically the current date) and the end of the final shift that has been assigned in the schedule
The schedule lifecycle documentation describes how On-Call Optimizer triggers assignment
of new shifts when the current horizon is about to fall below the desired horizon.
Horizon is a property of a schedule, not any particular member, and is calculated based on calendar days in the configured time zone of the schedule itself. A current horizon of zero indicates that the schedule’s assigned
shifts will end (or already ended before) today, while a current horizon of 1 day indicates that the final shift
in the currently assigned schedule ends tomorrow and so on.
The schedule window describes how many days of future shifts should be assigned at once when assigning new shifts
during the lifecycle of the schedule. The configured window is also used as the default
size for a new custom assignment.
By default the schedule window extends on from the final shift in the current schedule, but can be changed to start from a
different date (so long as it is not in the future) when generating a custom assignment.
The history window describes how many past shifts are included when calculating the balance of
the schedule.
On-Call Optimizer uses a 6-month history window, counting backwards from the start of the first shift in the new assignment.
Availability Information
The availability information for a schedule consists of the combination of both:
The combination of individual availability information from each member that has agreed
to share their calendar with the schedule.
Any availability entries synthesized due to a schedule availability reference that
has been configured on the schedule.
3.2 - Assignments
Assignments record individual shifts in the schedule
A schedule is composed of one or more assignments, which allocate members to shifts covering specific time periods.
Viewing Assignments
Shifts assigned to you personally can be seen on the On-Call Optimizer home page, or by selecting “Swap Shifts” in the main menu.
To view shifts for all members in a schedule, use the Overview and Assignments tabs.
Overview Tab
The Overview tab shows the member is who currently assigned to be on-call for the schedule and the next 3 upcoming shifts.
Assignments Tab
The assignments tab provides a summmary of the upcoming shifts for the schedule and a list of historical assigmnents for the schedule.
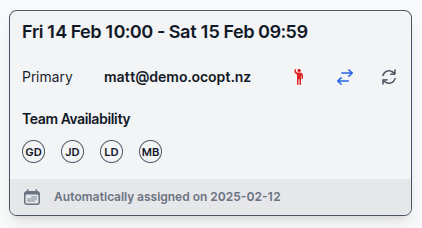
Shift Popup
Key details for individual shifts can be quickly seen via a popup accessed from any shift shown in the Overview or Assignments tabs by either:
Clicking on the shift, which will show the popup for that shift until dismissed or another popup is triggered. OR
Pausing the mouse over the shift, which will show the popup only while the mouse remains on the shift.
Displayed within the popup are key details of the shift:
The assignee for each configured role (primary, secondary, etc), along with a set of action icons that can be used to initiate
changes to the assignee of the shift.
Any penalties relating to the assignment of the shift to the assignee (displayed directly under the assignee if present).
The availability of other team members for this shift (displayed as color-coded round badges under the assignees).
A link to the assignment in which the shift was confirmed (in the footer of the popup)
The actions available for each assignee include:
Take Shift:
immediately assigns the shift to you.
Swap Shift:
initiates a swap request for the shift.
Reassign Shift:
directly reassign the shift to a specific member (coming soon).
The reassign shift action is expected to be available in May 2025.
Assignment Quality
The quality of an individual assignment describes how close to optimal the assignment algorithm was able to reach given the constraints of the schedule configuration
and availability of the members.
The quality of an assignment is reported at the top of the assignment page where you will find a summary line containing details on the
balance of the schedule and the quality of the assignment. The following icons and colours are used to provide a quick visual
overview of the quality of the assignment:
Green thumbs up:
The assignment is optimal or very close to optimal.
Orange thumbs down:
The assignment is OK, but has some penalties.
Red thumbs down:
The assignment has significant problems.
Assignment penalties
When an optimal assignment cannot be found, a set of penalties are reported to describe each of the compromises that On-Call Optimizer had to make to find
an viable assignment. These penalties are shown under the assignee in the shift popup when hovering or clicking on a shift.
For details on the types of penalties that can be reported, refer to the algorithm reference page.
Auto Assignment Settings
The auto assignment settings controls how On-Call Optimizer will maintain and extend the schedule throughout the lifecycle of
the schedule.
To access these settings, click the wrench icon beside the Next Shift Assignment heading found on the Overview or Assignments tabs of the schedule.
The following settings are available:
Start Date: The date from which assignments will be created. Refer to the lifecycle docs for details on behaviour before the start date.
Valid values when changing this are between the present date and 90 days in the future.
Horizon Days: Defines how many days of horizon (minimum 1, maximum 90) are desired for the schedule: a new assignment
will be created when the horizon created by the end of the last existing shift reaches this value.
Schedule Window Days: Controls how many days of shifts (minimum 1, maximum 90) will be assigned in each new assignment.
Require manual confirmation?: When set requires each new automatic assignment to be approved before the new shifts are confirmed in the schedule.
Disabling manual confirmation
New schedules are created with manual confirmation enabled, but it is recommended to disable manual confirmation once the schedule has reached steady state and members are comfortable
with how On-Call Optimizer is operating.
The rationale for this choice is that when first adopting dynamic scheduling it is not uncommon for members to need a few iterations of assignments to establish the patterns and habits of providing
availability information, and therefore the ability to review (and potentially re-generate) each automatic assignment before it is confirmed
can be useful.
However, once team members are comfortable with the generated assignments and a pattern of usage with On-Call Optimizer has been established, the effort of reviewing each new assignment is harder
to justify and delayed, or forgotten approval of an assignment risks reducing the horizon of the schedule below the desired value, or in the worst case causing the schedule to run out of assigned shifts!
Horizon and window sizing considerations
The schedule window should usally be kept above 20 days to ensure sufficient shifts to optimize over are present in each assignment.
It is also important not set the schedule window too large either to ensure availability information is available for all members for the time period covered by the window.
Large schedule windows risk scheduling shifts beyond the date where where members are comfortable maintaining their calendar availability details in advance.
The default values for the horizon and schedule window are both 30 days which has been found to work well for many schedules in practice.
This provides at lesat 1 month notice for each new shift that is assigned to a member and results in the available horizon for the schedule
following a sawtooth pattern between 60 days immediately following each new assignment, and then gradually reducing to 30 days over time until the configured
horizon is reached and the next assignment is triggered.
The horizon can be lowered as far as the team members are comfortable with without any adverse impact on the quality of assignments - the
only impact of a low horizon is less notification for each member before a shift.
Assignment Types
The assignment concept is used throughout the lifecycle of a schedule leading to several different types of assignments.
Current Assignment
The current assignment for a schedule is synonymous with the schedule itself and represents the canonical list of shifts describing which
member is assigned at each point in time. There only ever exists a single current assignment per schedule and the current assignment is
only ever modified through the assignment confirmation process.
On-Call Optimizer regularly generates new assignments to ensure the current assignment is extended into the future according to configuration of
the schedule.
Pending Assignment
A pending assignment represents a list of shifts that are not yet confirmed but are being considered for addition to the schedule using
one of the supported actions.
Pending assignments (if present, often there will not be any) are listed in the right-hand side bar of the schedule view underneath the
details of the next planned assignment.
Pending assignments originate from several sources.
Automatic Assignment
An automatic assignment is regularly generated by On-Call Optimizer during the lifecycle of
the schedule to extend the current assignment based on the configured assignment parameters.
Automatic assignments are only able to use the Add Shifts action to confirm new shifts onto the end of the current assignment.
Custom Assignment
A custom assignment is created directly by a user. The starting date, number of shifts and the action that
is used to confirm the custom assignment into the current assignment for the schedule are all able to be customized by the user.
Imported Assignment
An imported assignment holds shifts that originated and were assigned in an external system such as the on-call product linked to a schedule.
When a link is created, On-Call Optimizer will import the history of prior shifts
from the on-call product so they are available to help the assignment algorithm create assignments
that balance across all members of the schedule.
Saved Assignment
Saved assignments record the history of how the schedule was built and has evolved over time. In simple cases each historical assignment
can be matched directly to a subset of the schedule (more specifically to a subset of the current assignment of the schedule), however in
more complex cases where the schedule has been re-assigned or individual shift swaps have occurred it is possible that none of the shifts
from a saved assignment remain in the current schedule.
Assignment Actions
A pending assignment must select one of the following actions to determine how the current assignment is updated when the assignment is
confirmed.
Add Shifts
The pending shifts are added directly to the existing list of shifts in the current assignment. The combined list is sorted by start time.
This action will fail if any of pending shifts overlap with or attempt to re-assign any of the existing shifts in the schedule.
The Add Shifts action is the only action used for any assignment initiated by On-Call Optimizer, such as extending the schedule with new shifts or importing shifts from an external source. Authorized users may also use the Add Shifts action when confirming a Custom Assignment.
Replace Shifts After First Start
Any shifts in the current assignment which end after the starting time of the earliest shift in the pending assignment are removed.
The shifts from the pending assignment are appended to the remaining current assignment.
The action will not modify the end time of any existing shifts and will therefore create a gap in the schedule if the start time of the
earliest pending shift does not exactly match the end time of an existing shift.
This action is useful when the desire is to re-assigning all shifts after a particular date/time. This action will not be used by any
assignment created by On-Call Optimizer, but may be specified by authorized users when confirming a Custom Assignment.
Replace Conflicting Shifts
Any shifts in the current assignment which contain any time between the start of the earliest and the end of the latest shifts in the pending assignment are removed.
The shifts from the pending assignment are added to the gap created in the current assignment by the previous step.
The action will not modify the start or end time of any existing shifts and will therefore create a gap in the schedule if the start
and/or end times of the pending shifts do not exactly match the start/end times of any surrounding existing shifts.
This action is useful when the desire is to re-assign a small set of shifts (including just a single shift), such as in the case of
taking-over or swapping shifts. This action will not be used by any assignment created by On-Call Optimizer, but may be specified by
authorized users when confirming a Custom Assignment.
Assignment Confirmation
The process of confirming an assignment involves the following steps, which are guaranteed to occur transactionally:
The current assignment will be updated to include the pending shifts using the configured action as described above.
The new current assignment will be fully checked and validated and the process aborted unless all checks pass.
The pending assignment will become a saved assignment and become a permenant historical record of when and by which action the current assignment was updated.
Schedule events associated with new or changed shifts (e.g. notifications, export to destinations) will execute.
3.3 - Operating Lifecycle
Learn about the common operations and events that regularly occur for each schedule.
Time and tide wait for no one - On-Call Optimizer continuously monitors and assigns upcoming shifts to the best
available members and ensures that any external destinations configured for the schedule remain synchronized with
the assigned shifts.
How this occurs is easily understood as two processes that operate continuously, each checking the current state
and taking any necessary actions to move towards the desired state at any time where a difference between two two states
(current and desired) is detected.
Automatic Assignment
The automatic assignment process is responsible for ensuring the number of future shifts assigned for the schedule
always remains above the desired horizon.
Steady-state Operation
During typical conditions, the current horizon (the end time of the final shift
assigned in the schedule) is compared to the desired horizon and a new assignment
is triggered whenever the current horizon is about to fall below the desired value.
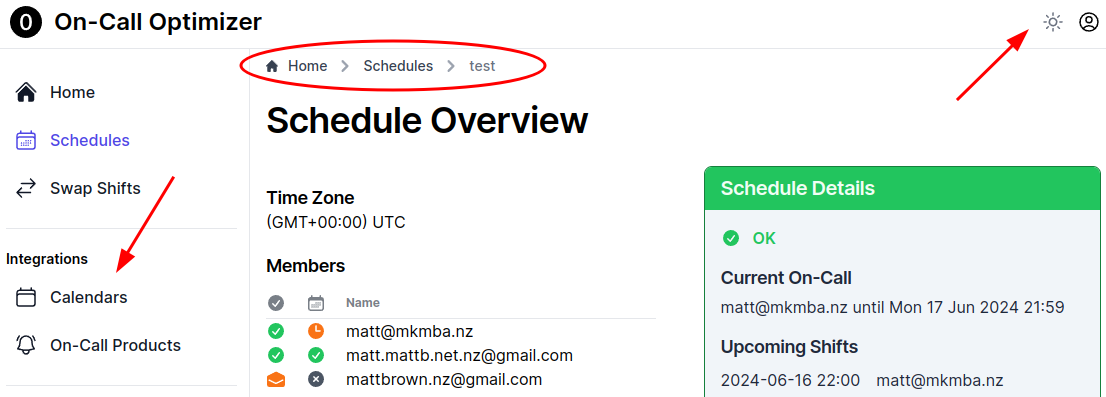
The date the next automated assignment will fall due and the shifts that will be assigned at that time are visible in
the Schedule Details side-bar on the right-hand side of each schedule.
The action taken once a new automatic assignment has been generated depend on the configuration of the Require manual confirmation?configuration setting for the schedule:
When enabled (default), the owner of the schedule will be notified of the new assignment, and required to review and
manually confirm the shifts. No further actions will be taken by the automatic assignment process until this occurs.
When disabled, an attempt to automatically confirm the new assignment into the current assignment for the schedule will
occur immediately after the assignment is generated.
Special Cases
First assignment for new schedules
A newly created schedule may not have any existing shifts from which the current horizon and therefore the due date
for the next assignment can be calculated! To address this, all schedules are created with a configured start date in
the future.
Prior to the start date no shifts are eligble for auto-assignment, and the start date itself is used instead of the
the end time of the latest assigned shift when calculating the current horizon of the schedule.
This means that the first assignment for new schedules will occur N days prior to the configured start date,
where N matches the desired horizon configuration of the schedule.
Unconfirmed automatic assignment
No further automatic assignment actions are undertaken while a previous automatic assignment is awaiting review. If this
review does not happen promptly the schedule becomes at risk of members not receiving the desired horizon window of
notification before their newly assigned shifts, or in the worst case, the schedule could run out of shifts entirely.
Pausing auto assignment or skipping time
Setting the start date to a future date at any time after the schedule has been created will result in the first assignment
logic described above being triggered again - while the start date is in the future, it will be used as the basis for
calculating the horizon when no other shifts exists. This can be used to cause On-Call Optimizer to skip assignment of shifts
for a period of time if desired.
External Synchronization
The external synchronization process is responsible for importing and exporting information about a schedule from configured
external systems.
Linked Schedule Configuration
For schedules configured with a link to an external On-Call Product, the following
configuration details for the schedule will be regularly updated with the external values:
Name
Time zone
Members
All other configuration details including the shift configuration, cross-schedule availability,
destinations and automatic assignment configuration are not changed by this process.
Destination Exports
Each configured destination is provided with new information whenever a new assignment is confirmed. Refer to the
destinations documentation for further details.
Availability Information
The availability information for each member of the schedule is refreshed
every hour and cached ready for use in any future assignments.
3.4 - Schedule Balance
Understand how On-Call Optimizer balances shifts across members
The balance of shifts between members of a schedule is one of the primary objectives that On-Call Optimizer targets.
On-Call Optimizer considers a schedule to be balanced when each member has a share of the total number of shifts that is proportional to the time at
which they were added to the schedule.
This means that the target number of shifts for each member in the schedule will often differ - members who joined the schedule around the same time will
have similar targets, but the target will vary between members who have joined the schedule at a later date.
Statistics describing the balance of the schedule are available for the current assignment - showing the live state of the schedule, and can also be viewed
when creating new custom assignments or examining the history of a particular assignment - showing a snapshot view of how that assignment altered, or
will alter the balance of the schedule when it is or was confirmed.
Summary
At the top of each assignment page you will find a summary line containing details on the balance of the schedule and the
quality of the assignment.
The following icons and colours are used to provide a quick visual overview of the status of the schedule balance:
Green thumbs up:
The schedule is balanced.
Orange thumbs down:
The schedule is slightly unbalanced.
Red thumbs down:
The schedule is significantly unbalanced.
Red upwards arrow:
The schedule is significantly unbalanced, but improving in this assignment.
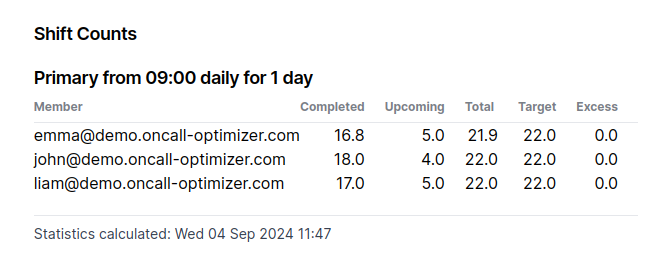
Live Balance
The live balance of a schedule will be displayed when viewing the current assignment
for a schedule using a table similar to the one shown here. For each member the following information is shown:
Completed - the number of shifts already completed by the member (any shift currently in progress is counted as completed in this table).
Upcoming - the number of shifts that have been confirmed for the member in future assignments.
Total - the total number of completed and upcoming shifts assigned to the member.
Target - the number of shifts that the member should be assigned, based on the the number of assignable members in the schedule and when they joined.
Excess - the number of shifts that the member’s total is in excess of their target.
Assignment Snapshot Balance
The impact of an individual assignment on the balance of a schedule can be seen on the assignment details page both before the assignment is confirmed and afterwards.
The balance table shown for an individual assignment is very similar to the example for the live balance above, except that the the Completed and Upcoming columns
are replaced with Previous and New columns instead:
Previous - the number of shifts already assigned to the member (may be completed or upcoming) which are not changing in the assignment.
New - the number of additional shifts that will be assigned to the member when the assignment is confirmed.
Total - the total number of previous and new shifts that will be assigned to the member when the assignment is confirmed.
Target - the number of shifts that the member should be assigned at the time when the assignment is confirmed.
Excess - the number of shifts that the member’s total is in excess of their target.
Unlike the live balance shown for the current assignment, the balance statistics shown for an individual assignment are a snapshot of the balance of the schedule
at the point in time when the assignment was generated or confirmed.
Shift Types
The balance for a schedule is calculated and tracked individually for each type of shift in the schedule. Shift types follow directly from
the Shift Configuration of the schedule and are described by the
day and time at which the shift starts, combined with its duration. The role (primary, secondary, etc) assigned forms the final component of a shift type,
to ensure members are assigned a proportionate number of shifts for each role.
Shift accounting
The numbers reported in the balance tables count the number of shifts of each type assigned to a member and will therefore represent different lengths of time. In
the balance table for a daily shift, a value of 1.0 would represent 24 hours, while in the table for a weekly shift a value of 1.0 would represent 168 hours.
Fractional shift numbers will arise in a number of situations, commonly including:
When the total number of shifts in the schedule is not evenly divisible by the number of members.
When swaps or other changes have resulted in the member only performing part of a shift.
Window Size
The balance for a schedule is calculated from the earliest shift contained within the history window (6 months in the past) until the final future
shift that has been assigned.
Even when displayed in the context of an individual assignment that may only be covering a few days of time, the balance reported is for the schedule over the entire window.
3.5 - Members
Schedule members can have differing roles, configuration and permissions governing their interaction with the schedule.
Each schedule in On-Call Optimizer has one or more members who can be assigned to shifts. Additional members not eligible for assignment in the schedule can also
be added in order to grant them permissions to view or administer the schedule.
The “Members” tab within a Schedule shows the list of members for the schedule along with their current role and properties.
Auto-send invitation emails
By default, On-Call Optimizer will automatically email invitations to new members when they are added to the schedule. This can be disabled by toggling the
setting at the top of the “Members” tab to off.
When auto-send of invitations is disabled, invitation emails will only be sent to members when explicitly triggered using the button below the member list.
Adding and Removing Members
Schedules linked to an on-call product
On-Call Optimizer schedules linked to a schedule in an external
on-call product synchronize their member list from that schedule in order to ensure shifts are assigned to members matching
the configuration of the linked schedule.
In most cases you should make any necessary additions and removals of members in that product and On-Call Optimizer will adopt the change the next time the
schedules are synchronized.
Additional members can be added directly in On-Call Optimizer with any of the supported roles (e.g. for administration or schedule visibility), but
will not be assignable as they cannot be synchronized back to the linked schedule.
Members added to the linked schedule in the external product will be synchronized into On-Call Optimizer within an hour.
New members are marked assignable by default when they are added to the On-Call Optimizer schedule.
Members who were originally added in On-Call Optimizer (and are therefore currently un-assignable) will remain in that state even if they are later added
directly to the linked schedule, however once their addition has been synchronized into On-Call Optimizer they can then be marked as assignable.
New members in the linked schedule which do not match an existing On-Call Optimizer account will cause an invitation to be generated. If the
auto-send invitation emails setting is disabled the invitation will remain unsent until manually triggered via the button under
the member list.
Members synchronized into On-Call Optimizer from the linked schedule cannot be removed in On-Call Optimizer, you must remove them from the linked schedule.
To prevent a member present in the linked schedule from being assigned future shifts, mark the member as un-assignable.
Removal of a member from the linked schedule will cause the member to be removed from the On-Call Optimizer schedule as well.
Schedules not linked to an on-call product
When a schedule is not linked to a schedule in an external on-call product
you can add and remove members directly to and from the schedule in On-Call Optimizer as described below.
Adding a member
To add a member to a schedule, enter their email address in the text box at the bottom of the member list and clicking the “Add” button.
If the email address entered does not yet have an On-Call Optimizer account, the user will be invited to create one (subject to the the
auto-send invitations setting).
If the schedule is linked to an on-call product, the member will not be assignable in the schedule (as described above).
The default role for newly added members is also called Member. The role can be changed via the member list once added.
Removing a member
To remove a member from a schedule, click the trash can icon to the right of the member’s name in the member list.
The last member with the Admin role cannot be removed from the schedule.
Members synchronized into On-Call Optimizer from a linked schedule must be removed in that schedule (as described above).
Removing a member prevents their inclusion in any future assignments, but does not remove them from any previously assigned shifts (including previously assigned
shifts that are still to occur in the future).
Member List
The first and second columns of the members list show the invitation and calendar availability state for each member of the schedule.
A description of each state can be shown by hovering over the icon(s) for any particular member or consulting the references below:
Invitation
The first column (titled Invite?) shows whether an On-Call Optimizer account exists for the member. The possible icon states are:
OK:
The member has logged in to On-Call Optimizer and joined the schedule.
Pending:
An invitation is ready but has not yet been sent to the member.
Sent:
An invitation has been sent to the member, but is not yet accepted.
Calendar
The second column (below the calendar icon) shows whether availability information is available for the member. The possible icon states are:
OK:
The member's calendar is linked successfully.
Warning:
The member has connected a calendar provider, but no calendars are linked.
Error:
The member has not linked a calendar provider.
The third column shows the member’s name or email address.
The fourth and fith columns allow configuration of the member’s assignment state and role in the schedule as described below.
The final column in the list contains actions (such as the remove icon) that may be available related to the member.
Properties
Invited
On-Call Optimizer supports adding members to a schedule without inviting them to share their calendars which can be useful when testing configuration and assignments of
a new schedule type. To use this functionality, ensure the auto-send invitations setting is disabled and then clear the checkbox to the left of
the member’s name in the member list.
Assignable
The boolean assignable property is configurable on each member of a schedule, regardless of role, and determines whether the member will be included in the assignment
of future shifts for the schedule.
Members default to being assignable when added to the schedule, but this can be changed using the toggle next to the member’s name in the member list.
Members added directly to an On-Call Optimizer schedule that is linked with an external schedule in an on-call product cannot be marked assignable as they do not
exist in the linked schedule. After you have added the member to the linked schedule, the assignable setting can then be updated to include the member in future
assignments.
A typical use case for marking a member unassignable is to allow a user to view or manage a schedule without participating in the schedule themselves.
Roles
Schedule Admin
Schedule admins have full access to the schedule and can perform all actions available to members. The user who creates the schedule becomes the first schedule admin
and can add further members as required. It is recommended to configure at least 2 admins per schedule.
Organization owned schedules are only deletable by a schedule admin when the Manage Schedules permission has been granted
to organization members. If this permission is not granted, the schedule will only be deleteable by organization admins.
Schedule Member
Member is the default role for newly added members of a schedule. Members are able to make changes to the configuration and assignments of the schedule, but cannot
remove or delete the schedule.
Schedule Viewer
Members in the viewer role can participate fully in the schedule (including being assigned shifts and participating in swaps), but are not able to make any changes to
the configuration of the schedule itself and cannot change or initiate new assignments other than by using the swap functionality.
3.6 - Configuration
Understand the configuration options for a schedule and their effects.
The configuration of a schedule controls how On-Call Optimizer will generate shifts to assign for the schedule, and any
availability information sourced from other schedules that should be taken into
account when generating assignments.
In addition to the schedule configuration described on this page, other aspects of the how the schedule behaves throughout its
lifecycle are controlled via:
The list of members and their roles and properties on the Members tab
The assignment settings accessible by clicking the wrench icon beside the “Next Shift Assignment”
heading on the “Overview” or “Assignments” tabs of the schedule.
Any destinations that are configured for the schedule.
Basic Configuration
The basic configuration for a schedule includes its Name and the Time Zone in which it operates.
For schedules linked to an external On-Call Product the basic configuration is not editable and will be
automatically synchronized from the external schedule.
Shift Configuration
The shift configuration describes how On-Call Optimizer will generate future shifts for the schedule. Up to 10 shifts may be configured on a schedule.
The available configuration fields for each shift are:
Day: Required. One of the normal days of the week (Mon-Sun) or one of the wildcard values Daily, Weekdays, Weekends.
Hour: Required. In 24-hour notation, 00 - 23.
Minute: Required. 00 - 59
Primary Assignee: Optional (but at least one assignee is required across all shifts).
Secondary Assignee: Optional.
Valid values for the assignee fields are:
Any of the assignable members of the schedule (creating a static assignment).
A reference to a role in another schedule (creating a nested assignment)
One of the following special directives:
Best Member to request automatic assignment between all assignable members of the schedule.
Best Member for GROUP_NAME to request automatic assignment between the members of a specific assignment group only.
Last Primary to request assignment of the member assigned to the primary role in the previous shift.
Last Secondary to request assignment of the member assigned to the secondary role in the previous shift.
[Not assigned] to request that no member be assigned to this role in the shift.
The Day, Hour and Minute fields describe when each new shift will start. The Primary/Secondary Assignee fields describe who, or how On-Call Optimizer
will choose to, assign to each shift.
The [Not assigned] keyword is typically used in the secondary field when only a single assignee is required for the shift, however it can also be used in the primary
field when you wish to configure a schedule with non-continuous assignments (e.g. only create shifts for business hours Monday to Friday). The only restriction is that at
least one of the shift configurations must contain an assignee - there’s no point asking On-Call Optimizer to manage a schedule to which no-one is ever assigned!
Use the example configs to further understand how shift configurations can be
combined to achieve a variety of different schedule types and configurations, or for detailed information consult the extension logic, and assignment algorithm reference.
Cross-Schedule Availability
The cross-schedule availability feature can be used to automatically generate
availability information for a schedule based on the assignments that are present in
another schedule.
The availabilty information generated by cross-schedule availability configurations will be used with the same weight and purposes as
availability information that has been individually supplied by members from their calendars.
Configuring cross-schedule availability requires 3 pieces of information:
Action: The type of availabilty information to create (Block or Prefer).
Source Assignee: Which of the assignees from the source schedule to create availability information for.
Source Schedule: The schedule from which to source the assignments used to generate the availability information.
Configuring cross-schedule availability creates a dependency on the source schedule which requires that it has been assigned prior to the
schedule that is depending on it. Attempts to assign new shifts for a schedule which has a cross-schedule availability dependency on a source schedule
which does not yet have assignments covering the dates of the requested assignment will fail as the source shifts needed to generate the availability
entries required by the configuration do not exist.
Therefore when configuring cross-schedule availability you need to double-check that the
horizon and schedule window settings for the source schedule are appropriately set to ensure it is always assigned before the schedule
depending on it.
Assignment Groups
Assignment Groups provide a way to limit the members eligible to be assigned to a shift to a subset of the members in the schedule.
To add and configure assignment groups click the “Configure assignment groups” link below the Shift Configuration section which will display the
assignment groups sidebar.
Default assignment group
Every schedule has a default assignment group called members that is automatically maintained by On-Call Optimizer to contain all of the currently
assignable members of the schedule. You cannot remove or directly modify the default assignment group. The default
assignment group is used when the standard Best Member directive is selected as the assignee for a shift.
Custom assignment groups
Schedule members or admins can create additional assignment groups by clicking the add icon at the bottom of the assignment groups sidebar. Custom groups
are configured with:
A name, used to uniquely identify the group when selecting it as an assignee for a shift.
Whether or not to automatically add members to the group.
By default this setting is enabled - the group will be created with all currently assignable
members of the schedule as members of the group, and new schedule members will also be added to the group at the same time they join the schedule in future.
Disabling the setting will create an assignment group containing no members initially, and will require members to always be explicitly added to it.
To edit a group, click the pencil icon to the right of the group’s name in the assignment groups sidebar to place the group into edit mode.
Toggle the membership of each assignable schedule member in the group by clicking on the tick or cross next to their name.
Turn the Auto-add new members setting for the group on or off using the toggle button.
To confirm any changes made, click the tick icon to the right of the group name, or to delete a group click the trash can icon to the right of the title.
Assignment groups that are in use (referenced by at least one shift) cannot be deleted and must contain at least one member.
3.7 - Destinations
Describes how external integrations are configured and kept up to date with shifts.
Each On-Call Optimizer schedule can be linked to one or more destinations to
enable the export of assigned shifts.
Additional destination types (e.g. calendars) will be added soon.
Adding and Removing Destinations
Destinations can be added and removed from a schedule via the “Destinations” tab within a Schedule.
Schedules created via linking an existing schedule will have a matching destination
pre-populated which can be removed or edited if desired.
The available configuration parameters for a destination are:
Source Assignee: Which of the assignees from the schedule will be exported to the destination.
Automatic: When enabled, updated shifts are automatically pushed to the destination whenever new assignments are confirmed on the
schedule. If disabled, updates to the destination must be manually triggered.
Destination Behaviour
On-Call Optimizer exports a list of shifts, each consisting of a single assignee to each destination. In order to export a schedule
containing both primary and secondary assignees, two destinations will need to be configured, one sourced from the primary assignee, the
other sourced from the secondary assignee.
For each destination On-Call Optimizer tracks the end time of the most distant shift that was successfully sent to the destination.
NOTE
On-Call Optimizer does not yet perform any ongoing synchronization or monitoring of previously exported shifts unless they are directly
changed in On-Call Optimizer (e.g. by replacing an earlier assignment or using On-Call Optimizer’s swap
functionality).
This allows last-minute and short-term changes to shifts (e.g. to cover a commute window from home to the office) to be made directly in
the destination without conflicting with On-Call Optimizer, however if you make a planned change to the schedule in On-Call Optimizer, the
destination will also be updated.
During normal operation the end time of the last shift exported to a destination should match the shifts that have been assigned up to the configured
horizon of the On-Call Optimizer schedule. This date can always be viewed in the tooltip of the
status icon for the destination on the Destinations tab of any On-Call Optimizer schedule.
Destination Export
When configured for automatic export, the destination will be updated with new shifts after
each new assignment is confirmed to the schedule. When automatic export is disabled, the destination will only be updated when an export
is explicitly triggered via the user interface.
To trigger a destination export, click the “Export Now” button on the right hand side of the destination’s row.
Destination Status
A status is reported for each destination as one of the following states:
OK: All assigned shifts are successfully exported and represented in destination.
Pending: No shifts are yet assigned for the schedule to export, or an export attempt is currently in process.
Warning: Future shifts (beyond 3 days from now) are not yet successfully exported to the destination.
Error: The current or imminent shifts (within the next 3 days) have not been successfully exported to the destination.
Any destination reporting an Error or Warning status will cause the schedule to be reported in the corresponding state also.
3.8 - Shift Swaps
Simple, automated assistance to resolve unexpected changes in availability
Unexpected changes in member availability are an inevitable fact of life. On-Call Optimizer assists schedule members to handle these events by
co-ordinating the process of reassigning a future shift that the requesting member is no longer able to perform.
Members simply specify the shift they are unable to perform and then get back to other work.
In the background
On-Call Optimizer takes care of notifying and checking with each other member of the schedule to determine whether they are willing and able to take the shift,
and then when a willing member is found the schedule is automatically updated.
Benefits
Eliminates significant time that would previously have been needed to manually arrange and configure the swap.
The members most likely to be able to accept the swap request are notified first as On-Call Optimizer is able to integrate the information already
held for each member, including their blocks, preferences and the overall balance of the schedule, into the planning of the swap request.
Members can choose to simply take the requested shift without needing to swap one of their existing shifts in return, providing greater choice and flexibilty
in how requests are resolved.
On-Call Optimizer ensures balance across the schedule is maintained by assigning fewer shifts to any member who has performed
more than the expected share of shifts in future assignments.
The end result is simple, straightforward shift swaps with minimal time or hassle required from any member.
Requesting a Shift Swap
To initiate a request to swap a future shift, click the swap icon shown to the right of the shift when viewing the assignments for a schedule.
Before confirming the request you will have the opportunity to supply a short note which you can use to describe any information or details that will help other
members determine whether they are able to accept the request as well as a deadline by which you would like to receive an answer to the swap request by.
Members of a schedule can initiate a swap for any shift, regardless of the current assignee.
Automatic Swap Requests
On-Call Optimizer can automatically trigger swap requests when an availability block overlaps with an assigned shift. This can occur when:
A new block conflicting with a previously assigned shift is added to one of the member’s configured calendars
A new assignment chooses to assign a member to a shift that conflicts with an existing block
If either of these conditions occur and automatic swap requests are enabled, then On-Call Optimizer will trigger a new swap request based on the following
criteria:
If the block overlaps with more than half of the assigned shift, then a full shift swap is requested.
If the block overlaps with up to half of the assigned shift, then a partial swap for just the blocked period is requested.
In both cases, once the swap request has been triggered, the normal swap processing logic is followed to find another member able to accept the shift. The
member on whose behalf the swap is being requested will also receive a notification to let them know that the swap has been initiated.
Enabling/Disabling Automatic Swap Requests
Automatic swap requests are disabled for each member by default.
To change the state of this functionality visit your profile page by clicking the user icon in the
top-right corner of On-Call Optimizer and selecting My Profile from the drop-down list.
In the preferences section of the profile page locate the Swap Requests heading, and then toggle the slider next to the Initiate from availability item
to the desired state.
Request Processing Details
Once you confirm the details of your swap request On-Call Optimizer will begin assembling an ordered list of members who are candidates for the swap.
When determining the ordering of members, On-Call Optimizer considers the same set of factors and weights as used in the
automatic assignment algorithm including member availability, schedule balance and the distance between shifts
for a member.
Members will be given a time window within which they can respond to the request. The length of time given to each member defaults to 8 working hours,
but will be reduced as necessary in order to ensure that all remaining candidates can be given an opportunity to respond prior to the specified deadline.
When reducing the available response time window, On-Call Optimizer will not reduce the window below 4 working hours, but will instead increase the number
of members allowed to have outstanding notifications to achieve the goal of giving all members an opportunity to respond prior to the specified deadline.
If no response has been received at the end of the time window allocated to a member, On-Call Optimizer will move on
and notify further members of the schedule to request their response. Members who did not respond within their original time window are still able to respond
at any point up until the request has been completed.
Once a response that causes the request to enter the accepted state is received (e.g. a Swap or Take action) no further members are notified. In
cases where all members defer their response, or no response has been received and the deadline is approaching the request will enter a last chance
state (described further below) in which all members are re-notified.
Responding to a Swap Request
To respond to a swap request, the responding member must choose one of four available actions:
Take the shift, without swapping an existing shift. The requested shift will be reassigned to the member accepting the request. If this results in
any imbalance between members in the schedule, it will be addressed by On-Call Optimizer assigning more/fewer shifts to the appropriate members in
subsequent assignments.
Swap an existing shift. The responding member will be able to choose from a subset of their assigned future shifts that match the availability
information of the requesting member (e.g. any assigned shifts that fall within a blocked
time period will be unavailable as a swap target).
This option may be unavailable when the responding member has no assigned future shifts, all
their assigned future shifts conflict with the requesting members availability, or none of their assigned shifts
are considered equivalent to the partial shift being swapped.
Defer their response until all other members have responded. Indicating that they may consider taking the shift as a last resort, but would
prefer another solution to be found if possible. On-Call Optimizer will re-notify members who deferred their response when the request enters
into the last chance state. This option cannot be selected once the last chance state itself has been reached.
On-Call Optimizer will automatically select this option for any member whose availability information contains a
block matching the requested shift. In this case, the member will not
be notified of the request until it enters the last chance state in the case that all other members respond with a decline or
defer response.
Decline the request. Indicating that they are unable to take the requested shift.
After selecting the desired action, an optional note to explain the response can also be provided.
Once you are happy with your selection and any note, click the Confirm Response button.
The first member to respond with a “Take” or “Swap” action will cause the request to be marked as accepted.
Partial Shifts
On-Call Optimizer supports swapping part of a larger shift. To use this functionality click on the
Edit start/end time button to the right of the Shift to Swap line when creating or editing a swap request
and select the desired start/end time (which must be within the original shift selected) for the swap request.
Responders will
Other than the selection of candidate shifts for responders to swap described below, all other processing of
partial swap requests is unchanged.
Response options for a partial swap request
When responding to a swap request for a partial shift members will be presented with a list of equivalent partial
shifts assigned to them that could be swapped with the requesting member. Depending on the details of the partial
swap requested only a subset of the shifts assigned to the responding member may be considered equivalent and able
to be swapped based on the criteria below.
If none of the member’s assigned shifts are considered equivalent
to the the partial swap request the Swap response will be unavailable, however the responding member can still
choose to Take the shift without a swap.
Identifying equivalent shifts
An assigned shift for a member is considered to be equivalent for a partial swap if it starts at the same shift configuration day and time
and has the same duration as the base shift which the partial swap request originates from.
If the duration of the partial swap is less than 24 hours, weekdays are considered equivalent to each other when
matching the start day between the requested partial swap and each potential equivalent shift assigned to the
responder.
Examples
An assigned shift for Wednesday 9am to Thursday 9am, would match a partial swap request for Monday 9am-5pm period
of a base shift covering 9am Monday to 9am Tuesday.
An assigned shift for Wednesday 9am to Thursday 9am, would not match a partial swap request for Monday 9am-5pm
period of a base shift covering 9am Monday to 9am the following Monday (e.g. one week).
Swapping the current shift
On-Call Optimizer supports swap requests that change the shift that is currently occuring which can arise in two
ways:
The current on-caller initiates the swap request after the start time of the shift.
A prior swap request does not receive a response prior to the start time of the shift being swapped.
When swapping the current shift On-Call Optimizer will immediately enter the last chance mode of
processing and request an immediate response from all members of the schedule. When a member accepts the request
the swap will begin from the next minute to allow time for synchronization with any configured destinations.
Swap Request State Reference
Each swap request passes through the following states
Pending
The request has been received and is being processed by On-Call Optimizer. Notifications to each candidate member will be sent in turn and all response
actions are available to be chosen by any candidate member (including those who have not yet been notified, who may notice the request in the UI, etc).
Accepted
Either a swap or an agreement to take the shift has been found and On-Call Optimizer is currently processing the required update(s) to the assignments
of the schedule. Once a request has moved into the accepted state it cannot be changed. Other members are unable to respond in any way and the action
cannot be reversed unless a subsequent swap request for the same shift is made after the current request reaches the completed state.
Completed
The requested shift (and the shift being swapped to if present) have been successfully reassigned in the current assignment
of the schedule. The request and the swap are final. If future changes to the shift are required they must be made via further swap requests or custom
assignments of the schedule.
Last Chance
The last chance state is entered when any of the following conditions are met:
All candidate members have provided a response without any member acceepting the request, but at least one member has deferred their response.
The deadline for the request is in 4 working hours or less (in the time zone of the schedule) and one or more candidate members has yet to respond, or
has deferred their response.
The shift being swapped is the currently active shift!
When the last chance state is entered all members who have not explicitly declined the shift will be re-notified with the information that no-one has yet
accepted the shift and their further response is now required.
Overdue
If no responses are received during the last chance state, the request will become overdue once the deadline has passed. In this state, all members will
have received at least one prior notification, but no member has accepted the request, and at least one member has not yet provided a response.
The request will remain in this state until it expires with On-Call Optimizer periodically reminding any members have not yet responded (including those
that initially deferred their response) that the requesting member is still awaiting an answer.
Infeasible / Expired
These terminal states indicate that the request was unable to be completed, either because all candidate members explicitly declined the shift (Infeasible),
or the start time of the shift was reached before any member accepted the shift (Expired).
4 - Calendar Integration
Calendars provide crucial availability information for each member to On-Call Optimizer.
On-Call Optimizer relies on external calendars to provide availability information for each member of an on-call schedule.
4.1 - Connect a calendar product
Establishing an connection between On-Call Optimizer and a calendar product.
To establish a connection between On-Call Optimizer and a supported calendar product follow these steps.
1. Login to On-Call Optimizer and navigate to the Calendars section.
Select Calendars from the side bar
From the Calendars page, select Add a new calendar connection at the bottom of the page.
Click on the button corresponding to the row of the calendar product you wish to connect to. After selecting a product you will either be:
Redirected to the website of your calendar product (e.g. Google, Outlook) and asked to grant On-Call Optimizer the necessary permissions
to read your calendars. OR
Prompted to enter the configuration details required to connect to your calendar (e.g. ICS URL).
Complete the authorization process provided by the calendar product, or supply the requested configuration details to continue.
Authorization when re-connecting a calendar
If you have previously authorized On-Call Optimizer to access your calendar you may find that you are immediately taken to step 3 below without requiring
any additional configuration or authorization steps.
3. Configure which calendars to import
Once you have completed the authorization and/or configuration process On-Call Optimizer will validate that it can successfully access the new calendar
connection.
If On-Call Optimizer can successfully access the configured calendar product, you will be shown a list of calendars that are available to configure
as sources for availability information.
For each calendar use the select box to configure whether and how availability information will be imported from it.
Click Save at the bottom of the list.
Finish
Once you cilck Save, the process of importing availability information will begin in the background and may take a few minutes to complete.
You can view the status of the import for each calendar on the main Calendars page accessible via the Calendars entry in the side bar at any time.
Any imported availability information will be visible on your home page once the import process is complete.
4.2 - Configuration
Choose which calendars availability information should be created from.
Once you have established a connection between On-Call Optimizer and a calendar product you have the ability to
customize which calendars are scanned for availability information and choose how it is imported.
Accessing calendar configuration
Select Calendars from the side bar
From the list of available connections click the Edit icon at the bottom of the connection you wish to configured.
Calendar selection
Use the select box in each row to choose how events on each calendar will be imported as availability information from one of the following options:
Ignore all events
On-Call Optimizer will not process or import any events on this calendar.
Create from matching events
On-Call Optimizer will import only matching events, and will use the event type or tags (e.g. no-oncall, 'prefer-oncall) to
select the action for the created availability information.
By default only the primary personal calendar associated with the account connecting the calendar to On-Call Optimizer is selected and will be configured
to Create from matching events.
All other calendars available on the connection are ignored by default but can be enabled and configured as desired
once the connection is established.
4.3 - Availability Information
Availablity information enables shifts to be assigned around the existing commitments of each team member.
Availability information is created by matching events on the calendars that have been connected to your account and configured for import.
Each piece of availability information is described by:
The member to whom it relates.
A start time.
An end time.
An action (prefer, or block).
Block actions cause On-Call Optimizer to avoid assigning any shifts to the member between the start and end times.
Prefer actions allow members to hint to On-Call Optimizer that they would prefer to be assigned shifts between the start and end times.
Creating availability information
Availability information is created from each event found on a configured calendar after it passes initial filters and when either:
The event type indicates the event represents unavailability, OR
The title or description contains one of the recognized tags.
Events which do not match on type or tag are completely ignored.
Specific calendars can also be configured to bypass the matching process to import all events from the calendar with a fixed action.
Event types indicating unavailability
Events of the following types on a configured calendar will always be matched, and will result in availability information being created with a block action:
Out of office
Holiday
Events matched by type do not perform further tag matching. Events of a matching type will always result in availability information with a block action
in On-Call Optimizer. It is not possible to create availability information with a prefer action from an event matched by type.
Tag matching
Events containing one or more of the following tags in the title or description, will result in availability information with the corresponding action being created.
Recognized tags to create an availability block
not oncall
no oncall
not-oncall
no-oncall
noc
Recognized tags to create an availability preference
prefer oncall
prefer-oncall
Block actions will always take precedence over prefer actions where multiple tags are found on a single event, or when multiple different events with different action tags
are present with overlapping times.
Availability weighting
Availability events for each user are used in shift assignment when any minute of an availability event overlaps with any minute
of the shift. Each event overlapping with a shift contributes a score to the optimization algorithm’s consideration of
how optimal it would be to assign that shift to the user.
The score for each event is calculated starting from a base value determined by the action associated with the event, which is then weighted
against how much of the of the overall shift duration the event overlaps with using a linear calculation:
An event that overlaps with every minute of a shift will have a final weighted score the same as the base score for the event action.
An event overlapping with half the minutes will result in a final weighted score that is 50% of the base score.
An event overlapping for only a small number of minutes might result in a final weighted score that contributes only a very small score.
(e.g. for a 24-hour shift containing 1440 minutes, any overlap less than 14 minutes will contribute less than 1% of the base score).
The effect is that the assignment algorithm will block or prefer a shift for a user with availability information that overlaps any portion of the shift
when no other constraints exist - even in the case of very short overlaps. However, when resolving overlaps between availability information between users, or addressing
prior imbalances in the schedule, availability events that overlap more of a shift will have more influence than those that only overlap a small portion
of the shift.
Availability lifecycle
New availability information is imported to On-Call Optimizer from configured calendars on a regular basis to cover the time period from
the present time until 90 days in the future. Any previously imported availability information that has been removed or updated in the
source calendar will also be removed or updated as necessary in On-Call Optimizer.
Availability information will expire and be removed from On-Call Optimizer’s primary store as soon as the end time of the event is in the past.
A copy of the availability information used in each assignment of shifts is stored in the logs providing the history of each assignment event until the assignment
event expires from On-Call Optimizer based on retention duration of the organization’s plan.
Removing availability information
Individual events in the future
To remove availability information for a future time from On-Call Optimizer, update or remove the calendar event that the information is
sourced from (e.g. remove the associated holiday or out of office event, or update the event title or description to remove any
no-oncall or similar tags).
On-Call Optimizer will detect the changes on the next refresh, or you can trigger an immediate refresh on the
main Calendars page.
All future events sourced from a specific calendar
To remove all upcoming availability events sourced from a specific calendar, change the event behaviour option for that calendar in the corresponding
row of the configuration for that connection to Ignore all events. You can also disconnect a calendar product entirely from On-Call Optimizer
which will remove all events that were imported from calendars provided by that connection.
More Information
For further details on how availability information is used in shift assignment, refer to the algorithm details documentation.
4.4 - Event Filtering
On-Call Optimizer is designed and built to preserve privacy by collecting as little calendar data as possible.
Calendar data is sensitive and often contains personal details. On-Call Optimizer minimizes the amount of information
processed using filtering, matching and storing the minimum details required.
Initial Filters
On-Call Optimizer only requests event details for those calendars which have been specifically enabled.
Event details on other calendars will not be read or accessed by On-Call Optimizer even if access to them is incidentally available.
When processing events on configured calendars On-Call Optimizer filters events using the following set of criteria
The event must be organized, or accepted by the user importing the calendar as described below, AND
The event must occur within 90 days of the present date.
Any event not matching both criteria is ignored and not processed further. On-Call Optimizer does not store any details of these events.
Event ownership and acceptance
Only events that are either organized or explicitly accepted by the authenticated user are processed as sources of availability information.
Events created by other users which appear on a calendar (e.g. because you have been invited to participate in the event), will be ignored
by On-Call Optimizer until you accept the event on the calendar. This check is in place to prevent any user with the permissions to place
invited events on your calendar from being able to create availability information for you.
These rules are also applied if you configure a team or shared calendar which you have access to as a source of availabilty information
in your On-Call Optimizer account. Only those events on the shared calendar which you have directly organized, or explicitly accepted
will be imported as availability information for you in On-Call Optimizer.
Event Matching
The event matching step is skipped when you configure a calendar to import all events as block or preference actions.
Events passing the initial filter are only imported when either:
The event type indicates the event represents unavailability, OR
The title or description contains one of the recognized tags.
Refer to the availability information documentation for further details on how the matching process works.
Imported Data
Calendar events which make it through the filtering and matching process are imported into On-Call Optimizer’s database.
Imported events are stored as 4 pieces of information:
The member to whom it relates.
The start time.
The end time.
An action (prefer, or block).
On-Call Optimizer does not store any of the textual details of the event (e.g. the title or description), nor any information
about the invitees or participants.
On-Call Optimizer does not store any details of events on calendars not selected for import, or which did not pass the filter or matching stages.
4.5 - Supported Calendars
Understand which calendar products are supported by On-Call Optimizer and how to use them.
On-Call Optimizer supports the import of availability information from the products listed below.
If the calendar you use is not shown, please get in touch, and we will see if support can be added.
4.5.1 - Google Calendar
How to link a Google Calendar to On-Call Optimizer
On-Call Optimizer supports the import of availability information from one or more Google calendars.
Connection Process
To link a Google Calendar to your On-Call Optimizer account follow the connection instructions
and click the Connect Google button.
You can connect any number of Google calendars (e.g. work and personal) to a single On-Call Optimizer account so long as you have
permission to log-in and complete the authorization process with each Google account.
Updating calendar selection
You can change or update which of the accessible calendars will be used as a source of availability information following the instructions
for calendar configuration.
Disconnecting
To remove a Google Calendar connection:
Select Calendars from the side bar
From the list of available connections click the Disconnect icon at the bottom of the connection you wish to remove.
OAuth permissions
Disconnecting a calendar in On-Call Optimizer will delete all credentials to the calendar held by On-Call Optimizer and prevent any further attempts to read the calendar by On-Call Optimizer, however the OAuth grant of permissions remains in place on the Google side even though it can no longer by utilized by On-Call Optimizer.
For completeness you may want to also visit your Google Account Connections Page and revoke any permissions grants for On-Call Optimizer.
Required Permissions and Data
On-Call Optimizer uses the minimum possible set of OAuth permissions and takes steps to minimize the amount of calendar data accessed and stored.
Used to retrieve the list of available calendars to allow you to select which calendars On-Call Optimizer should process.
Used to read event information from selected calendars to match to your availability preferences.
Data accessed
On-Call Optimizer filters events to minimize the amount of information processed and retained.
4.5.2 - Microsoft Outlook
How to link a Microsoft Outlook calendar to On-Call Optimizer
On-Call Optimizer supports the import of availability information from one or more Outlook calendars.
Connection Process
To link an Outlook Calendar to your On-Call Optimizer account follow the connection instructions
and click the Connect Outlook button.
You can connect any number of Outlook calendars (e.g. work and personal) to a single On-Call Optimizer account so long as you have
permission to log-in and complete the authorization process with each Microsoft account.
Updating calendar selection
You can change or update which of the accessible calendars will be used as a source of availability information following the instructions
for calendar configuration.
Disconnecting
To remove an Outlook Calendar connection:
Select Calendars from the side bar
From the list of available connections click the Disconnect icon at the bottom of the connection you wish to remove.
OAuth permissions
Disconnecting a calendar in this way will delete all credentials to the calendar held by On-Call Optimizer and prevent any further attempts to read the calendar by On-Call Optimizer, but the OAuth grant of permissions remains in place on the Microsoft side even though it can no longer by utilized by On-Call Optimizer.
For completeness you may want to also visit one of the following pages and revoke any permissions grants for On-Call Optimizer:
On-Call Optimizer uses the minimum possible set of OAuth permissions and takes steps to minimize the amount of calendar data accessed and stored.
OAuth scopes requested
Calendars.Read
Used to retrieve the list of available calendars to allow you to select which calendars On-Call Optimizer should process.
Used to read event information from selected calendars to match to your availability preferences.
Data accessed
On-Call Optimizer filters all accessed events and only retains the description and start/end time details for matched events. No other calendar data is retained or stored.
4.5.3 - iCalendar
How to link any calendar providing an ICS feed to On-Call Optimizer
On-Call Optimizer supports the import of availability information from one any calendaring product that is able to provide a web-accessible
iCalendar feed.
Connection Process
To add an ICS feed to your On-Call Optimizer account follow the connection instructions
and click the Add ICS URL button.
Disconnecting
To remove an ICS feed:
Select Calendars from the side bar
From the list of available connections click the Disconnect icon at the bottom of the connection you wish to remove.
Supported Products
On-Call Optimizer’s ICS support is compliant with the RFC 5545 specification and should work with
any calendar product producing a valid iCalendar feed in this format. On-Call Optimizer has been specifically tested with ICS feeds generated
by the following products:
3. Select your On-Call Product and configure authentication
Click on the logo of the On-Call Product you are connecting to.
Enter your API Key in the provided field and click Continue
Screencast
Done
Once you have configured an API key, On-Call Optimizer will begin the process of connecting to the chosen product and collecting details of the available schedules. This may take a couple of minutes during which you will see a loading spinner.
5.2 - Supported On-Call Products
Understand which on-call products are supported by On-Call Optimizer and how to use them.
On-Call Optimizer supports connection with the products listed below.
If the product you use is not shown, please get in touch, and we will see if support can be added.
Synchronize On-Call Optimizer’s flexible, calendar aware on-call assignments to your PagerDuty schedules.
Import PagerDuty schedule configuration and history into On-Call Optimizer.
Enjoy automated shift swap handling synchronized from On-Call Optimizer to PagerDuty.
How it Works
On-Call Optimizer will import the list of members and shift history from a PagerDuty schedule to an On-Call Optimizer schedule.
On-Call Optimizer will maintain override entries in one or more PagerDuty schedules to synchronize the on-call shifts assigned to members
with the flexible, calendar aware assignments and swaps generated and managed by On-Call Optimizer.
From the Integrations menu, select API Access Keys from the Developer Tools column.
Click Create New API Key.
Enter a description for the key (e.g. “On-Call Optimizer”) and click the Create Key button.
The Read-only API Key checkbox must remain unchecked.
Keep the generated key in a safe place for later use. You can now proceed to the In On-Call Optimizer section below.
In On-Call Optimizer
Click On-Call Products in the side menu.
Click Create New Connection at the bottom of the page.
Click the PagerDuty logo.
Enter the API Key obtained in the previous section into the API Key field and click Continue
On-Call Optimizer will begin the connection process and present the list of available PagerDuty schedules when complete. To continue onwards from
this point, follow the Link an existing schedule getting started guide.
How to Uninstall
To remove a PagerDuty connection it must not be in use by any schedule in On-Call Optimizer.
Identify all PagerDuty linked schedules using the green PagerDuty badge that appears to the right of their name.
From the Configuration tab of the schedule, click the permanently delete link at the bottom of the page.
Enter the name of the schedule in the Confirm permanent deletion text field and click the Permanently Delete Schedule button.
Delete any destinations referencing the PagerDuty connection you want to remove
from any schedule where they are configured.
For each schedule, click the Destinations tab and review the list of configured destinations.
For each destination using the connection being removed, click the Remove button on the right-hand side.
Once the connection is no longer in use by any On-Call Optimizer schedule:
Select On-Call Products from the side menu.
Click on the unused PagerDuty connection in the list of connections.
Click the Destroy Connection button.
Additional Details
Permissions and Data Access Reference
On-Call Optimizer requires read-write PagerDuty API key to link to a PagerDuty schedule and export shifts to it as a destination.
Data accessed
On-Call Optimizer exclusively uses the Schedule and User endpoints of the PagerDuty API, and does not require access to any other API object types.
On-Call Optimizer reads the name, members and shift configuration of any available PagerDuty schedules for the purposes of presenting
a list of available schedules to the user in the On-Call Optimizer application.
For any PagerDuty schedule linked to an On-Call Optimizer schedule, On-Call Optimizer will, in addition to the basic data described above,
also read a list of assigned shifts and overrides on an ongoing basis for the purposes of maintaining and validating synchronization
between On-Call Optimizer and PagerDuty.
For any PagerDuty schedule configured as a destination, On-Call Optimizer will create and
delete override entries on the PagerDuty schedule for the purposes of bringing the PagerDuty schedule into alignment with the shift
assignments in On-Call Optimizer.
While executing the above primary functions, On-Call Optimizer will also read the list of users available in the PagerDuty account
for the purposes of mapping between the PagerDuty user ID and the user’s email address and full name which are required by On-Call Optimizer.
On-Call Optimizer does not access or store any other attributes of PagerDuty users (e.g. phone numbers or contact methods).
5.2.2 - Opsgenie
How to link Opsgenie to On-Call Optimizer
On-Call Optimizer supports the import of configuration details and the export of shift assignments to one or more Opsgenie schedules.
Connection Process
To link an Opsgenie account to your On-Call Optimizer account:
Select On-Call Products from the side menu.
From the On-Call Products page, select Create New Connection at the bottom of the page.
Click on the Opsgenie logo.
Enter your API Key in the provided field and click Continue
On-Call Optimizer will begin the connection process and present the list of available Opsgenie schedules when complete.
Opsgenie Schedules and Rotations
The data model for representing an on-call schedule and an associated set of assigned shifts differs between On-Call Optimizer and Opsgenie:
An On-Call Optimizer schedule has a single configuration describing how and when shifts rotate between members. Each shift within the schedule
may have one or more assignees (e.g. primary, secondary, tertiary).
An Opsgenie schedule can contain one or more rotations, and each rotation can have an individual configuration for both how shifts rotate between
members and the list of members for the rotation.
Alerts in Opsgenie may only be routed to a schedule, not a rotation.
Alerts routed to a schedule will be delivered to any member currently assigned to any rotation within the schedule.
To achieve the primary/secondary on-call functionality supported in a single schedule in On-Call Optimizer requires the use of two individual schedules
each with their own rotation in Opsgenie.
To provide consistent behaviour despite these differences, On-Call Optimizer uses the following process:
Only an Opsgenie schedule can be the source or destination of/for an On-Call Optimizer schedule. On-Call Optimizer cannot be configured from or targeted
to a particular rotation within an Opsgenie schedule.
When importing shifts from an Opsgenie schedule, assignees from each configured rotation within the schedule will be merged into a single On-Call
Optimizer shift in the position indicated by their ordering in the Opsgenie interface (e.g. the first rotation will take the primary role in On-Call
Optimizer, the second rotation will take the secondary role and so on).
When exporting shifts to an Opsgenie schedule, the override entries created by On-Call Optimizer in Opsgenie will not specify any particular rotation,
and will therefore apply to all rotations within the schedule. The On-Call Optimizer shift role that is exported to the override entries for each
Opsgenie schedule is selected at the time the destination is configured and can be any of the available
roles for the On-Call Optimizer schedule.
Shift end time alignment
On-Call Optimizer does not currently support importing shifts from Opsgenie schedules containing rotations whose shifts do not have matching end times.
Opsgenie Override Entries
On-Call Optimizer uses the Opsgenie override functionality to represent
the assigned shifts for each schedule. An override entry is created for each shift assigned by On-Call Optimizer resulting in continuous override coverage
being provided in the Opsgenie UI to match the schedule assigned by On-Call Optimizer.
On-Call Optimizer tracks the latest (most distant) date for which it has successfully exported assigned shifts to Opsgenie as override entries and does
not make any further modifications to overrides prior to this date unless they are directly changed in On-Call Optimizer (e.g. by replacing an earlier assignment
or using On-Call Optimizer’s swap functionality).
This allows last-minute and short-term changes to overrides (e.g. to cover a commute window from home to the office) to be made directly in Opsgenie without
conflicting with On-Call Optimizer, however if you make a planned change to the schedule in On-Call Optimizer, Opsgenie will be updated.
Pre-existing overrides in Opsgenie for dates beyond the date to which On-Call Optimizer has previously exported will be overwritten when On-Call Optimizer
exports the assigned shifts for that time period for the first time.
During normal operation the latest date exported to Opsgenie will match the shifts that have been assigned up to the configured
horizon of the On-Call Optimizer schedule. This date can always be viewed in the tooltip associated
with the destination in the bottom of the Schedule Details sidebar of any On-Call Optimizer schedule.
Disconnecting
To remove a Opsgenie connection it must not be in use by any schedule in On-Call Optimizer.
Deleted any schedules in On-Call Optimizer which are linked via the Opsgenie connection you want to remove.
Delete any other destinations using the Opsgenie connection you want to remove
from any schedule where they are configured.
Once the connection is no longer in use by any On-Call Optimizer schedule:
Select On-Call Products from the side menu.
Click on the unused Opsgenie connnection in the list on the page.
Click the “Destroy Connection” button.
Required Permissions and Data
On-Call Optimizer requires a read-write Opsgenie API key to link to a Opsgenie schedule and export shifts to it as a destination.
If destination export functionality is not required, On-Call Optimizer will work with a read-only API key, but will only be able to list and import configuration data from the available Opsgenie schedules.
Data accessed
On-Call Optimizer exclusively uses the Schedule, Schedule Rotation and Schedule Override endpoints of the Opsgenie API, and does not require access
to any other API object types.
On-Call Optimizer reads the name, members and shift configuration of any available Opsgenie schedules for the purposes of presenting
a list of available schedules to the user in the On-Call Optimizer application.
For any Opsgenie schedule linked to an On-Call Optimizer schedule, On-Call Optimizer will in addition to the basic data described above,
also read a list of assigned shifts and overrides on an ongoing basis for the purposes of maintaining and validating synchronization
between On-Call Optimizer and Opsgenie.
For any Opsgenie schedule configured as a destination, On-Call Optimizer will create and
delete override entries on the Opsgenie schedule for the purposes of bringing the Opsgenie schedule into alignment with the shift
assignments in On-Call Optimizer.
6 - Messaging
Messaging product integrations can be used to receive notifications and interact with On-Call Optimizer schedules..
On-Call Optimizer currently supports the following messaging products:
6.1 - Slack
Receive notifications and interact with your schedules from within Slack using the On-Call Optimizer Slack App.
Beta Feature
The On-Call Optimizer Slack App is currently in beta. Please get in touch to have it enabled for your organization..
The App Home provides a quick overview of the current state of your On-Call Optimizer account showing your upcoming shifts and current availability information.
The App Home is available by clicking the item with the On-Call Optimizer logo and name in the Apps section of the Slack menu sidebar.
If you do not see On-Call Optimizer in your list of apps, you can use one of the links provided on the Messaging page in your
On-Call Optimizer account to link directly to the App Home screen, after which the app will apppear in your list.
App Messages
The Messages tab located within the app’s home in Slack is a DM channel where notifications from On-Call Optimizer to you as an individual user will be delivered.
In addition to receiving your personal notifications from On-Call Optimizer via the messages tab, you are also able to use most of the app commands
described below in this channel to interact with your On-Call Optimizer account and schedules without causing noise or disruption to other users in public channels.
Inviting the app to a channel
You can invite the On-Call Optimizer Slack App to any channel using the /invite @On-Call Optimizer command, or Integrations > Add App UI within the members dialog for the channel.
Once the On-Call Optimizer App has joined the channel it will post a welcome message describing the next steps and how the app will interact with the channel. The first of these steps
will be to link one or more On-Call Optimizer schedules to the channel using the link schedule command described below. Once linked to a channel, On-Call Optimizer will deliver notifications regarding the schedule as messages to the channel when new assignments are confirmed, or new swaps are requested.
App Commands
The On-Call Optimizer Slack App supports the following commands which can issued from any channel the app is installed in using Slack’s standard @mention syntax (e.g. @On-Call Optimizer help), or from the Messages tab of the App Home in which case the @mention is not required. On-Call Optimizer does not receive or process any channel messages
that are not directed towards it via one of these methods.
list schedules
The list [all] schedules command can be used in any channel and will return details of any On-Call Optimizer schedules which have been linked to the channel.
When used with the optional all parameter, a list of any other schedules available to the user issuing the command which could be linked to the channel will also be returned.
link schedule <name>
The link schedule <name_fragment> command can be used in any channel to create a link between the named On-Call Optimizer schedule and the current channel. The primary purpose
of linking a schedule to a channel is to subscribe the channel to receive notifications regarding events on the schedule.
The schedule to link can be specified as any fragment of a schedule name (as shown by the list schedules command) that uniquely identifies a single schedule.
notification config
The notification config command displays the current notification settings for each schedule linked to the channel. Notifications which are enabled for delivery to the channel
will be shown with a ✔. Notifications which are disabled for delivery to the channel will be shown with a ✘.
The name of the notification is show in CamelCase immediately following the status indicator and can be used with the enable and disable commands described below to control
which notifications are received.
When issued with a single parameter notification_name, the named notification will be enabled or disabled for delivery to the channel for all linked schedules.
When issued with the second schedule_fragment_name parameter, the named notification will be enabled or disabled only for the schedule that matches the specified name.
To find the name of the notification for use with this command, use the notification config command described above or check the context footer of any notification message.
help
The help command displays a brief summary of the available commands and a link to this page.
First time setup
Installation
To enable any of the functionality described on this page, the On-Call Optimizer Slack App must be installed in your Slack workspace. To do so, follow the instructions below:
Visit the Messaging page in your On-Call Optimizer account and click the Add to Slack button
On-Call Optimizer will display a message confirming that your Slack and On-Call Optimizer accounts have been successfully connected in the On-Call Optimizer web interface,
and as a message in Slack.
Connect Accounts
The first time each user attempts to use the On-Call Optimizer Slack App they will be prompted to connect their On-Call Optimizer account to their Slack account
using the following process:
View the App Home screen in slack. (If you need help finding it, use the links provided on the Messaging page in your
On-Call Optimizer account).
Click the Connect Account button shown at the bottom, you will be redirected to a page in On-Call Optimzer.
If required, complete the On-Call Optimizer login process.
On-Call Optimizer will display a message confirming that your Slack and On-Call Optimizer accounts have been successfully connected.
You can verify the status of the connection in future by visiting On-Call Optimizer’s App Home in Slack (which will only function if the connection has been established),
or by clicking the Messaging link in the On-Call Optimizer menu sidebar.
7 - Reference
Detailed reference information for technical users of On-Call Optimizer.
Please refer to the following pages for detailed information on how On-Call Optimizer operates.
7.1 - Example configurations
Examples of how to configure Schedules
Using basic and nested schedules, it is possible to create almost any configuration of on-call schedule that you require as demonstrated by the examples below.
If none of these examples meet your needs, and you need help creating a schedule to match your requirements, please get in touch.
7.1.1 - Weekly Shift
Demonstrates a simple schedule changing between members once a week at a specified date and time.
This configuration results in On-Call Optimizer balancing team members using a single shift type covering 7 days.
While this is a common rotation pattern for many teams, the full benefits of On-Call Optimizer will not be experienced in this configuration due to the limited number of shifts available to be matched to team member constraints and preferences.
It is recommended that you consider migrating to one of the later examples in the configuration library which provide more flexibility to schedule around team member constraints and preferences.
This configuration results in On-Call Optimizer balancing team members using a single shift type covering each 24
hour period, with no differentiation made between weekdays and weekends in the balancing process.
Typically each member should be assigned similar numbers of shifts for each different day of the week by the default behaviour of On-Call Optimizer’s
algorithm, however if team members persistently block or prefer particular days (e.g. weekends) via their
availability information, other members may find themselves consistently assigned to
particular days of the week without any schedule imbalance arising.
Enforcing Weekday vs Weekend Balance
An alternative configuration that ensures all team members are assigned balanced weekday and weekend day shifts despite individual preferences would be:
Day:
Hour:
Minute:
Primary:
Secondary:
Weekdays
09
00
BEST_MEMBER
[Not assigned]
Weekends
09
00
BEST_MEMBER
[Not assigned]
This configuration results in On-Call Optimizer using two shift types for balancing purposes which contain:
All 24-hour duration shifts starting Mon-Fri.
All 24-hour duration shifts starting on Sat and Sun.
On-Call Optimizer aims for each member to have a balanced share of the shifts within each shift type.
7.1.3 - Business hours only shifts (schedule contains gaps)
Demonstrates a schedule assigning members only during business hours with gaps in between the shifts.
In situations where out-of-hours coverage is not required, you can create a schedule which only assigns members
during particular time periods, leaving gaps with no assignee(s) scheduled at all other times.
The following example demonstrates a shift configuration that will create shifts covering Mon-Fri 9am-5pm in the
schedule’s time zone. No shift or assignee will be available outside those times.
7.1.5 - Separate business and after-hours shifts (delegated to a partner team)
Demonstrates a schedule with after-hours shifts handled by a different partner team.
This schedule configuration is commonly used when two teams in different time-zones are able to provide
coverage during different hours of the day.
Note how (unlike the basic after hours) example where every day of the week is treated the same,
this example also demonstrates the use of the Weekdays wildcard in the shift configuration to achieve the result of having Saturday
and Sunday also treated as after-hours and assigned to the partner team for the full 48-hour period.
This configuration results in On-Call Optimizer balancing team members in a very similar way to the business hours example,
using a single shift type covering each 8 hour period on Mon-Fri.
There are two additional shift types (16-hour overnight shifts, and 64-hour weekend shifts) assigned to the partner team in the main schedule, however
as explained below, these shift types are not used for balance and assignment purposes.
Partner Team Schedule
The shifts delegated to the partner team will be assigned in the final output of this schedule by referencing the existing assignments of the referenced partner
schedule which are unchanged by the fact that it has been referenced from this schedule. This allows the partner team to use any rotation configuration they like,
independently of any scheduling choices made in the the main schedule.
In this example, the partner team is using the Simple Daily Rotation configuration which assigns a single
shift per day, and therefore will continue to aim to assign a balanced number of daily shifts to each member.
Fully Rendered Schedule
When viewed in the On-Call Optimizer web UI, or exported to an on-call products the “fully rendered” schedule combining the above two rotations will be as follows:
2023-07-24 09:00 person2@example.com # Mon2023-07-24 17:00 member2@example.com # Mon 10:00 in partner-rotation America/Los_Angeles2023-07-25 09:00 person1@example.com # Tue2023-07-25 17:00 member1@example.com # Tue 10:00 in partner-rotation America/Los_Angeles2023-07-26 09:00 person3@example.com # Wed2023-07-26 17:00 member3@example.com # Wed 10:00 in partner-rotation America/Los_Angeles2023-07-27 09:00 person2@example.com # Thu2023-07-27 17:00 member2@example.com # Thu 10:00 in partner-rotation America/Los_Angeles2023-07-28 09:00 person3@example.com # Fri2023-07-28 17:00 member3@example.com # Fri 10:00 in partner-rotation America/Los_Angeles2023-07-29 17:00 member3@example.com # Sat 10:00 in partner-rotation America/Los_Angeles2023-07-30 17:00 member1@example.com # Sun 10:00 in partner-rotation America/Los_Angeles2023-07-31 09:00 person1@example.com # Mon2023-07-31 17:00 member2@example.com # Mon 10:00 in partner-rotation America/Los_Angeles
Demonstrates a schedule balancing two 12-hour shifts between a UK and US west coast pair of teams.
This schedule configuration enables each team to have the majority of their on-call hours within typical day/waking hours.
It involves 3 separate schedules, one for each of the local teams and a third schedule which is then used to co-ordinate and
join the local schedules together.
Main Schedule Shift Configuration Entries
The main schedule is configured in the America/Los_Angeles time zone and uses a simple shift configuration pattern that
rotates between a nested schedule for each team at the appropriate time each day.
The London team’s schedule is configured in the GMT time zone and the team has chosen to schedule themselves using a
4 day/3 day split across the week.
Day:
Hour:
Minute:
Primary:
Secondary:
Mon
06
00
BEST_MEMBER
[Not assigned]
Fri
06
00
BEST_MEMBER
[Not assigned]
The 06:00 UTC shift start time is selected to match the 22:00 America/Los_Angeles shift start time in the main schedule.
When viewed in the On-Call Optimizer web UI, or exported to an on-call products the “fully rendered” schedule combining combining all of the above configuration will result in the following shifts:
Demonstrates a schedule balancing three 8-hour shifts that follow the sun around the globe.
In this example there are 3 teams, one in London, one in Sydney and one in San Francisco, who work together to provide an overall
on-call schedule. The London and San Francisco teams are equally sized and participate every day of the week, while the Sydney
team with fewer people only participates during their week days, with the weekend shifts covered only from London and San Francisco.
As with the more basic follow the sun example this example is constructed
with one schedule per team, combined with a fourth co-ordinating schedule that is used to provide the overall schedule.
Main Schedule Shift Configuration Entries
The main schedule is configured in the Australia/Sydney time zone in order to easily highlight the shift start times that relate to weekend
coverage being provded in London and San Francisco.
The first 3 shift configurations follow a simple repeating pattern for each of the weekdays, while the final 3 shift configuration entries
deal with the slightly more complex set of shifts required to implement the different shift lengths for London and San Francisco that are
required to provide the desired weekend coverage.
When viewed in the On-Call Optimizer web UI, or exported to an on-call products the “fully rendered” schedule combining all the individual shifts will be as follows:
# Rendered in UTC2023-07-24 00:00 person2@example.com # Mon 10am SYD / Sun 5pm SFO / Mon 1am LON2023-07-24 08:00 london-member1@example.com # Mon 6pm SYD / Mon 1am SFO / Mon 9am LON2023-07-24 16:00 member2@example.com # Tue 2am SYD / Mon 9am SFO / Mon 5pm LON2023-07-25 00:00 person2@example.com # Tue 10am SYD / Mon 5pm SFO / Tue 1am LON2023-07-25 08:00 london-member1@example.com # Tue 6pm SYD / Tue 1am SFO / Tue 9am LON2023-07-25 16:00 member1@example.com # Wed 2am SYD / Tue 9am SFO / Tue 5pm LON2023-07-26 00:00 person2@example.com # Wed 10am SYD / Tue 5pm SFO / Wed 1am LON2023-07-26 08:00 london-member1@example.com # Wed 6pm SYD / Wed 1am SFO / Wed 9am LON2023-07-26 16:00 member3@example.com # Thu 2am SYD / Wed 9am SFO / Wed 5pm LON2023-07-27 00:00 person2@example.com # Thu 10am SYD / Wed 5pm SFO / Thu 1am LON2023-07-27 08:00 london-member1@example.com # Thu 6pm SYD / Thu 1am SFO / Thu 9am LON2023-07-27 16:00 member4@example.com # Fri 2am SYD / Thu 9am SFO / Thu 5pm LON2023-07-28 00:00 person2@example.com # Fri 10am SYD / Thu 5pm SFO / Fri 1am LON2023-07-28 08:00 london-member3@example.com # Fri 6pm SYD / Fri 1am SFO / Fri 9am LON2023-07-28 16:00 member3@example.com # Sat 2am SYD / Fri 9am SFO / Fri 5pm LON2023-07-29 05:00 london-member3@example.com # Sat 3pm SYD / Fri 10pm SFO / Sat 6am LON2023-07-29 17:00 member4@example.com # Sun 3am SYD / Sat 10am SFO / Sat 6pm LON2023-07-30 05:00 london-member3@example.com # Sun 3pm SYD / Sat 10pm SFO / Sun 6am LON2023-07-30 17:00 member1@example.com # Mon 3am SYD / Sun 10am SFO / Sat 6pm LON2023-07-31 00:00 person3@example.com # Mon 10am SYD / Sun 5pm SFO / Mon 1am LON
Learn how On-Call Optimizer creates balanced schedules using availability information.
On-Call Optimizer uses constraint programming algorithms to
solve the challenge of producing an optimal schedule.
Goals
To determine what an optimal schedule looks like, On-Call Optimizer is programmed with a series of goals that are desired
for a schedule. A perfect schedule would meet every goal, an optimal schedule comes as close as possible to meeting each goal given
the constraints dictated by the shift configuration of the schedule and the
availability information for each of the members.
The goals that On-Call Optimizer tries to achieve focus on maximizing the balance of the schedule over the mid to
long term, while also maintaining the quality of each individual assignment in the short term.
Typical goals that On-Call Optimizer tries to achieve include:
On-Call Optimizer uses a constraint satisfying algorithm to find an solution (aka assignment) that is both feasible
and comes closest to meeting each goal.
The input to the algorithm starts with a set of variables referenced by a tuple of (start time, assignee role, member).
So for an example assignment for a single primary assignee in a schedule of 5 members for 7 shifts, there will be 35
different shift variables input into the algorithm.
Next hard constraints which determine whether or not a particular assignment is feasible or not are configured. In the simplest case
the only hard constraint would be that the sum of all variables matching (start time, assignee type, *) must be equal to 1 - e.g. only
solutions that assign a single member to a shift are feasible.
After the hard constraints additional constraints representing each desired goal for the schedule are configured. Goal based constraints
utilize a weight factor rather than requiring equality to a fixed value and match against particular combination of shift variables that
are set to represent each potential solution, A score is calculated for each constraint in each potential solution by multiplying the value
of the matching shift variables against the weight of the constraint. The overall sum of these scored constraints is reported as the “cost”
of the assignment solution, and the assignment solution with the lowest overall cost represents the optimal assignment given the set of inputs.
Example weighting factors
Illustrative weighting factors for the typical goals above might look like the following:
Any assignment matching a blocked shift: >2.0, ensuring that such assignments are only ever used as a last resort if no other possibilities exist.
Any shift assignment above or below the ideal balance are penalized: 1.0
Any assignment of a preferred shift: -0.5, the negative weighting results in a favourable score, making any assignment containing this shift preferred over an assignment that does not.
Any consecutive shift assignment for a member: 0.3
In practice the specific weighting factors used are much more complex and are selected based on On-Call Optimizer’s accumulated
expertise of the ideal weightings for different schedule configuration patterns.
BEST_MEMBER
The “BEST_MEMBER” placeholder is used in the shift configuration for each schedule to denote
that the assignee for the specified shift should be chosen from among the members of the schedule based on the output of the above algorithm.
Therefore the “BEST_MEMBER” for a shift will be the member assigned to the shift variable for that shift in the solution that resulted in the
lowest overall cost.
Importantly “best” does not mean “perfect”. In situations where there are competing constraints, the best solution may require assigning
a member to consecutive shifts or ignoring their preferences in order to achieve an overall optimum assignment.
7.3 - Extension logic
Learn how On-Call Optimizer generates future shift entries
On-Call Optimizer shifts are defined by the day of the week, hour and minute at which they start (e.g. Mon 10:00) and therefore no shift
can ever be longer than 7 calendar days. The following details describe at a high-level how On-Call Optimizer uses this configuration
data to generate specific shifts with fully-defined start and end times.
Basic procedure
Given a starting timestamp:
Loop through all defined shift configurations; discard any with a starting day that does not match the weekday.
From the remaining shift configurations; discard any with a starting hour before the hour of the day.
From the remaining shift configurations; discard any with a starting minute before the minute of the hour.
Sort any remaining shift configurations by hour, then minute in ascending order and then select the first (earliest hour, minute).
The Day, Hour and Minute from this selected configuration is the starting time of the next shift in the schedule.
If no matching shift configurations remains, advance the timestamp to the end of the day (00:00 next day) and repeat the process.
Use
The basic procedure can be used directly with an arbitrary timestamp to find the starting time of the next shift in the schedule.
To find the starting time of the shift that will follow an existing shift in the schedule, the procedure must be executed with the starting
timestamp set to 1 minute after the starting time of the shift to be followed - any end time for the existing shift should be ignored. See
the example below for an illustration of why this is important.
All time and date calculations during the extension process must be performed with respect to the time zone of the schedule itself.
Matching of day wildcards
A shift configured with the day set to the Daily wildcard will match any timestamp.
A shift configured with the day set to the Weekdays wildcard will match any timestamp, where the abbreviated name of the day of the week (e.g. %a strftime(3) component) in the time zone of the schedule is one of the Mon-Fri set.
A shift configured with the day set to the Weekends wildcard will match any timestamp, where the abbreviated name of the day of the week (e.g. %a strftime(3) component) in the time zone of the schedule is one of Sat or Sun.
Examples
For simplicity these examples do not display the time zone, which is not relevant but can be assumed to be UTC.
Basic
Assuming a shift configuration of Mon 10:00, Fri 17:00, when executed for the week starting April 1st 2024, the next 4 returned shifts
would be:
2024-04-01 10:00
2024-04-05 10:00
2024-04-08 10:00
2024-04-12 10:00
This provides a schedule with a ~5-day shift covering the working week, and a ~2-day shift covering the weekend.
Daily and Weekends
Assuming a shift configuration of Daily 10:00, Weekends 22:00, when executed on April 4th 2024, the next 7 returned shifts
would be:
2024-04-04 10:00
2024-04-05 10:00
2024-04-06 10:00
2024-04-06 22:00
2024-04-07 10:00
2024-04-07 22:00
2024-04-08 10:00
This provides a schedule with 24-hour shifts during weekdays, but adds an additional “overnight” shift on weekends resulting in a split
of each weekend day (Sat, Sun) into two 12-hour shifts.
Extension after configuration change
This example explains why it is important to extend from 1 minute after the start of the final existing shift, rather than
from the end of the existing shift.
Moving the expected start time back by 1 hour creates an ambiguous situation for the schedule, either the next shift needs to start 1 hour
prior to the end of the existing last shift, or if the end of the last shift is strictly observed and extension begins from 10am on Monday
the 8th, the next starting time is not until 9am the following Monday, creating a 7-day gap in the schedule!
While either scenario will likely require user input to resolve and confirm the desired intention, On-Call Optimizer prefers to generate
schedules that provide continuous coverage and therefore adopts the rule describe above - extension starts from the minute after the last
existing shift starts, resulting in shifts that overlap the existing schedule by returned.
7.4 - Authentication and Authorization
Authentication and authorization with third-party integrations
On-Call Optimizer exclusively uses OAuth and OIDC for authorization and authentication, there is no support for accessing On-Call Optimizer via username/password.
On-Call Optimizer adheres to the principle of least privilege, requesting only the minimum OAuth permissions and scopes required to complete the
action requested following the principle of incremental authorization. This allows users to mix and match between different providers without needing to grant an overly wide set of permissions to On-Call Optimizer.
Permissions requested at Login
On-Call Optimizer requests an OIDC login flow from the authentication provider requesting the OIDC standard email and profile grants. On-Call Optimizer stores the email and name returned in the provided ID token.
When logging in with a Google Workspace, or Microsoft organizational account, On-Call Optimizer will also retrieve and store the ID, name and primary domain
of the workspace/organization of your account in order to create and associate your On-Call Optimizer account with a corresponding On-Call Optimizer Organization.
For Microsoft accounts the User.Read permission is requested in order to retrieve this information as it is not included directly in the ID token.
All other information available to On-Call Optimizer during the login process is discarded. In particular, once the login process has completed, On-Call
Optimizer does not retain or store the access or refresh tokens provided by the OIDC login flow.
Permissions requested when connecting a calendar
When connecting to a calendar provider, On-Call Optimizer uses a standard OAuth 2.0 authorization code flow to obtain a read-only access token, along
with an offline access (refresh) token to allow continuing access to the users calendar.
Permissions requested when connecting an on-call product
On-Call Optimizer uses API tokens for access to any configured on-call product schedules. A read-only API token is supported when an on-call product is
used a a source for On-Call Optimizer schedule configuration. A read-write API token is required when an on-call product is configured as a destination for
a schedule.
Permissions requested when connecting to Slack
When the On-Call Optimizer Slack app is installed for a Slack Workspace, On-Call Optimizer receives an OAuth 2.0 access and refresh token which are used to
access the Slack API. The following scopes are required for the On-Call Optimizer Slack app:
app_mentions:read - to allow the app to receive app_mention notifications, in order to respond when the app is directly mentioned.
channels:read, groups:read, im:read - to allow the app to receive member_joined_channel and member_left_channel events in order to keep track of the channels it has been invited to be present in, and to make conversations.info API requests to retrieve the name of those channels. On-Call Optimizer only receives these events and requests information for channels which it has been invited to join.
im:history - to allow the app to receive message.im notifications when a user directly interacts with the app from the messages tab of the App Home surface. On-Call Optimizer does not make any API requests using this scope.
reactions:read, reactions:write - to allow the make reactions.* API requests in order to provide reactions indicating the status of On-Call Optimizer’s response to a command request issued by a user. On-Call Optimizer does not read or write reactions to any other messages.
[0]: The OIDC protocol includes the offline access scope by default, however On-Call Optimizer does not retain the provided refresh (or access) tokens,
so no offline access is available to On-Call Optimizer, even though the permissions screen seen by the user indicates it may be.
[1]: Refer to the calendar provider for details on the specific scope name: Google, Outlook
7.5 - Integration Points
On-Call Optimizer provides numerous integration points to enable interoperation with other software.
On-Call Optimizer supports email notifications for new assignments and new swap requests.
On-Call Optimizer has an integrated Slack App which in addition to providing notification and messaging functionality, also allows interaction with On-Call Optimizer
schedules from within the Slack UI.
Additional Integrations
Additional integrations will be added as demand and development capability allow.
Please contact us, if you would like to request integration with a product not yet supported.
API and Event Notifications
On-Call Optimizer functionality can be made available via API or event (e.g. webhook) based methods upon request.
7.6 - Notifications
Discover available notifications and how to configure when and how On-Call Optimizer will notify you of relevant events.
Notification Philosophy
On-Call Optimizer aims to provide relevant and useful notification of key events and situations to all interested parties while minimizing unnecessary
distraction and noise. To achieve this aim On-Call Optimizer provides a highly configurable notification framework which recognizes that what is relevant
varies can vary significantly between individuals, teams and schedules!
This page describes the available notifications that On-Call Optimizer can generate, how they can be customized and how they are configured.
Notification Methods
To select your preferred notification method, use the selector on the profile page (also accessible by clicking the user icon in the top
right corner of On-Call Optimizer and selecting My profile from the drop-down menu).
By default, all users will be notified via email, to the address associated with the account used to login.
Some users of On-Call Optimizer may also have the option to receive notifications via Slack. Slack notifications are available to members with an organization linked account where
the organization in On-Call Optimizer has been linked to a Slack workspace. Details on whether these conditions are met can be found by clicking the Messaging item from the
Integrations section of the menu sidebar.
On-Call Optimizer supports email notifications for new assignments and new swap requests.
On-Call Optimizer has an integrated Slack App which in addition to providing notification and messaging functionality, also allows interaction with On-Call Optimizer
schedules from within the Slack UI.
Additional Integrations
Additional integrations will be added as demand and development capability allow.
Please contact us, if you would like to request integration with a product not yet supported.
API and Event Notifications
On-Call Optimizer functionality can be made available via API or event (e.g. webhook) based methods upon request.
7.7 - Organization Support
Providing consistent visibility and management of schedules and users across your organization.
Organization support in On-Call Optimizer provides many benefits for larger teams including the ability for members
to view schedules within the organization that they are not directly members of.
Organization Basics
An organization in On-Call Optimizer is inherited from the organizational information provided by the login identify provider.
When the identity token resulting from a successful login provides organizational metadata your On-Call Optimizer account will
be associated with the corresponding organization entity in On-Call Optimizer.
The supported organizational identity providers are:
Google Workspace
Microsoft Work accounts with an associated organization.
On-Call Optimizer’s organizational features cannot be used when authenticating from a consumer Gmail or Outlook personal account.
To check whether your On-Call Optimizer account is associated with an organization, click on the profile icon in the top right corner
of the app. Organization accounts will show an organization icon and name between your name and email and the ‘My profile’ link. If you
do not see this entry, your On-Call Optimizer account is not associated with an organization.
Organizational details can be viewed on the organization profile page which is accessible by clicking on the link in the user profile
menu described in the previous paragraph.
Organization Resource Ownership
Most resources (including Schedules, On-Call Product and Messaging integrations) created by an On-Call Optimizer account belonging to an
organization will be owned by the organization rather than the individual.
The only exception to this are Calendar integrations, which by their nature are always owned by the individual who created them.
Organization Best Practices
Multiple administrators
We recommend you configure two or more users as Organization Admins to ensure there are no single points of failure.
To change the roles for users in your organization:
Select the organization entry in the profile menu in the top-right corner of the page.
Find the appropriate member in the table under the ‘Members and Roles’ heading.
Change the role of the member to ‘Admin’ using the select box on the corresponding line.
Organization Roles
Each member of an organization in On-Call Optimizer belongs to a role which grants permissions to perform certain actions. The available
roles are:
Organization Admin
Can participate in the schedules they have been added to according to their assigned
schedule role.
Can change the organization role of any member of the organization.
Are automatically granted all of the organizational permissions available to members described below.
The first user to login to On-Call Optimizer from an organization will be assigned the organization admin role, subsequent users will be
assigned as organization members.
Organization Member
Organization members can participate in the schedules they have been added to according to their assigned
schedule role.
The organization member role can also be granted any or all of the following permissions on the organization:
View all schedules - Defaults to true. Allows members of your organization to view schedules in the organization
that they are not members of.
Manage schedules - Defaults to false. Allows members of your organization to create schedules, and delete schedules
on which they hold the schedule admin role.
Manage Integration Connections - Defaults to false. Allows members of your organization to create, update and delete integration
connections such as On-Call and Messaging products.
8 - Frequently Asked Questions
Find answers to common questions about On-Call Optimizer.
How good are the generated schedules?
The quality of each generated schedule depends primarily on the degree of constraint created by the
availability information On-Call Optimizer is working with
for a schedule.
On-Call Optimizer is capable of generating an optimal schedule that completely meets each of the goals, but more commonly a perfect
schedule is not available with the given inputs and the weights must be used to determine how to prioritize against the goals.
On-Call Optimizer provides detailed scoring data for the generated assignments to help you understand this process and what could be
changed to improve the generated schedules if you are not happy with the quality.
To maximise On-Call Optimizer’s ability to generate optimal schedules, it is recommended that you consider using shorter shift lengths (e.g. 12hrs, 1 day) rather than longer shifts (e.g. entire week) as this provide more opportunities to schedule around the constraints of team members while maintaining fairness and respecting preferences.
Can additional logic be be added to the algorithm?
Yes! Subject to prioritization against other feature requests and roadmap items, we are very happy to consider adding further goals or constraints for the optimizer to consider.
Get in touch by filling out the form at the bottom of the page and let us know what you would find useful.
9 - What's New
On-Call Optimizer is continuously improving. Get the details on the latest changes and updates.
SOC2 Compliance
On-Call Optimizer’s SOC2 Type II report has been issued providing third party validation of our commitment to security & compliance
and demonstrating how important it is to use to build, earn and retain our customer’s trust.
If you require a copy of our SCO2 report please request access to our trust center, or read the
blog post for more details.
Configurable time/date format
A new user setting has been added to provide choice over how dates and times are presented. The setting can be found on your
profile page (accessible by clicking the user icon in the top-right corner of the
application, and selecting My Profile).
The available time formats are:
Friendly (default): Thu 05 Jun 2025 09:18
Concise: 2025-06-05 09:18
Concise with day: Thu 2025-06-05 09:18
Regardless of the format chosen, hovering on any time/date displayed in On-Call Optimizer will continue to show a detailed description
of the time/date including the timezone.
Swap cancellation
Cancelled swap requests are now retained in On-Call Optimizer and can be viewed in their cancelled state - previously when cancelling a swap
request it was immediately deleted leaving no trace in the application.
This means that clicking on a notification link for a swap that has since been cancelled no longer results in a page not found error!
Automatic cancellation
Swap requests where the shift being swapped is no longer assigned to the requesting member are now automatically cancelled. The requesting
member will receive a notification when this occurs.
Calendar Improvements
Importing events from a calendar provider user account with a different email address from the
email address of the On-Call Optimizer account is now supported (e.g. linking your personal user.personal@gmail.com calendar to your
work On-Call Optimizer account - user@company.com).
Events organized or accepted by either your On-Call Optimizer email or the
email of the connected calendar account will be imported by On-Call Optimizer.
Calendars can now be configured to block or prefer all accepted events. For example, if you have a specific calendar containing only events
you are unavailable for, you can configure
On-Call Optimizer to create an availability block for each event imported from that calendar without needing to add individual “no-oncall”
tags to each event.
The new behaviour can be configured on a per-calendar basis instead of the existing behavior of importing only matching events,
which remains the default choice for existing calendars.
The calendar configuration screen has a new drop-down replacing the old toggle button to allow configuration of the new behaviour while
also preserving the existing behaviour.
Support for aliasing user email addreses and organization domain names between On-Call Optimizer and external systems has been added. This
enables use of On-Call Optimizer in cases where the email address of the account used to login to On-Call Optimizer does not align with the
email address used in an on-call product (e.g. user@company.com has an account under user@company.co in Pagerduty).
User and Domain aliases are an advanced feature not exposed by default - please contact us if you need this enabled on your account.
Bugfixes and minor changes
Added help tooltips to schedule and assignment configuration views.
Fixed a regression that prevented assignee options for assignment groups being shown in the shift configuration.
Improved matching of shifts to exported overrides in external on-call products, in particular multiple consecutive overrides at a provider
which are equivalent to a single shift in On-Call Optimizer are now recognized without triggering the need to be deleted and re-created.
Fixed bug that showed the child schedule name rather than the actual assignee when viewing the shift of a parent schedule assigned to a
nested child schedule.
Optimized the layout of availabilty events on the member availability calendar to use less vertical space and improve the visual appearance.
Fixed display of calendar cells with many events. If more than 5 rows of events need to be displayed in any cell, a link
to display a popup window showing the remaining events will appear at the bottom of the cell.
Fixed time zone handling in the calendar to always use the configured time zone for the current user when grouping events
into days.
The red/green color used for block/preference display on the member availability calendar has been improved to a less
saturated value more in keeping with the rest of the calendar event colors.
The export synchronization process has been improved to prevent a difference being reported when the shifts being exports from On-Call Optimizer
are already present in the external destination in a slightly different form (e.g. a 2-day shift on On-Call Optimizer would previously require an
identical 2-day override in the external destination, but will now accept 2 1-day overrides if their start/end times and assignees otherwise match
what On-Call Optimizer would export).
For more details on older changes, please select a month from the list below.
9.1 - June 2025
Changes and updates released in June 2025
SOC2 Compliance
On-Call Optimizer’s SOC2 Type II report has been issued providing third party validation of our commitment to security & compliance
and demonstrating how important it is to use to build, earn and retain our customer’s trust.
If you require a copy of our SCO2 report please request access to our trust center, or read the
blog post for more details.
Configurable time/date format
A new user setting has been added to provide choice over how dates and times are presented. The setting can be found on your
profile page (accessible by clicking the user icon in the top-right corner of the
application, and selecting My Profile).
The available time formats are:
Friendly (default): Thu 05 Jun 2025 09:18
Concise: 2025-06-05 09:18
Concise with day: Thu 2025-06-05 09:18
Regardless of the format chosen, hovering on any time/date displayed in On-Call Optimizer will continue to show a detailed description
of the time/date including the timezone.
Swap cancellation
Cancelled swap requests are now retained in On-Call Optimizer and can be viewed in their cancelled state - previously when cancelling a swap
request it was immediately deleted leaving no trace in the application.
This means that clicking on a notification link for a swap that has since been cancelled no longer results in a page not found error!
Automatic cancellation
Swap requests where the shift being swapped is no longer assigned to the requesting member are now automatically cancelled. The requesting
member will receive a notification when this occurs.
Calendar Improvements
Importing events from a calendar provider user account with a different email address from the
email address of the On-Call Optimizer account is now supported (e.g. linking your personal user.personal@gmail.com calendar to your
work On-Call Optimizer account - user@company.com).
Events organized or accepted by either your On-Call Optimizer email or the
email of the connected calendar account will be imported by On-Call Optimizer.
Calendars can now be configured to block or prefer all accepted events. For example, if you have a specific calendar containing only events
you are unavailable for, you can configure
On-Call Optimizer to create an availability block for each event imported from that calendar without needing to add individual “no-oncall”
tags to each event.
The new behaviour can be configured on a per-calendar basis instead of the existing behavior of importing only matching events,
which remains the default choice for existing calendars.
The calendar configuration screen has a new drop-down replacing the old toggle button to allow configuration of the new behaviour while
also preserving the existing behaviour.
Support for aliasing user email addreses and organization domain names between On-Call Optimizer and external systems has been added. This
enables use of On-Call Optimizer in cases where the email address of the account used to login to On-Call Optimizer does not align with the
email address used in an on-call product (e.g. user@company.com has an account under user@company.co in Pagerduty).
User and Domain aliases are an advanced feature not exposed by default - please contact us if you need this enabled on your account.
Bugfixes and minor changes
Added help tooltips to schedule and assignment configuration views.
Fixed a regression that prevented assignee options for assignment groups being shown in the shift configuration.
Improved matching of shifts to exported overrides in external on-call products, in particular multiple consecutive overrides at a provider
which are equivalent to a single shift in On-Call Optimizer are now recognized without triggering the need to be deleted and re-created.
Fixed bug that showed the child schedule name rather than the actual assignee when viewing the shift of a parent schedule assigned to a
nested child schedule.
Optimized the layout of availabilty events on the member availability calendar to use less vertical space and improve the visual appearance.
Fixed display of calendar cells with many events. If more than 5 rows of events need to be displayed in any cell, a link
to display a popup window showing the remaining events will appear at the bottom of the cell.
Fixed time zone handling in the calendar to always use the configured time zone for the current user when grouping events
into days.
The red/green color used for block/preference display on the member availability calendar has been improved to a less
saturated value more in keeping with the rest of the calendar event colors.
The export synchronization process has been improved to prevent a difference being reported when the shifts being exports from On-Call Optimizer
are already present in the external destination in a slightly different form (e.g. a 2-day shift on On-Call Optimizer would previously require an
identical 2-day override in the external destination, but will now accept 2 1-day overrides if their start/end times and assignees otherwise match
what On-Call Optimizer would export).
9.2 - May 2025
Changes and updates released in May 2025
Calendar UI default
On-Call Optimzer now defaults to a calendar view to display the assignments and shifts for a schedule and associated information such as
the availability of members.
This updated UI provides significant usability improvements and is the result of several months of testing and interation with a dedicated
group of testers and early adopters.
Improved assignment quality for schedules with secondary assignees by fixing a bug in the calculation of how far apart each member’s
shifts are expected to be spread.
Email generated by On-Call Optimizer is now sent with headers to prevent auto-replies from being generated.
9.3 - April 2025
Changes and updates released in April 2025
Availability details and historical member visibility
Quality and balance details (including availability) displayed for future shifts now reflect the live state of the schedule:
Availability information added/removed since the shift was assigned will be reflected in the shift popup
making it easier to see at a glance the up-to-date status of who may be able to take or swap the shift.
Members removed from the schedule since the assignment will not be shown in the availability or balance details.
A snapshot of the availability and balance details at the time the assignment was confirmed remains available when viewing the assignment directly via the ‘Assignments’
tab of the schedule.
Past members can also be included in balance tables on any assignment (live or historical) by clicking the ‘Show historic members and shifts’
link below the table.
Bugfixes and minor changes
The following bug fixes and minor changes were also released in April 2025.
Changed the background and text colors used for calendar events to improve constrast ratios for better readability.
Simplified assignee names by trimming the domain portion (after the @) of an assignee’s email address when it matches the domain of the organization.
Reworded historical assignment descriptions to more clearly explain the contents and mechanism of confirmation.
9.4 - March 2025
Changes and updates released in March 2025
The following changes were released to On-Call Optimizer in March 2025
Assignment Groups
Assignment Groups provide a way to limit the members eligible to be assigned to a shift to a subset of the members in the schedule.
This allows for common use-cases such as gradually introducing new members to the schedule or reducing the workload of team
members with additional duties to be managed directly within the schedule, where previously supporting these use-cases required creating additional
nested schedule.
The nested schedule functionality remains available and can also be used together with assignment groups as required.
Members can now opt in to having swap requests automatically triggered for any shift that conflicts with a block in their availability information,
helping to maintain schedule quality with minimal manual intervention.
There are two situations in which these types of conflicts can occur and from which an automatic swap request can be triggered:
When a new block conflicting with a previously assigned shift is added to one of the member’s configured calendars
When a new assignment chooses to assign a member to a shift that conflicts with an existing block (currently very rare, but will become more common due to the weighted availability changes described below)
In both cases, once the swap request has been triggered, the normal swap processing logic is followed to find another member able to accept the shift.
Automatic swap requests are disabled by default and must be turned on by each member from their profile page.
Availability preferences and blocks are now weighted based on how much they overlap with a shift, providing more flexible and accurate schedule generation.
What’s Changing?
Previously, any amount of overlap between an availability entry and a shift resulted in the entire shift being blocked or preferred for that member. In the
case of schedules with a weekly shift pattern, this means that a single hour preference or block event on a member’s calendar would result in the entire
week-long shift being preferred or blocked for the member!
On-Call Optimizer will now weight these overlaps proportionally when considering the cost/benefit of assigning each shift to a particular member:
A 1-hour block occurring within a week long (e.g. 168 hour) shift will contribute less than 1% of its current impact on the algorithm.
A 4-hour preference in a 24-hour shift will contribute 17% of its current impact on the algorithm.
A full-day block overlapping a daily shift shift will be unchanged and continue to contribute 100% of it’s current impact on the algorithm.
In addition to the changes described above, the following bug fixes and minor changes were also released in March 2025.
The remove member icon is no longer hidden from view when a member cannot be removed
from a schedule. The icon now uses styling to indicate if the users is removable or not, and provides an explanatory tooltip on hover with the reason removal
is prevented when disabled.
9.5 - February 2025
Changes and updates released in February 2025
The following changes were released to On-Call Optimizer in February 2025
Improved Swap Flexibility
In response to many requests, the flexibility of the shift swap functionality has been significantly increased to allow any schedule member to initiate a swap
request for any upcoming shift assigned in the schedule, not just shifts assigned directly to them.
An additional shortcut to directly take an upcoming shift and assign it directly to yourself is now also available.
Both of these new capabilities are accessed via the shift popup described below.
Further improvements building on this flexibility including short-cuts to quickly take a partial portion of the current shift, and the ability to reassign any shift to a specific member are in progress and will also be launched in early March.
Shift Popup
The new swap actions described above, as well as other key details about a shift, are located in a new popup accessible by clicking or hovering over any
shift displayed within the Overview or Assignments tab of a schedule.
Details of assignment factors that impacted on the quality of the assignment have also moved to be shown within the popup for each shift, rather than as a
separate list next to the assignment on the main page.
The shift popup works with both the current table-based default shift layout and the upcoming calendar based preview layout.
Further to the initial Calendar UI released in January, additional calendar view support has been added to the home and schedule overview pages.
Calendar view is now available on the following pages:
Your Home dashboard, showing your personal upcoming shifts and availability.
The schedule Overview tab, showing the assigned shifts (historical and upcoming) for the schedule as well as the shifts planned to be assigned
in the next automatic assignment.
When viewing the details for a specific assignment via the Assignments tab of a schedule.
We expect to finish the calendar functionality and migrate all users to it as the default On-Call Optimizer experience in March, however for
now it remains as an opt-in preview which can be enabled or disabled using the link shown in the top banner of the application.
Please continue to try it and report any bugs or rendering issues you encounter.
SOC2
On-Call Optimizer’s SOC2 type 2 audit window begun in the last week of February.
9.6 - January 2025
Changes and updates released in January 2025
The following changes were released to On-Call Optimizer in January 2025
Product Improvements
The synchronization logic used between On-Call Optimizer and external destinations (e.g. Pagerduty) was improved to more robustly handle
the presence of overlapping and conflicting shifts in the destination. On-Call Optimizer will now remove all shifts in the destination which
conflict with the intended shifts being exported.
Calendar UI Preview
A much requested calendar based interface to schedules and assignments is now available as an opt-in preview which can be enabled or disabled using
the link shown in the top banner of the application.
Calendar view is currently available on the following pages:
When viewing the details for a specific assignment via the Assignments tab of a schedule.
Calendar support on additional pages will be added in the coming weeks.
Adventurous users are encouraged to enable the preview and report any bugs or rendering issues they encounter.
Certifications
On-Call Optimizer’s certification journey has taken a significant step forward, with the completion of
our first black box penetration test by Capture The Bug. The test found no major issues and reported only two minor risks related to support for older
TLS algorithms enabled in our load balancer which have since been disabled.
Our SOC2 preparation work with Advantage Partners continues smoothly, tracking towards audit commencement in mid to late February.
Bugfixes and minor changes
In addition to the changes described above, the following bug fixes and minor changes were also released in January 2025.
To improve responsiveness, synchronization of configured destinations on a schedule now occurs immediately after the destination
configuration is changed, rather than waiting until the next scheduled (e.g. hourly) synchronization of the schedule.
Swapped shifts in a nested schedule did not trigger export of updated shifts to the destinations of any parent schedules depending on the child
schedule.
9.7 - Changes in 2024
Changes and updates released in 2024
Select a month below:
9.7.1 - November 2024
Changes and updates released in November 2024
The following changes were released to On-Call Optimizer in November 2024.
Product Improvements
Support for importing calendars from any product capable of generating an iCalendar (ICS) feed. More details
The badges displayed beside the name of a schedule linked with an external system (e.g. Pagerduty) have been improved to better represent the configuration of the
link, in particular whether it is used to import configuration, export shifts or both. Additional documentation has also been added to explain the concept of a
linked schedule.
Certifications
Significant progress has been made in On-Call Optimizer’s certification journey during November:
Advantage Partners has been engaged to complete a SOC2 audit of On-Call Optimizer.
Capture the Bug has been engaged to complete a black box penetration test of On-Call Optimizer.
Bugfixes and minor changes
In addition to the changes described above, the following bug fixes and minor changes were also released in November 2024.
The “retain events” setting on individual calendars has been removed to simplify the product. User feedback showed this feature to be both confusing and
infrequently required. Removing or deselecting a calendar will now cause all events imported from that calendar to be removed and unavailable for use in
future assignments.
9.7.2 - October 2024
Changes and updates released in October 2024
The following changes were released to On-Call Optimizer in October 2024.
29 Oct 2024 - Add/modify members on linked schedules
Additional members not present in the on-call product can now be added to the schedule in order to grant administration of viewer privileges. Members added
directly to On-Call Optimizer in this way are not eligible for assignment in schedules.
Members sychronized from the linked on-call product schedule can be marked as ineligible for assignment in On-Call Optimizer to temporarily or permanently
exclude them from generated assignments.
A new setting to control whether On-Call Optimizer will automatically send invitation emails to newly added members of a schedule has been added.
Previously On-Call Optimizer attempted to allow the user to choose behaviour in real-time by providing several different action buttons during the creation
or modification of a schedule.
For more details regarding the operation of this setting (which defaults on), please refer to the documentation.
15 Oct 2024 - Tabbed UI for schedules
The schedule pages and configuration have been re-organized into separate tabs to improve the usability, navigation and discoverability of the various
aspects of a schedule.
Please take some time to explore each of the tabs and let us know what you think.
Notable relocations:
The members of the schedule are now configured and managed on a top-level page accessed from the Members tab.
Settings related to automatic assignment are now on a separate page accessed by clicking the wrench icon beside the Next Shift Assignment heading on the Overview or Assignments
tabs.
Destinations for the schedule have been promoted to a top-level tab, rather than being hidden at the bottom of the previous edit schedule page.
Bugfixes and minor changes
In addition to the changes described above, the following bug fixes and minor changes were also released in October 2024.
The case of the admin of a schedule configured to synchronize from a source schedule being removed is now correctly handled by marking the member as un-assignable in On-Call Optimizer,
but leaving them as the admin of the schedule. Previously the synchronization failed as it attempted to remove them from the schedule entirely, leaving the schedule without an admin!
The ability to change the roles and assignable status of schedule members is now present on the Members tab of a schedule.
Fixed import of Pagerduty schedules containing references to users that no longer exist in Pagerduty.
Improved UX for schedule member role modifications to only show options available to users based on their current role.
Fixed a bug preventing the addition of Schedule destinations in certain circumstances.
Fixed an issue where the import of historical shifts prior to the auto-assignment start date could overwrite confirmed assignments in On-Call Optimizer
if one of the imported shifts spanned the start date itself.
The previous validation requirement that the auto-assignment start date and shift configuration days must much has been removed. This means the first assigned
shift may occur on a date after the configured start date (e.g. if the start date is a Monday and the configuration only has shifts starting on Wednesday).
9.7.3 - September 2024
Changes and updates released in September 2024
The following changes were released to On-Call Optimizer in September 2024.
4 Sep 2024 - Schedule balance and assignment quality statistics
On-Call Optimizer now provides detailed statistics on the balance and assignment quality of a schedule to assist in the understanding and management of a schedule.
Schedule balance is calculated and managed over the mid to long term timeframe and ensures that each member of the schedule is assigned a proportionate share of the
total number of shifts.
Assignment quality is calculated and managed for each individual assignment and takes care of ensuring that member’s availability information is respected, shifts are
not too close together and many other related factors.
Balance improvements for schedules with partial shift swaps
In conjunction with the new balance statistics now being reported, the handling of partial shift swaps has been improved to ensure that the balance of the schedule is
maintained even when partial swaps are required.
Prior to these improvements balance was calculated by counting the number of shifts of each type assigned to each member, with fractional swaps resulting in many
different types of shifts of varying duration being created and balance being managed within each type individually.
The improved approach maintains a record of the original shift type any partial shift originated from so the
appropriate fractional share of the shift can be accounted to the member in the balance calculation.
9.7.4 - August 2024
Changes and updates released in August 2024
The following changes were released to On-Call Optimizer in August 2024.
28 Aug 2024 - Blocked swap requests are deferred not declined
When a swap is requested On-Call Optimizer previously automatically declined the request on behalf of a member if their availability information
contained a block covering the shift being swapped. Based on customer feedback, this behaviour is now changed to only defer the swap request so that
the member has the opportunity to accept the swap if their circumstances have changed.
Please refer to the swap documentation for more details on the differences
between declining and deferring a swap request.
02 Aug 2024 - Organization Support and Schedule Permissions
Organization Support
On-Call Optimizer now recognizes the organizational metadata provided by Google and Microsoft when authenticating from
a Google Workspace or Microsoft Work account and places the On-Call Optimizer account into a corresponding organization.
The organization can be used to manage permissions for users and schedules across the organization.
Schedule members can now be assigned a role which determines the permissions they have within the schedule. The three available
roles are Admin, Member and Viewer.
Historically members had permissions equivalent to Viewer, but based on feedback and collected experience all new members added to
schedules will default to being assinged the Member role, allowing them to configure and manage the settings and assignments of the schedule.
This change is being gradually deployed to Schedules and may not yet be visible in your schedule.
The following changes were released to On-Call Optimizer in July 2024.
30 July 2024 - Notification improvements
Notification for new assignments and new swap requests
On-Call Optimizer now generates notifications when a new assignment is confirmed for a schedule, and when a new swap request
is created. These notifications can be received via email or Slack (via the new integration described below).
New assignment notifications are enabled by default and are sent to:
Each member of the schedule: containing the specific shifts newly assigned to that member.
Any linked Slack channel: describing the full set of shifts that were confirmed.
New swap request notifications are only enabled by default for Slack channels linked to a schedule. Individual members are able to
opt-in if desired, but are not opted-in by default to avoid created unwanted duplication between notifying upon creation of
the request, and the point at which the member receives the existing “swap response required” notification (which cannot be disabled).
On-Call Optimizer now has a Slack app which can be used to interact with
your schedules from within Slack to view current information and receive notifications for events such as new swap requests.
This feature is available to users with an organization linked account and requires installation
of the On-Call Optimizer Slack App into the organizations Slack workspace.
Additional app functionality and notifications are planned in future releases.
The following changes were released to On-Call Optimizer in June 2024.
26 June 2024 - Swap Requests for partial shifts
Ability to request a swap for a partial shift
Swap Requests can now be created for partial periods during an assigned
shift (e.g. one day during a week, or one hour during a day). To initiate a partial swap request, click the
Edit start/end time button to the right of the Shift to Swap line when creating a swap request.
When responding to a swap request for a partial shift On-Call Optimizer attempts to identify equivalent partial
shifts from your assignments to present as
swap candidates.
On-Call Optimizer now supports the ability to request a (partial) swap for the remainder of the current shift.
This change means swap requests now remain active and do not expire until the end of the shift being swapped,
where previously they would expire at the start of the shift if a response had not yet been received.
Only organized or accepted events can provide availability information
Availability information will now only be imported from events which you have
either organized, or explicitly accepted.
Prior to this change, any event on a configured calendar which matched the filtering criteria
would create an availability entry in On-Call Optimizer - including events created by other users on shared/team calendars and events you
have been invited to (but have not accepted) from any user. The inclusion of these types of events almost always resulted in unwanted
availability information being present in On-Call Optimizer which is prevented by this change.
This change will also remove any existing availability information that had been previously imported but does not match the new criteria to
ensure consistency between On-Call Optimizer and the configured calendars.
Availability information sourced from a calendar that is no longer connected can now be removed by clicking the red cross shown to the right
of the entry in the availability list shown on the home page.
Configurable retention of availability information when disconnecting a calendar
On-Call Optimizer’s default behaviour of retaining any previously imported availability information for future use when a calendar is
disconnected can now be disabled.
When disabled, any previously imported availability information is removed and will not be used in future assignments from the point when
the calendar is disconnected.
To assist with navigation and understanding of where you are in the application, On-Call Optimizer now provides navigation breadcrumbs
at the top of the main content area.
Integrations top-level menu
To reflect their central importance to On-Call Optimizer the external integrations for Calendar and On-Call Products have been
promoted to top-level items in the side menu on the left of the page.
Pointers to this new location from the previous links within
the user profile and schedules pages have been maintained while users adjust to the change.
Dark Mode
On-Call Optimizer now supports light and dark themes. The default theme will be chosen based on your operating system settings as
reported by your web browser. To override the default theme use the selector to the left of the user menu in the top-right of the page. Your selected theme will be persisted in your account settings and will take effect across all logins.
5 June 2024 - Support non-continuous shifts
On-Call Optimizer can now support assignment of shifts that are non-continuous (e.g. contain gaps in coverage) which are typically
used in situations where a schedule is desired to provide business-hours only coverage.
To use this feature, create a shift configuration for the time
period where no assignee is desired and select the [Not Assigned] placeholder as shown in the example config.
The following changes were released to On-Call Optimizer in May 2024. For more recent changes see the current changelog.
30 May 2024 - Availability information displays
Two new ways to view the availability information associated with a schedule have been added.
Member availability summary
From the main schedule page, click the View member availability link under the list of members to view a summary of member availability
matched to each shift of the next assignment planned for the schedule (top of page), as well as a list of the individual availability
events that have been imported for each member of the shift (bottom of page).
The information on this page reflects the live view of future availability and will change over time as availability information is added,
removed and updated from connected calendars for each member.
Assignment availability history
The availability information that was used when constructing each assignment is now displayed alongside the assignment for any pending
or confirmed assignment.
The availability information shown on an assignment page is a snapshot of the actual data used in the assignment and is unaffected by any
subsequent additions, removals or changes to the live availability data used for future assignments.
28 May 2024 - Require manual confirmation setting
Automatic assignment is now enabled for all schedules by default. The previous setting to disable automatic assignment has been replaced
with a new setting to require manual confirmation of new automatic assignments.
The configuration of existing schedules is unchanged, by once automatic assignment is enabled it will not be able to be disabled again.
The assignment algorithm has been significantly improved to fix issues identified with providing balance between members when large
imbalances are present in the historical schedule.
14 May 2024 - Swap Functionality
On-Call Optimizer’s long awaited swap functionality is now live!
When unexpected changes happen after the schedule has been confirmed users can now simply let On-Call Optimizer know which shift they
are no longer able to perform and let On-Call Optimizer handle the logistics of finding an appropriate member or take or swap the shift
with, saving time and hassle.
Understand On-Call Optimizer’s layered security approach and access trust resources.
We appreciate your trust in On-Call Optimizer and take the responsibility to protect your data seriously. Please
take some time to browse this section of our documentation to understand the principles and approach that we have
committed to in order to maintain your trust in us and to prove our security and compliance to our third-party
auditors.
Governance
On-Call Optimizer’s security approach begins with our policies and controls which are based on a set of principles
that establish the foundation for our security practices and provide the standard against which our compliance is
audited against.
Our key security principles are:
Simplicity. This principle is applied to both our software implementation - we strive to eliminate unnecessary
complexity so our systems are easy to operate and audit, and the design of our product - we collect the bare
minimum of information required to complete the jobs asked of us and no more.
Granular, least privilege access. Access to data should be granted only to those with a legitimate business need,
in the narrowest way feasible and for only the necessary period of time (not indefinitely). The same approach is
also applied to components of our systems.
Defense in depth. We implement multiple layered controls, and monitoring of those controls to ensure they are
functioning as intended, based on a belief that errors and failure of individual components are inevitable in
distributed software systems, so the system as a whole must be robust against the failure or malfunction of each
of its components.
Continuous improvement. We iterative measure, evaluate and improve our security policies and controls as our
business and the threat environment in which we operate changes. Through this iteration we look for opportunities
to increase the effectiveness of our controls and improve our visibility and confidence in the layers of protection
we have in place.
We are working towards SOC 2 Type II attestation to build further confidence in our security controls and implementation
and expect to receive our first report mid-year 2025.
Data Protection
All data in transit to and stored by On-Call Optimizer is protected by strong encryption.
Data at rest is stored on encrypted VM volumes and encrypted block storage buckets managed by our providers AWS and GCP.
We require TLS 1.2 or higher with strong cipher suites and enforce the use of HSTS to protect against downgrade attacks
in order to maximise the security of data in transit.
Sensitive material such as encryption keys and application secrets is managed at the highest tier of our data security
policy classification, with strictly limited access and handled. We rely on trusted industry standard products such as
AWS Secrets Manager and Parameter Store to minimize manual handling of this material.
Product Security
To build confidence in our deployed software’s ability to uphold our security principles we engage in a range of security
related activities, including:
Regular penetration tests (at least annual) on all aspects of the application. Our last penetration test was conducted in
December 2024 by SecurityLit Ltd and is available in our Trust Center.
Static code analysis is used during development by all developers and is enforced at pull request time.
Vulnerability and dependency management scanning is performed continuously on deployed code, and during development to
ensure our software remains free of known vulnerabilities and remains up to date with released patches.
Full use of available browser policy mechanisms (e.g. content security policy, feature policies and cross-domain policies)
is made to ensure the minimum possible attack surface is available should any zero-day vulnerability be discovered in our
application code.
Internal Security
Our internal corporate and development environments are carefully managed and monitored.
All corporate hardware is centrally managed and tracked by Vanta’s MDM software which monitors key security configurations
include disk encryption, screen lock configuration, software update state and malware protection.
Remote access to internal resources is secured using the Tailscale VPN software.
All employees and contractors are required to undertake reguular security awareness training.
We use Google Workspace as a central SSO identity provider and require 2FA authentication for all account access.
Employees do not have direct production access during their day-to-day work and are required to specifically authenticate
and gain elevated credentials limited to the task at hand when performing any production operations.
No production data (including customer data) is permitted to be stored or processed on On-Call Optimizer’s corporate systems.
Data Privacy
All our activities, policies and data management are compliant with the NZ Privacy Act. In accordance with our principle of
simplicity, we strive to collect the minimum amount of data necessary for On-Call Optimizer to function and we take our
responsibility to be trustworthy stewards of that data seriously.
All employees are required to sign and commit to our security, privacy and confidentiality policies.
Customer data is promptly deleted upon request and/or shortly after a customer terminates their services.
More Details
For further details on our security practices, please refer to the detailed pages below.
10.1 - Reporting Issues
Vulnerability reporting and management for On-Call Optimizer
If you believe you have found a vulnerability in On-Call Optimizer, or are seeing unexpected behaviour that you believe has security implications, please follow the
guidelines below.
Reporting a Vulnerability
To report a security concern, please email us at urgent-issue@oncall-optimizer.com with a description of the issue and steps
to reproduce (if known).
Authenticated On-Call Optimizer users can access a token from the help page within the application at https://app.oncall-optimizer.com/help.
Please include this token in your report to ensure faster notification and response.
Responsible Disclosure
Upon discovering a vulnerability:
Submit your findings to us via the instructions above.
We will acknowledge your submission within 1 working day and provide you with a named contact person.
Once a vulnerability has been reported
We will analyse your reported vulnerability and describe our planned response within 5 working days. If our response indicates that further time is needed beyond this initial
period we will maintain regular updates to inform you of the progress.
We may invite you to further collaborate with us to ensure the vulnerability is dealt with as effectively and efficiently as possible.
Once a fix for a vulnerability has been deployed
We will notify any affected customers of the vulnerability and its solution.
If you desire, we will acknowledge your work in discovering, reporting and helping to resolve the vulnerability.
At all times, we expect you to act with professionalism, maintaining a high standard of conduct, including confidentiality. We expect any discovered vulnerability is reported
directly to On-Call Optimizer in the first instance, in order to allow us to protect our customers as effectively as possible.
Acknowledgements
If you have found a vulnerability in On-Call Optimizer and follow the responsible disclosure process, we will acknowledge your contribution publicly on this page if requested.
10.2 - Certifications
Details of the standards and certifications On-Call Optimizer has achieved
On-Call Optimizer is designed and architected to be secure, protecting the confidentiality, integrity and availability of your data. We pursue independent third-party certifications to demonstrate our commitment to security and compliance.
Access to certification documents and related policies can be requested via our trust center.
SOC2
SOC2 is a widely recognized standard for security and compliance.
On-Call Optimizer is SOC 2, Type II complaint. Our latest report was issued in June 2025 and is available in our trust center.
Penetration Testing
In addition to security certification, On-Call Optimizer is also subject to external penetration testing to independently validate the security of our systems.
Our latest pentration test was completed in December 2024 with no significant findings reported and is available in our trust center.
By default the trust center provides an overview of On-Call Optimizer’s compliance program. Please use the links provided in the center to request additional
access to certification and policy documents if required.