Ensure you have completed the organization set-up and established a connection
with an on-call product before startig this guide.
Overview
For teams new to On-Call Optimizer, the following four steps provide a recommended path to
integrating your existing schedule:
Set-up the link between your existing schedule and an On-Call Optimizer schedule. As part of this step you will configure a future date for On-Call Optimizer to start assigning shifts from and generate invitations to members to join On-Call Optimizer.
Each member has time to accept the invitation, link their calendar to On-Call Optimizer and add availability information.
Once all members are set-up, the first assignment for the schedule can occur. You will have the opportunity manually review and confirm everything is working as expected.
Finally, when the team is comfortable with how the schedule is operating, configure On-Call Optimizer to automatically confirm and export assignments on a rolling basis.
Teams already experienced with On-Call Optimizer, can skip or shorten the time spent on
steps 2 and 3 while still following the same overall process to link additional schedules.
What you need
To successfully complete this guide, you will need:
An existing on-call schedule in a connected on-call product.
Schedule Admin: 5-10 minutes to complete the initial setup and invitation process in step 1,
and additional time to review and confirm the assignment in step 3.
Each team member: 5-10 minutes to link their calendar and set-up availability information
during step 2.
Changes to your existing schedule
You will have full control over when and how each action On-Call Optimizer takes occurs.
Your existing schedule will not change in any way until you explicitly initiate the export of
the first assignment in step 3.
Notifications generated
You can choose to send new members an invitation to join On-Call Optimizer during step 1.
You (and any other schedule admins) will receive a notification when the first assignment
is ready for review.
When you confirm the first assignment in step 3, each member assigned new shifts will receive
a notification detailing their shifts.
Ready to begin?
To get started, select Step 1: Set-up schedule below.
If anything is unclear, or your would like some assistance feel free to reach out to help@oncall-optimizer.com.
1 - Step 1: Set-up schedule
Integration of a schedule begins with On-Call Optimizer importing key
configuration details from the existing schedule.
Select existing schedule
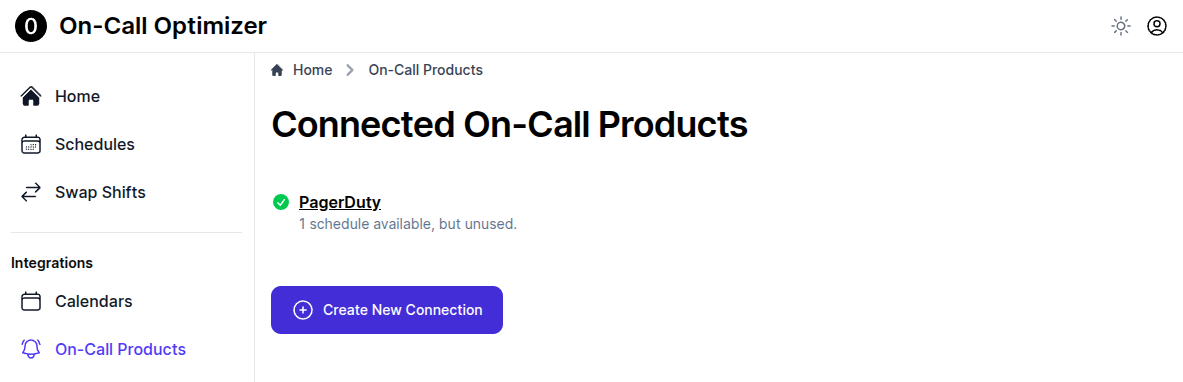
Click ‘On-Call Products’ in the menu and select the connection to the product where your
existing schedule exists from the displayed list.
From the list of all existing schedules, find the row corresponding to the schedule
you want to integrate with On-Call Optimizer and click
Create On-Call Optimizer Schedule in the right-most column.
For connections with many available schedules, you can use the search box to filter the table.
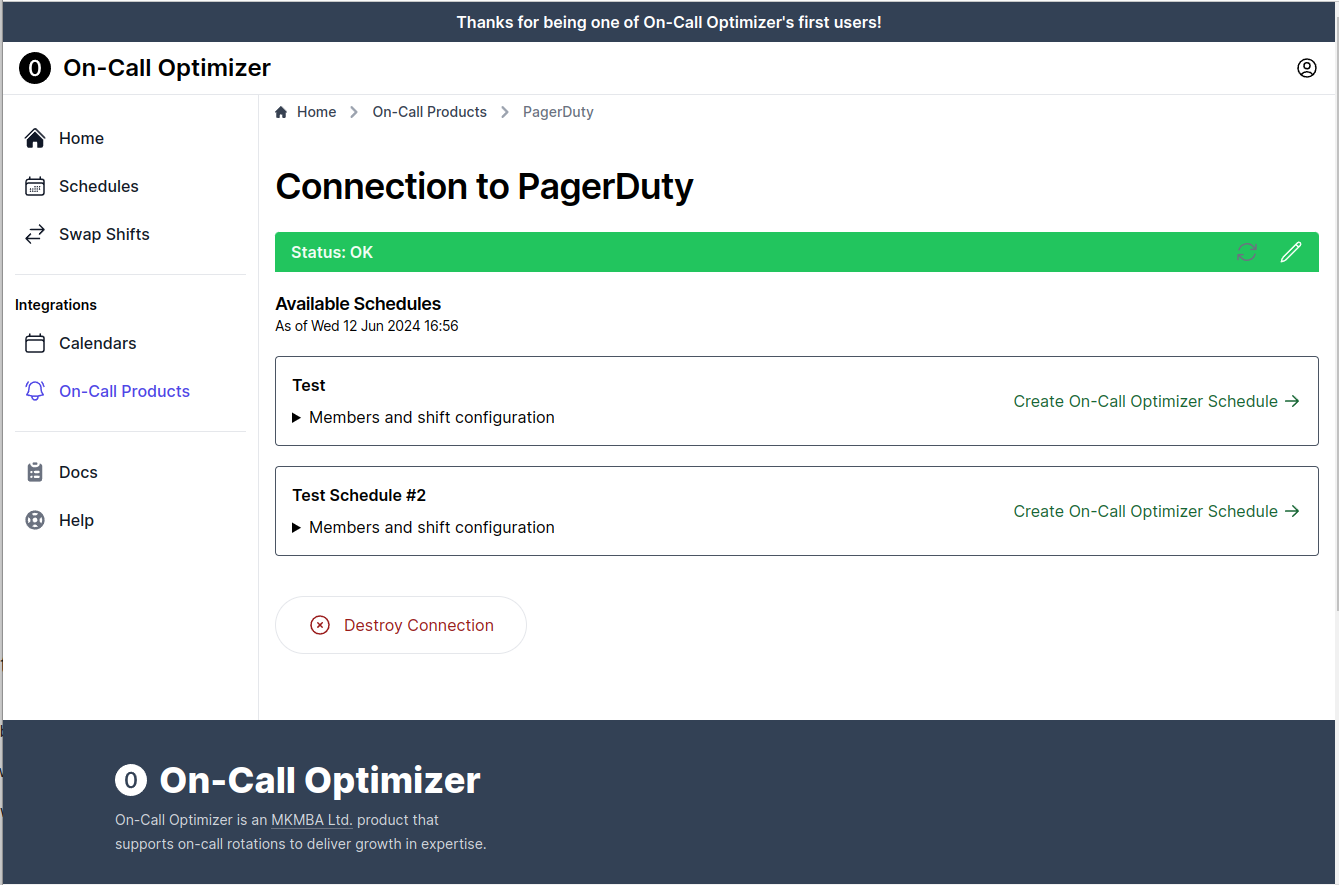
On-Call Optimizer supports primary and secondary assignees using a single schedule
configuration. When linking to a product like Pagerduty which requires two independent
schedules for primary/secondary roles, select the schedule corresponding to the primary
assignee in this step.
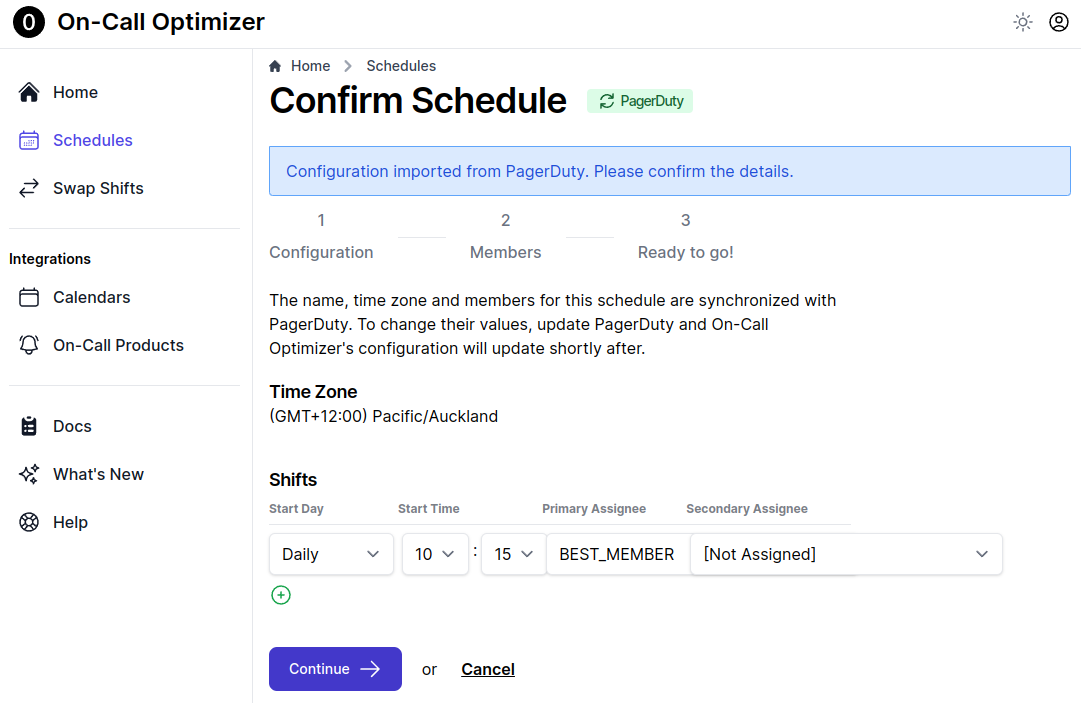
Configure shift specifications
On-Call Optimizer will show the time zone and shift configuration that have been detected from the source On-Call Product.
If the listed shifts do not match your desired configuration you can alter them now (e.g. to add a secondary assignee). Refer to the schedule configuration docs for further information.
Once you are happy with the configuration shown, click Continue to proceed to Members.
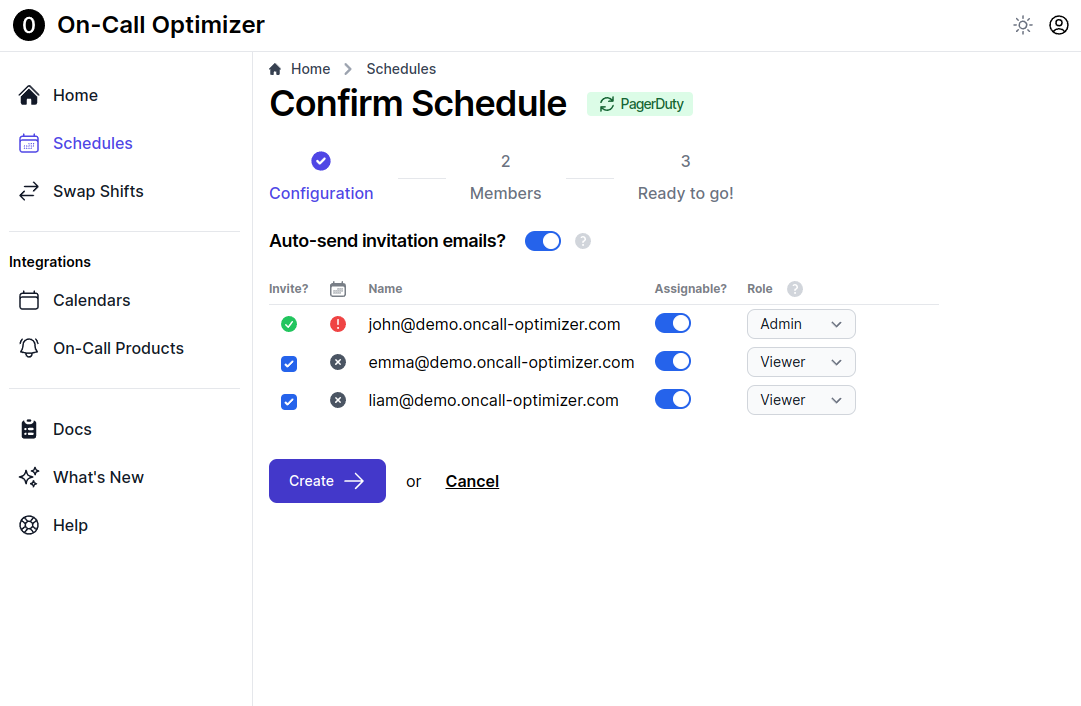
Member list
Review the list of members imported from the linked schedule. Select the appropiate role
and assignability status for each member. For more information on these options, refer to
the schedule members docs.
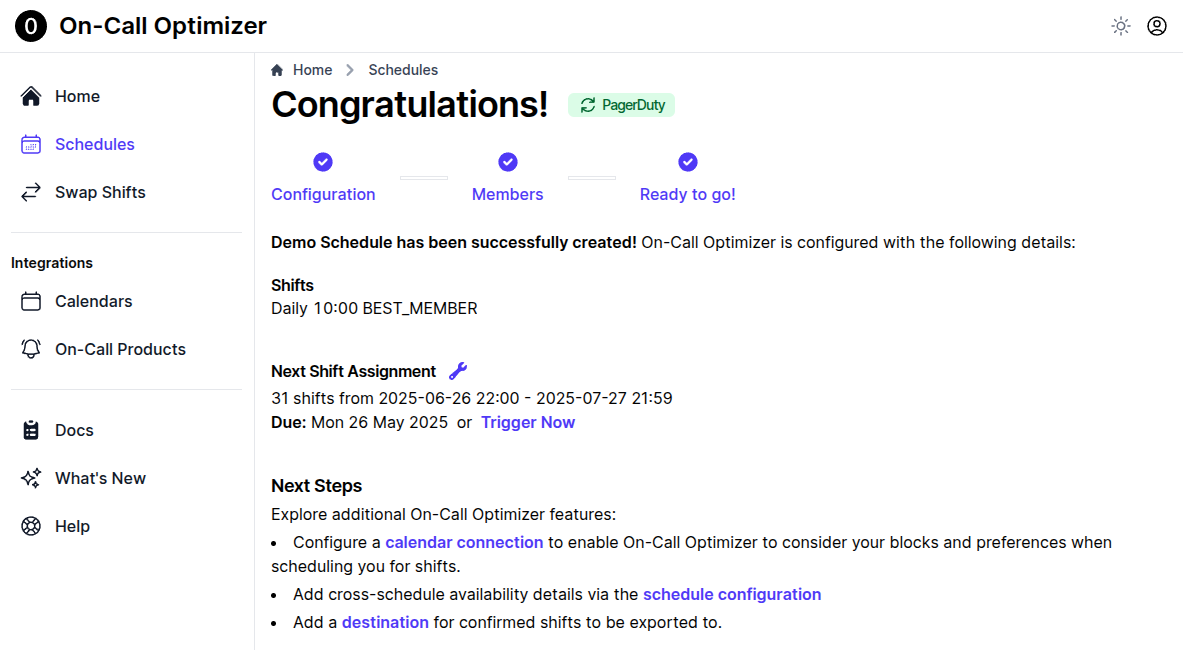
Click Create to finish linking the schedule. On-Call Optimizer will send invitations to any
members who do not yet have an On-Call Optimizer account unless you uncheck the
Auto-send invitation emails option above the member list.
Next Steps
Your schedule is now linked. The confirmation page shows when the first assignment for the schedule will take place.
We’ll come back and look at how the first assignment will work in step 3, first, each member needs to link their calendar to
On-Call Optimizer to provide their availability information.
After configuring the schedule it’s time to ensure each member of the schedule has a calendar linked to provide availability information
for On-Call Optimizer to use when choosing which shifts to assign to them.
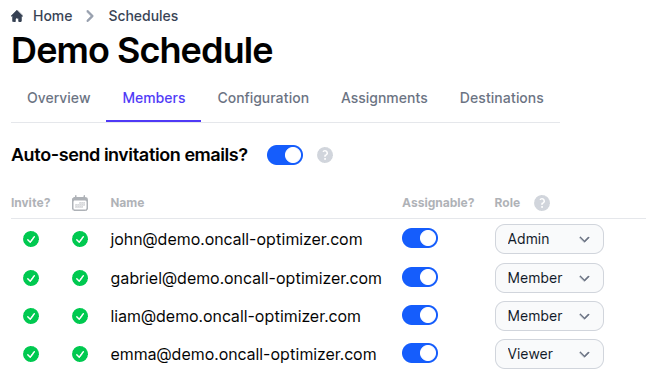
Member Status
The Members tab of the schedule provides you with a quick summary of the status of each member via the icons in the first two columns. The Invite? column
shows whether an On-Call Optimizer account exists for the member. The calendar icon column shows whether availability information is available for the member.
Hover over each icon for an explanation of the status or refer to the schedule member docs.
Target State
To begin Step 3 each assignable member needs two green check marks in their row
(as shown in the screenshot below), indicating that they have signed in to On-Call Optimizer and configured a calendar to provide availability information.
Members missing a green check mark should be instructed to follow the steps below.
Assignments will be generated for every member listed as assignable, even if they have not yet logged in to On-Call Optimizer or configured a calendar.
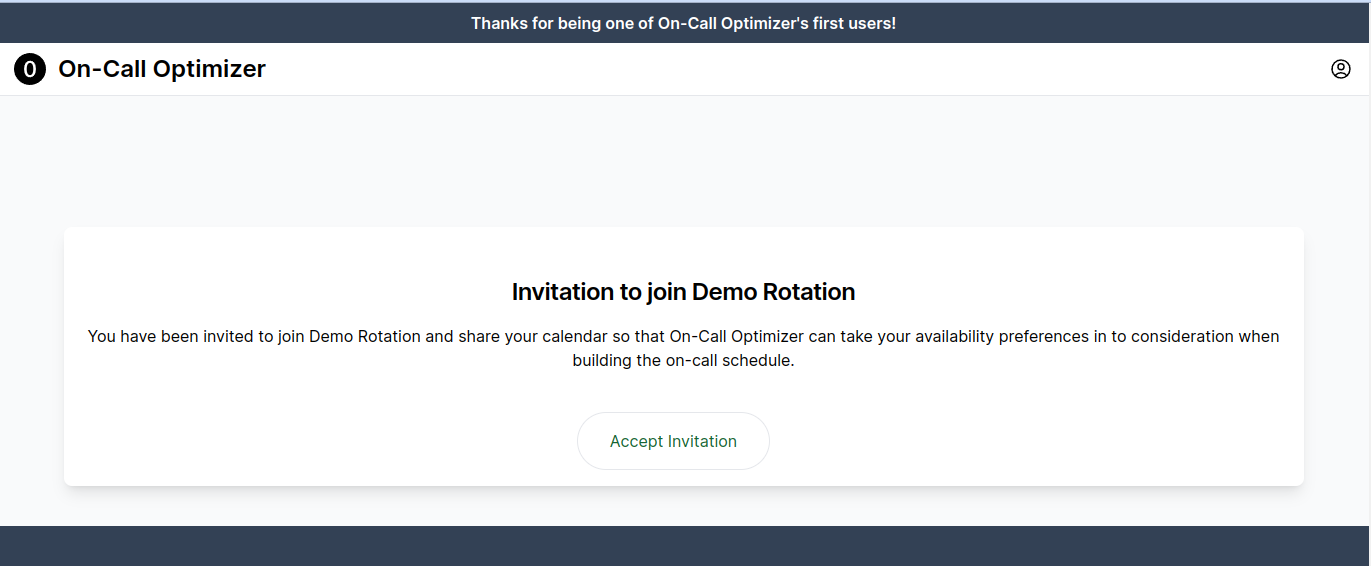
Responding to an invitation
Invitations to join On-Call Optimizer will arrive at the specified email address of the member via an email.
Click the link containing an invitation code to respond, which will require logging in to On-Call Optimizer.
After logging in, click the button to accept the invitation.
Linking a calendar
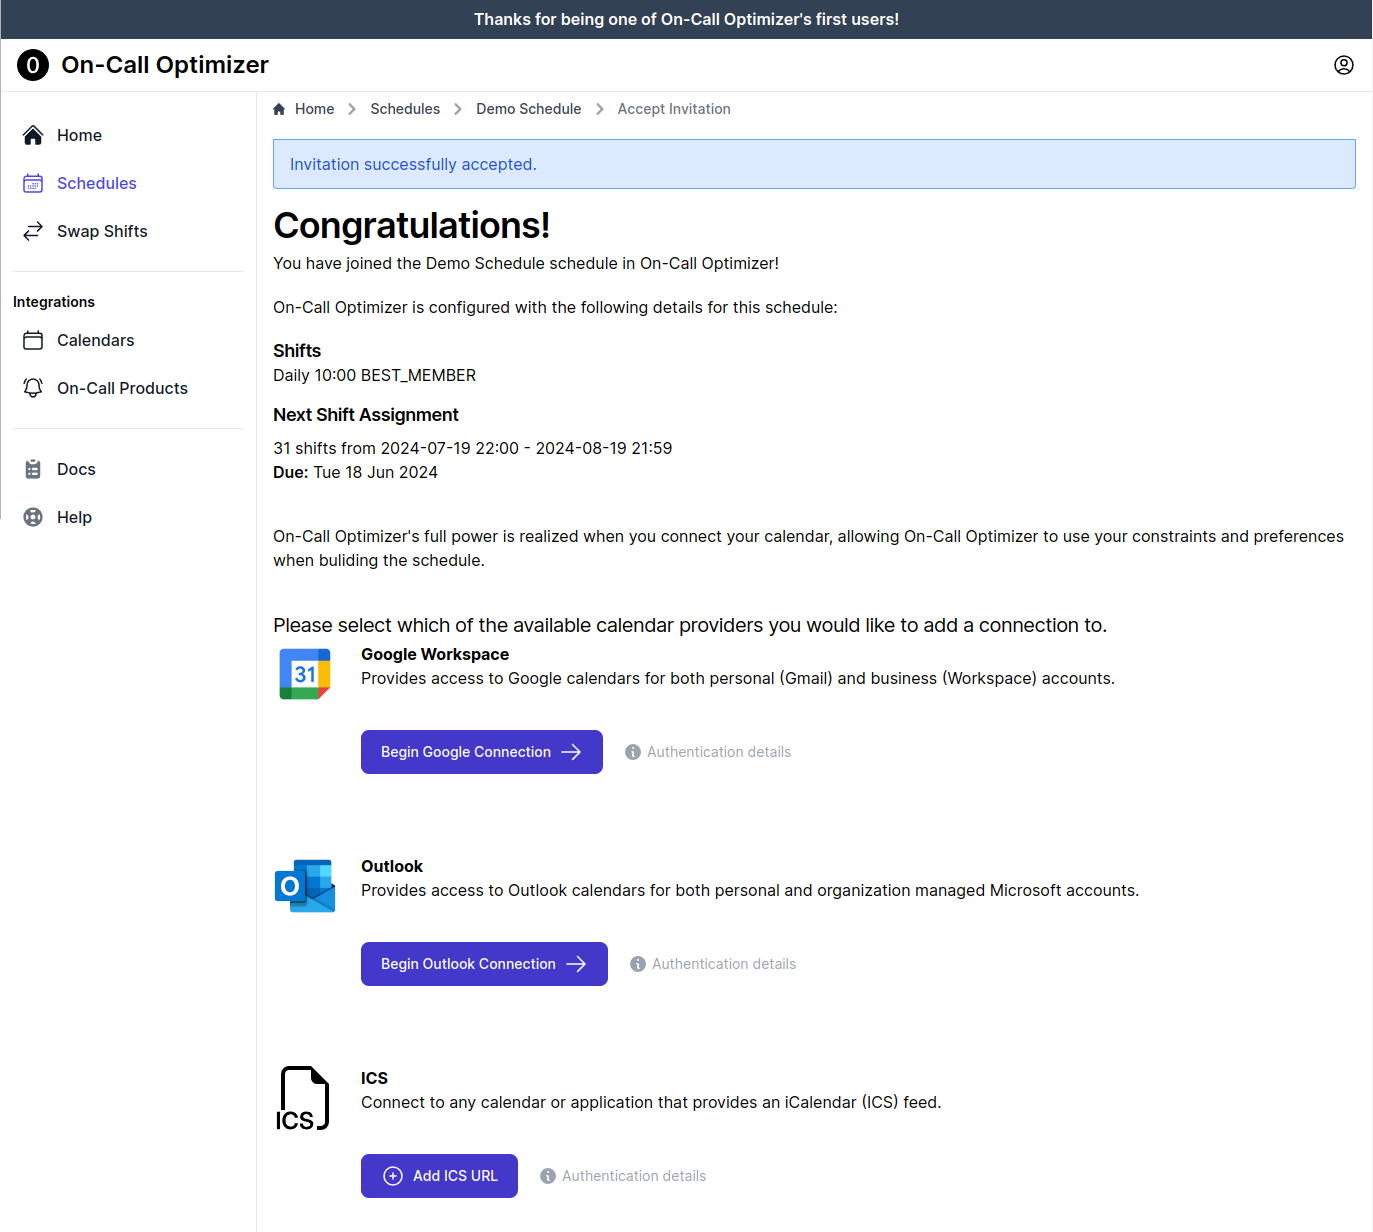
Once the invitation has been accepted, you will be prompted to link a calendar.
The welcome screen will provide a list of available calendar providers.
Click the button for the desired provider to begin the connection process.
The same options are available by selecting the Calendars menu item, and then clicking Add Calendar Connection button at the bottom of the page.
Authentication
After selecting the calendar provider an authorization flow will occur for Google and Outlook calendars, or a prompt for the ICS URL will appear and must
be completed.
For more information on the authorization or configuration process please refer to the full calendar documentation.
Calendar Selection
When multiple calendars are available on the connection you will be asked to select which calendars On-Call Optimizer will process for availability events.
For each calendar select whether or not On-Call Optimizer should process it for availability information.
Click Save when done to confirm these choices.
Calendar Operation
On-Call Optimizer regularly scans linked calendars for new or changed availability information and uses the latest available information to assign
new on-call shifts.
For more details on how to structure calendar events for On-Call Optimizer to recognize, please refer to the event filtering documentation.
Next Steps
When all members have configured their calendar connections you’re ready to proceed.
Now that all members have a linked calendar, it’s time to generate the first shift assignment!
Background
On-Call Optimizer’s schedule lifecycle regularly assigns new shifts so that a
configured number of days (the horizon) of shifts into the future are assigned.
The first assignment for a new schedule takes place 7 days after it is created (providing time for users to be invited and link their calendars first),
and uses a default horizon of 30 days. This means the first shift assigned by On-Call Optimizer will start in around 37 days time
(give or take a few days depending on your shift configuration).
Existing shifts from configured destination schedules will be imported into On-Call Optimizer as history to provide continuity until that date.
Configuring lifecycle parameters
To change the horizon, click the (wrench) icon to the right of the Next Shift Assignment heading found on the Assignments tab at any time (or on the confirmation page immediately following creation of a schedule).
After saving lifecycle parameters, the Next Shift Assignment section of the Assignments tab updates to show the date of assignment and shifts
to be assigned based on the new configuration.
Changing the first assignment
To generate your first assignment immediately click the Trigger Now option on the Assignments tab.
To change the date or duration of the first assignment without affecting the configuration of future assignments, click the Create New Custom Assignment button on the Assignments tab.
In both cases, you can copy/paste the URL of the resulting assignment to other team members for review or discussion before confirming it if desired.
Creating an assignment via either of these methods is low-cost and safe to do whenever you’re curious what the next set of shifts will look
like given the currently available information.
The resulting assignment can easily be abandoned or regenerated as described if you do not wish to confirm it into the current schedule.
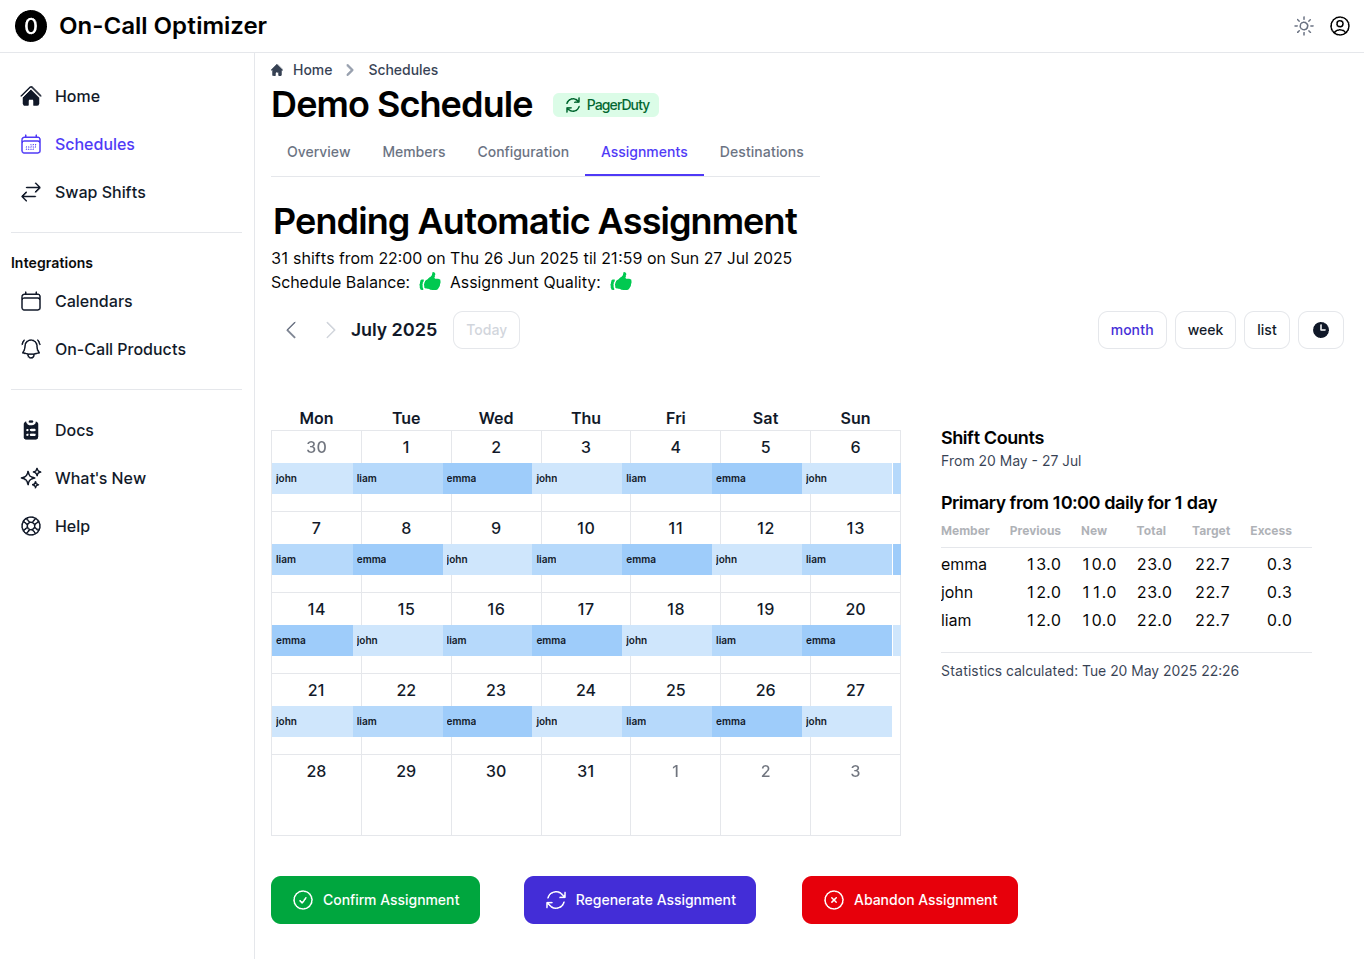
Assignment confirmation
Once an assignment has been generated (either automatically, or in response to an action from the above section) you will see the assignment review screen:
To view more details hover or click on any shift to show the corresponding shift popup.
Three actions are available for each pending assignment:
Confirm: This adds the shifts from the pending assignment into the schedule itself. When you confirm shifts into the schedule:
Each member with new shifts assigned receives a notification.
The shifts are queued for export to each configured destination.
Confirmation cannot be undone. Confirmed shifts can be replaced by a subsequent custom assignment or a swap request.
Regenerate This regenerates the assignment using the most recently fetched availability information for each member of the schedule.
Regeneration can be useful when one or more members have changed their availability information since the assignment was first generated.
Abandon Deletes the assignment.
Exporting updated shifts
After the first assignment has been confirmed, an orange notification icon appears on the Destinations tab for the schedule to signal there are pending changes
waiting for export to one or more destinations.
Click into the Destinations tab to see a count of shifts to be added or removed from each destination. Click View Diffs to see the specific changes to be made.
When you’re happy with what will be exported, click Export Now to begin updating the shifts in the connected on-call product.
Next Steps
The schedule is now fully operational. The final step enables On-Call Optimizer’s automatic lifecycle operations.
On-Call Optimizer is designed to work in the background, consistently and reliably keeping your on-call schedules up-to-date, flexible and fair without requiring
any significant input or attention from you or other members of the schedule.
Lifecycle automation
The previous steps of this guide helped you manually confirm and export the first assignment generated by On-Call Optimizer for your schedule.
On-Call Optimizer will keep requiring manual confirmation and manual export of any updated shifts until you are ready to enable automatic operation.
Our Recommendation
Enable automatic export for each destination as soon as you’ve completed the export of your first assignment (e.g. now!).
Enable automatic confirmation of new assignments once you and your team are comfortable with On-Call Optimizer’s
schedule lifecycle and are in the habit of keeping availability information up to date in
your calendar.
It’s important to enable automatic destination export as soon as possible so that updated shifts resulting from swaps can be promptly synchronized to all connected destinations.
The cost of keeping manual confirmation enabled for longer is only in your own time to approve assignments.
Enable automatic destination export
Each configured destination can be individually enabled or disabled for automatic export.
To enable a destination, visit the Destinations tab for the schedule, and simply toggle the slider next to the Enabled? text to the right (on) for the appropriate destination.
Enable automatic confirmation of new assignments
To allow On-Call Optimizer to automatically confirm new assignments it creates for you click on the Assignments tab of the schedule and then select the (wrench) icon to the right of the Next Shift Assignment heading.
In the assignment settings page that is displayed, toggle off (to the left) the slider with the Require Manual Confirmation? label.
Congratulations
You’ve reached the end of this guide! Your on-call schedule is now fully configured and running in On-Call Optimizer.
If you have any questions which were not answered here, please let us know at help@oncall-optimizer.com.